Home Blog Page 94

The Ultimate Guide to Air Ventilation for Healthy Homes

0
Air ventilation for home

People require fresh air to live comfortably and achieve optimal health. In urban areas, a lack of land gives rise to the construction of stacked building blocks. Since the stacked buildings are built nearby, proper ventilation will be difficult to achieve.

In today’s blog of Brick & Bolt, you will understand air ventilation for homes, their benefits, different air ventilation methods, ventilation in different home areas, and sustainable and eco-friendly ventilation solutions.

Understanding Air Ventilation for Home

Ventilation is the process of bringing fresh outdoor air into a home or building and circulating it around the space to enhance air quality. Natural methods, mechanical methods, or a combination of both can accomplish this. Air ventilation is a crucial way of eliminating air impurities from buildings and is necessary for both high indoor air quality (IAQ) and thermal comfort.

Benefits of Proper Air Ventilation for Homes

Without a proper ventilation system in place, you have no control over the airflow in a building. The following are the main advantages of air ventilation systems for homes:

Air Ventilation Avoids Condensation 

An air ventilation system for homes avoids condensation and offers structural benefits.

In the winter, the considerable temperature differential between indoors and outdoors allows heated interior air to retain more moisture. When the indoor temperatures drop, the air will no longer be able to carry all of the moisture. Thus, it results in condensation on cold surfaces such as windows and walls. Continuous condensation can result in moist areas, peeling wallpaper, and the growth of black mould, all of which pose health threats. A condensation control device requires appropriate air ventilation to increase air circulation, reduce moisture levels, and maintain a fresh, healthy environment free of condensation. 

Air Ventilation Offers a Healthier Environment

A good air ventilation system for home will help you avoid skin allergies, asthma attacks, eczema, watery eyes, itching, sneezing, and a runny nose, directly or indirectly. You can also improve indoor air quality by having air-purifying plants in your home.

Control of Indoor Air Quality

Volatile organic compounds (VOC) can develop from cooking or using chemicals, causing breathing issues. With air ventilation, you can take steps to improve your indoor air quality.

Carbon dioxide, a common indoor air pollutant, can also build up in a house, significantly lowering indoor air quality. However, with a well-maintained and controlled ventilation system, you may successfully reduce CO2 accumulation. Monitoring CO2 levels might also be a good predictor of other potential air quality issues. Taking control of your home’s ventilation not only improves indoor air quality but also lowers the danger of respiratory viruses. 

Removes Bad Odour

Poor ventilation can also cause foul odours in buildings. Because of the absence of ventilation, foul odours will be generated in the enclosed location. Air ventilation will eliminate this scenario.

Methods to Improve Air Ventilation for Homes

Natural ventilation

There are numerous ways to improve the air ventilation of your home or desired building. The following are the key methods to consider:

Natural Ventilation in Buildings

For centuries, natural ventilation has been the most commonly used method for the ventilation process in homes. It involves sufficient use of natural things like different types of windows, doors, and roof turrets across the different parts of the walls without using fans or other mechanical means. For both balconies and outdoor living areas, you can strategically design the required window types in a windward direction. Pressure-driven and stack ventilation are two other methods for providing natural ventilation. 

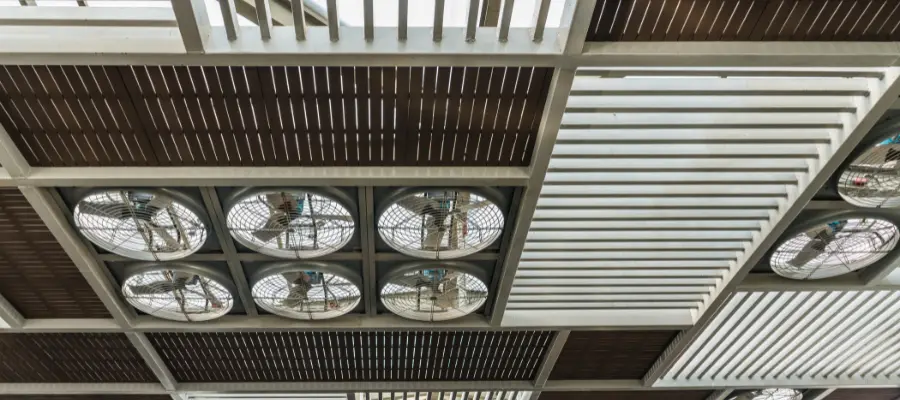
Mechanical Ventilation in Buildings

Opening up the windows to let fresh air in isn’t always possible, particularly when it’s cold or hot and humid outdoors. In those cases, you should consider mechanical home ventilation or heat recovery ventilation. Heat recovery ventilation uses the air in and/or out of a building with the help of electricity or other sources of power. The building may require filtering or cleaning the outside air, depending on their source. The principle of supply and extraction states that one set of ducts and inlet grilles brings outside air into a space, while another set of ducts extracts the stale air and exhausts it outside. Incoming air can be found in diffusers on the ceiling, wall, or floor. Mechanical ventilation can fulfill house requirements like controlled, personalized, and local exhaust ventilation.

Smart Ventilation System

Smart ventilation is all about the integration of systems, which means that ventilation systems are automatically adjusted on a regular basis to meet the desired interior air quality. The smart ventilation system focuses on delivering ventilation while lowering energy usage, utility bills, and other costs. A smart ventilation system regulates the ventilation rate based on the building’s location, occupancy level, air quality conditions, and electrical grid requirements, among other factors. Sensors in the smart ventilation system send out alerts when the system needs to be maintained.  

Smart ventilation systems are very responsive and can instantly alter the ventilation in the building. It can provide warnings based on the indoor-outdoor temperature and air quality index. 

Mixed-Mode Ventilation System

The mixed-mode (hybrid) ventilation system combines different types of ventilation services, such as natural ventilation and mechanical systems, and includes all the best features. 

The hybrid system is an economical ventilation system that enhances indoor air quality. It maintains the indoor climate, provides thermal comfort for occupants, and reduces carbon dioxide levels. These hybrid systems are commonly utilised in offices since they help increase employee productivity by providing a comfortable environment.  

Air Ventilation in Different Home Areas

Home ventilation system

Kitchen Air Ventilation

The kitchen requires proper air ventilation to remove pollutants. You can place kitchen chimneys and exhaust fans to direct cooking odours and smoke outside. You can read more about Tips for Designing a Functional Kitchen for better design ideas.

Bathrooms Air Ventilation

Proper ventilation in bathrooms is very important to maintain good air quality by removing moisture and odours. Otherwise, it can have adverse effects on health.

Make sure to install extractor fans in toilets and bathrooms.

Basements and Attics Air Ventilation

Consider adding exhaust fans if you reside in basements and attics with inadequate ventilation owing to poor airflow. 

Sustainable and Eco-friendly Ventilation Solutions

  • You can use green building practices to provide sustainable and eco-friendly ventilation. 
  • You can include ventilation as per sustainable design principles to ensure natural ventilation and reduce reliance on mechanical systems. 
  • You can also use natural elements or sustainable building materials, such as bamboo, green roofs, and living walls, to improve natural air filtration and indoor air quality.

Conclusion

A proper air ventilation system for home is critical for maintaining a healthy and comfortable living environment, particularly in urban locations with limited space. Smart ventilation systems will be better suited for energy-efficient ventilation systems in urban locations. By implementing sustainable and eco-friendly home design strategies , homes can improve air quality and minimise their reliance on mechanical systems. Irrespective of natural techniques or complex technical solutions, prioritising air ventilation is critical for producing a healthy, efficient, and comfortable living environment. 

Precast Building Construction: Revolutionising the Modern Construction Industry

0
precast building construction image

Modern architecture and engineering are being changed by precast building construction. In this blog Brick & Bolt will explain about precast building construction, why it’s becoming more popular, the different types of precast building elements  that are used, and the pros and cons of this method.

What is Precast Building Construction?

Precast building construction is the process of making structures out of concrete by pouring concrete into reusable moulds in a factory environment. Then, these precast concrete elements are brought to the building site and put together to make the structure that is needed. In standard building methods, concrete is poured and hardened on-site. This method is different. Precast construction is popular among builders and engineers because it is known for being precise, high-quality, and quick.

The first step is making a mould based on the specific design requirements. The concrete is then poured into the mould and protected while it sets. After the precast elements have hardened, they are brought to the building site and assembled together, usually with the help of cranes and other material-handling machines. This method ensures that the elements are made consistently and accurately, which lowers the chance of mistakes during construction.

Also read: Improving Construction Site Safety

Why Choose Precast Construction?

There are several reasons to choose precast construction methods instead of traditional ones:

1. Quality Control

Precast elements are manufactured in a controlled factory environment that allows strict quality control measures to occur. This results in elements that are of good quality, uniform, and meet certain standards.

2. Time Efficiency

Precast concrete parts can be made off-site in a controlled environmentmanner, which greatly reduces the time needed for construction on-site.

3. Cost-Effectiveness

Even though moulds and shipping costs are higher at first, the precast construction can save you money in the long run. Overall savings come from lower labour costs, less waste, and shorter building times. If you are not aware of construction costs, our cost estimator will help you to calculate your construction budget so that you can plan accordingly.

4. Strength and Durability

People know that precast concrete is strong and lasts a long time. Because the manufacturing environment is controlled, high-quality materials and precise mixing methods can be used. This makes the elements strong enough to survive a wide range of environmental conditions.

5. Versatility

Precast concrete can be used to build many different things, from homes to commercial buildings, bridges and infrastructure projects. Many industries choose it because it can be used in many situations.

Types of Precast Elements Used in Construction

Different types of elements are used in precast building construction, and each one has a specific purpose to do. People mostly use the following types of precast elements in their construction:

1. Precast Beams and Columns :

This type of precast element is strong and long-lasting, which makes it perfect for use in load-bearing walls or columns. Precast beams and columns are often used in commercial buildings, bridges, and buildings with multiple floors.

2. Precast Slabs

Precast slabs are used for floors and roofs. There are two types of precast slabs and they are solid slabs and hollow-core slabs. 

3. Precast Walls

You can use precast walls as load-bearing or non-load-bearing parts. Some of them are solid walls, sandwich panels (which keep heat in), and architectural panels (which make a building look better).

Advantages and Disadvantages of Precast Building Construction

Precast building construction has a lot of advantages, but it also has some disadvantages. Let’s look at both sides:

Advantages of Precast Building Construction:

  • The controlled factory environment ensures that the products are of high quality and meet all the requirements for size and shape. This improves the final product and reduces the number of changes that need to be built on-site.
  • As mentioned above, precast elements can be made while the construction site preparation work is going on. This parallel work reduces the time it takes to build something so that projects can be finished faster compared with traditional construction methods.
  • Most of the building work is done off-site, which means that a lot less work needs to be done on-site. This not only saves money but also reduces the chance of crashes and harm on the construction site.
  • Precast construction produces less waste than traditional methods. The controlled manufacturing process allows precise material use, which cuts down on waste and helps make buildings more eco-friendly.
  • Making precast elements in a factory reduces the amount of dangerous work that needs to be done on-site, making the building site safer and reducing accidents.

Disadvantages of Precast Building Construction

  • Making moulds and setting up precast manufacturing can cost a lot at first, which could be a problem for smaller projects with limited funds.
  • Even though precast construction is flexible, it may not be as easy to design as traditional methods. Using precast methods may make it harder and cost more to create complex or custom designs.
  • When precast elements are used, there needs to be enough space on-site for storage and assembly. This can be difficult in cities with lots of people or on building sites with limited space.

In conclusion, if you know about precast building construction, then you can make smart choices about using this method for your projects. Even though there are some problems, the pros of precast construction make it a good choice for current construction needs. Precast building construction is going to become more and more important in shaping the future of architecture and engineering as the industry keeps coming up with new ideas. Build your home with the best construction company in Bangalore and experience the hassle free construction experience.

Unlocking Home Water Tanks: Your Essential Guide to Optimal Water Storage

0
Home Water Tank Image

Every house needs a reliable way to store water and keep it safe from dirt and debris for future use. A home water tank is a solution for storing and safeguarding water for future purposes. In this blog Brick & Bolt explains home water tanks, it’s important, and the different types of water tanks available for your home. This guide will help you make smart choices about storing water for your daily needs.

What is a Water Tank & Its’s Importanace?

A water tank is a large container used to store water. People can store water in these tanks for many reasons, such as drinking, farming, fire emergencies, and other domestic and commercial uses. For homeowners, having a home water tank is especially important to ensure a steady supply of water during droughts, water main breaks, and other emergencies that could stop their normal water service.

A home water tank is important for more reasons than just being ready for emergencies. In addition, it is very important to save water. When people collect and store rainwater, they use less municipal water supplies, which lowers their water bills and has less of an effect on the earth. A home water tank can also ensure that the water supply doesn’t run out during times of high demand, like when you’re farming or washing dishes.

Types of Home Water Tank

Types of home water tank

Each type of water tank has its own pros and cons. They come in different sizes, styles, and materials. The most popular types of water tanks for homes are bladder tanks, concrete tanks, steel tanks, and fibreglass tanks. Because each type is different, it can be used for different purposes and fit various preferences. Some of the home water tanks are-

  1. Plastic Water Tanks
  2. Steel Water Tanks
  3. Concrete Water Tanks
  4. Fibre Glass Water Tanks
  5. Bladder Water Tanks

1. Plastic Water Tanks

Polyethylene, a strong but lightweight plastic, is used to make plastic water tanks. People like these tanks because they are inexpensive and versatile.

Pros of Plastic Water Tanks

  • Plastic tanks are usually less expensive than other types of tanks.
  • They are easier to move and set up because they are light.
  • Plastic tanks don’t rust, so they last longer.
  • It can be set up in a lot of different ways to fit different needs and spaces.

Cons of Plastic Water Tanks

  • Plastic tanks are strong, but they can crack more easily when they are hit or put under a heavy load.

2. Steel Water Tanks

Steel water tanks are made of galvanised or stainless steel and are a strong and long-lasting way to store water at home.

Types of Steel Water Tanks
Many types of steel tanks are on  the market, but only two steel water tanks are mainly used in homes for storing water, and they are-

Corrugated Steel Tanks: These are made from ribbed steel sheets, making them stronger.

Welded Steel Tanks: Smooth-sided tanks that are made from welded steel plates are called welded steel tanks.

Pros of Steel Water Tanks

  • Extremely long-lasting and able to handle extreme weather conditions.
  • It can last for many years with proper maintenance.
  • It is suitable for the storage of large amounts of water.
  • The fact that steel tanks can be recycled makes them good for the environment.

Cons of Steel Water Tanks

  • If you fail to maintain steel tanks properly, they can rust over time.
  • In general, they cost more than plastic tanks.
  • It is not easy to move and set up without professional help.

3. Concrete Water Tanks

Concrete water tanks are made of reinforced concrete and are known for being strong and lasting a long time.

Pros of Concrete Water Tanks

  • Tanks made of concrete are very strong and can last for many years.
  • They keep water warm in the winter and cool in the summer.
  • It can be made in any shape or size, based on the water and space needs.
  • Once they are set up, concrete tanks don’t need much upkeep.

Cons of Concrete Water Tanks

  • Compared to other types of tanks, it costs more to buy or build at first.
  • They are heavy, which makes them hard to move and set up.
  • Concrete can get cracks over time, which can cause leaks.

4. Fibreglass Water Tanks

Reinforced fibreglass is used to make fibreglass water tanks. These tanks are strong for their weight and corrosion resistance.

Types of Fibre Glass Tanks

There are two types of fibreglass tanks commonly used in homes. They are

Above-Ground Fibreglass Tanks: These tanks are usually round and are made to be installed above ground.

Underground Fibreglass Tanks: These tanks are made to be buried, saving ground space and keeping the water from changing temperatures.

Pros of Fibreglass Water Tanks

  • Fibreglass will not rust or corrode, no matter how challenging the climate is.
  • It’s easier to move and set up than steel or concrete tanks.
  • It doesn’t crack or break easily and lasts a long time.
  • Doesn’t need as much maintenance as other materials.

Cons of Fibreglass Water Tanks

  • Although fibreglass is strong and flexible, it can still crack in some situations. 
  • It is easy for algae to grow on fibreglass surfaces, especially when they are warm and humid.

5. Bladder Water Tanks

Bladder tanks, which are also called pillow tanks, are flexible containers made of strong, long-lasting materials that are meant to store water temporarily.

Pros of Bladder Water Tanks

  • It’s easy to move and set up, making it perfect for emergency or temporary use.
  • It can be taken down and put away when not in use.
  • It can be used for many uses like storing water for drinking and watering plants.

Cons of Bladder Water Tanks

  • It’s not the best way to store water for a long time.
  • It may get hurt by sharp items or rough handling.
  • Most of the time, they are smaller than regular water tanks.

What are the Factors to Consider When Choosing a Home Water Tank?

1. Before choosing a water tank, consider its primary purpose. Depending on the purpose, different types of tanks may be needed:

  • A tank made of safe materials is needed to keep potable water.
  • If there is a lot of water demand, you might need a bigger tank.
  • The best tanks are ones that are made to collect and do rainwater harvesting.
  • You need a tank that is strong and easy to handle for any emergency water storage.

2. Different materials are used to make water tanks, and each has pros and cons. So, know about them before purchasing tanks for homes.

3. The tank’s size and capacity are very important things to think about:

  • For larger homes, bigger tanks are usually needed to hold enough water.
  • Think about how much water you use every day for cooking, drinking, cleaning, and other activities.
  • Check how much room there is for the tank to be installed, whether it’s above or below ground.
  • You should plan for possible increases in water demand, like when you add more people to your family or grow your yard.

4. The place where you want to put the tank can affect your choice:

  • It may take up more space, but above-ground tanks are easy to set up and keep up. Tanks that are buried save space on the ground and keep the water from freezing or flowing.
  • Make sure the tank is easy to get for cleaning and upkeep.
  • Some tanks, like steel and concrete ones, need a strong base to hold their weight.

5. Your home’s temperature and environment can affect how well and how long your water tank lasts:

  • If you live in a place where temperatures change a lot, choose materials that don’t change much in temperature, like concrete or fibreglass.
  • In places with strong sunlight, you need materials that don’t damage easily or tanks with protective coats.
  • Consider tanks made to survive earthquakes if you live in an area that is prone to them.

6. Your budget will be a big part of your choice:

  • Consider how much the tank will cost you upfront, including buying and installing it.
  • Think about how much it will cost to maintain, fix, and replace the tank over its lifetime.

7. Make sure the tank you chose complies with the local regulations and standards :

  • Try to know about local building codes and standards to see how to install a water tank.
  • If you want to store drinking water in the tank, make sure it meets health and safety guidelines.

8. You can feel safe with a good guarantee and customer service:

  • Look for tanks that come with long warranties that cover any problems or damage that might happen.
  • Pick a manufacturer or provider with a good reputation and good customer service.

In conclusion, choosing the right water tank for your home is important to make sure that your family has a safe and reliable water source. Whether you choose a bladder tank, plastic, concrete, steel, fibreglass, or something else, each has its own pros and cons that you should think about based on your needs and situation. If people know about these differences, they can make smart choices that will help them store more water, support efforts to save water and give them peace of mind in case the water supply goes out. Buying a good home water tank isn’t just for ease; it’s also an important step toward being eco-friendly and ready for anything. 

If you are planning to build your dream home but are worried about your budget estimation, use our cost estimator to estimate your budget. Then, construct your dream home with the best leading construction company in Chennai and make your dream come true.

Mastering the Types of Concrete Curing

0
Types of concrete curing

When it comes to concrete construction, concrete curing is a very common term used countless times. Have you ever wondered about concrete curing and its different types?

In today’s Brick & Bolt blog, you will explore different types of concrete curing based on the curing methods.

What is Concrete Curing?

The curing of concrete is a stage in construction that prevents the evaporation of water from the concrete as it hardens and maintains moisture in the concrete surface for hydration reactions. Curing is the process that builds the strength of concrete by moisturising its surface. When concrete cures, it absorbs the moisture content to complete its chemical action and achieve its full strength.

Concrete does not reach its intended strength instantly. It takes 24 hours to attain 16% of its intended strength, and it reaches full strength after 28 days. 

The primary goal of concrete curing is to avoid water loss and keep the temperature low enough to disperse the heat of hydration. Proper concrete curing is essential for both onsite and offsite construction methods, regardless of the type of concrete used.

Different Types of Concrete Curing

Based on the curing methods, the following are the major types of concrete curing.

  1. Water Curing
  2. Wet Covering
  3. Formwork Curing
  4. Membrane Curing
  5. Sheet Curing
  6. Curing by Absorbing Heat

1. Water Curing

Curing methods

This type of curing is used to avoid drying the concrete surface. It’s generally used for pavements and flat concrete surfaces, when the concrete is thinner.

There are two methods to apply water on concrete.

  • Ponding the concrete
  • Use of sprinklers

Ponding the Concrete

A small clay bund or water-retaining substance is placed around the concrete surface’s perimeter. The bund divides the entire surface into small parts, and the enclosed areas are filled with water. The process involves continuously soaking the concrete surface rather than allowing it to dry. This approach is particularly effective in dry settings since it eliminates the need to pour water continuously. For ponding concrete, it’s essential to consider factors like choosing the right water tank and implementing rainwater harvesting systems for your home to ensure an adequate water supply.  

Use of Sprinklers

Using sprinklers is a necessary step to prevent the concrete surface from drying due to evaporation. The key is to continuously spray water at a constant and uniform rate, ensuring adequate curing. Sprinklers set at the spacing will be used for this purpose. 

2. Wet Covering

Wet curing is a method of maintaining surface moisture levels using materials such as hessian and gunnery bags. These coverings will be placed on the concrete surface once it has hardened sufficiently to act as a cover. This approach is suitable for curing vertical surfaces such as concrete columns and walls. 

3. Formwork Curing

Formwork is the best method for curing concrete, especially for thick concrete where high heat is generated during curing. This method is cost-effective since the cost is included in the formwork itself. The main challenge is keeping the formwork in place a bit longer.

Formwork curing helps prevent cracking in large concrete structures by providing a more stable curing environment. It is also used to manage heat in thick concrete, ensuring safe and even curing. The thickness of the formwork is decided based on factors like peak temperature and temperature differences.

For thicker concrete, a mockup test is often done before the main construction to monitor temperature changes. The test helps decide on the formwork material, its thickness, the temperature at which concrete should be placed, and measures to reduce heat during curing. This test ensures the conditions are safe and acceptable. Labour costs are an important consideration for formwork installation and removal, which you can estimate using the home construction labour cost guide. For columns, the formwork needs to stay in place longer, which might add to the project’s cost.

4. Membrane Curing

A membrane is generated on the concrete’s surface to prevent moisture from evaporating. Liquid form material is sprayed over the concrete surface, where it solidifies and forms a membrane. These ingredients can be applied using a brush or roller. 

There are two kinds of membranes.

  • Water-based
  • Oil-based

Water-based curing membranes are more popular than oil-based membranes because they can be rinsed off with water after curing, whereas oil-based membranes need more effort to remove. To remove the oil base membranes, they must be acid-etched, sandblasted, or chipped.

5. Sheet Curing

Sheet curing is a type of concrete curing, and two types of sheets are used.

  • Polythene Sheet
  • Curing Blankets

Both types of sheets are usually used to cure flat surfaces. Polythene sheets are used to cover concrete slabs and columns. The sheet can be properly set on the slab just after it gets hardened. Shelter areas are also created by using polythenes and applying them to concrete. This method allows the concrete to dry naturally. On special occasions, when there is less evaporation and the concrete is not that structurally important, this method can be used.

Plastic sheets can also be used to cover concrete. These sheets are used to cover flat surfaces. Plastic is a watertight and lighter material. In addition, it is easy to handle. Curing blankets protect newly placed concrete. They perform the same function as other sorts of sheets, ensuring that no moisture evaporates from the concrete surface.

6. Curing by Absorbing Heat

Pipes are placed inside the concrete to absorb heat. Water circulates through the concrete and absorbs its heat. This technology is better suited to thick concrete and higher-grade concrete buildings. It lowers the core temperature.

However, these approaches should be cautiously utilised because a quick temperature shift may cause concrete to crack. Continuous monitoring of the water’s temperature provides information about the interior temperature. Depending on the observations, the flow rate can be changed.

Types of curing

Conclusion

Concrete curing determines the strength and durability of concrete structures, making it an essential component of construction. Proper curing processes guarantee that concrete retains adequate moisture and a suitable temperature for hydration, both of which are critical for producing the desired structural qualities. Understanding and executing proper curing techniques allows construction experts to greatly improve the quality and longevity of concrete structures, assuring their safety and functionality for years to come.

If you are seeking long-lasting and durable construction, look no further than Brick & Bolt. As a premier construction service provider in India, Brick & Bolt offers extensive expertise to bring your project to life. Refer to their comprehensive house construction cost guide to plan your budget effectively. They can guide you in choosing the appropriate construction materials and designing house floor plans. Additionally, you can easily estimate your building costs with our exclusive building cost estimator tool.

South east Corner Plot Vastu: A Comprehensive Guide

0
South-east corner plot vastu

Agneya, or South-east, is the direction where the fire element is dominant. According to Vastu Shastra, a south-east-facing plot is auspicious. However, certain Vastu guidelines must be followed when designing and building a south-east-facing home.

In today’s blog of Brick & Bolt, you are going to understand the South-east corner Vastu, its benefits and challenges, Vastu guidelines for interiors and South-east corner extended plot vastu remedies.

Understanding the South East Corner Plot Vastu

Vastu is an ancient science of structures; when people truly follow it, they invite wealth, health and success. The significance of Vastu lies in how a well-designed home brings peace and clarity. 

The plots that contain roads in both the east and south directions are considered southeast corner plots. According to the Vastu principle for plot selection, the southeast corner plots are very auspicious for cafes, hotels, tea shops, and industries that are related to electricity or fireworks. If you are selecting a south-east facing plot for your home, make sure to choose the rectangular or square-shaped plot. The layout should be wider in front and narrower in behind. The plot should also be elevated at the southwest corner and lower at the northeast corner. 

If your plot faces the southwest direction, you can refer to our south-west facing Vastu for house guide for recommendations.

South East Corner Plot Vastu Guidelines

Entry from south east vastu

South-East Direction Vastu Entrance

The main door of the south-east corner of the house should be placed in either the Eastern or Northeast direction. The main entry from the southeast is not the best choice as it may cause financial losses. If you don’t have any other option, then make sure to install three Vastu pyramids at the entrance door, which will lessen the negative effects.

Kitchen in South-East Corner Vastu

Although your kitchen should be constructed in the southeast direction of the house, you must face the east or west while cooking. If your home’s main entrance faces the southeast, having the most windows in the kitchen is advised. Ensure all the windows face the north-east or the north-west for the south-east corner of the house. As per Vastu, please do not place the kitchen in the southwest direction, as it is most inauspicious. This basic yet crucial Vastu principle can assist you in creating a balanced and good energy flow in your home. Pay attention to Vastu tips for kitchen design, appliances, and remedies to ensure a harmonious cooking and dining experience.

Bedrooms and Living Room Placement

The master bedroom should be located in the southwest corner, while the guest bedroom should be in the northwest corner. The living room should be facing either north or east. It is critical to avoid locating the bedroom on the southeast corner for the house having entry from south-east vastu, as this can lead to health issues.  

Septic Tank, Toilet and Bathroom Vastu for South East Facing House

The ideal placement for a toilet is in the West of North West (WNW) direction. Bathrooms or toilets should not be placed in the house’s south, north, or south-west corners. Furthermore, do not build a toilet, septic tank, or underground water tank in these locations. Placing a toilet in the heart of the house, known as the Brahmasthan, should also be avoided. Any extension in these directions is regarded as a Vastu fault and should be avoided. Furthermore, avoid installing a toilet beneath the staircase, as this can cause energy bottlenecks. According to Vastu principles, septic tanks should not be placed in the south east or south west directions. 

Pros and Cons of South East Corner Plots

Similar to all other directions, a house facing southeast has advantages and disadvantages. The following are some of them:

South East Corner Plot Advantages

  • You can enjoy abundant natural light throughout the day, reducing energy bills.
  • You will get better gardening opportunities with more natural light.
  • For colder climate regions, longer sunlight hours are best.

South East Corner Plot Disadvantages

  • Longer hours of sunlight increase heat in summer, which increases AC bills for houses in hot weather regions.
  • Houses facing south, if not carefully planned according to Vastu, can cause major financial and health difficulties.
  • An underground water bore well cannot be made on the front side of the house because it is in the fire-dominant direction.
  • It’s difficult to sell because of wrong perceptions and faulty myths about the south direction.

South-East Corner Vastu Remedies

  • Mirrors are extremely important in Vastu Shastra. Placing a mirror in the proper direction might be really beneficial for home inmates. If your home’s southeast corner is a source of contention, hang a mirror on the southwest wall to reflect the negative energy.  
  • Your property should always have an entrance facing northeast or east. The last thing you want is for it to be in the southeast. However, if it is already set up in this manner, putting three Vastu pyramids at the front door will mitigate the negative consequences.
  • Vastu Remedies recommends painting the southeast corner’s walls in dark colours, such as crimson, to restore the family’s stability. You can learn more about Vastu colours for your home and their significance in creating a harmonious living environment.
  • If you place a Vastu Kalash at the southeast corner of your home, your family will enjoy greater prosperity, happiness, and harmony.
  • Sea salts and crystals can greatly reduce the symptoms of Vastu. Use this remedy for your master bedroom, which is in the southeast direction and cannot be shifted. Place a dish of sea salt or camphor crystals on the corner, facing northeast. 
  • Plants often add new energy to the home. Keeping certain plants, such as the money plant, jade plant, and bamboo, in the southeast direction can be quite helpful to your home. 

While building a new home offers the opportunity to incorporate Vastu principles from the ground up, even if you’re living in a rented space, Vastu remedies for rented homes can help you maintain positive energy and balance.

Can South East Corner be Extended

In Vastu Shastra, the South East corner is associated with the element of fire (Agni) and is considered crucial for energy and vitality. Extending the South East corner of a building is generally discouraged, as it may disrupt the balance of energies within the space.

Potential issues with extending the South East corner include:

  • Financial challenges: It might lead to unexpected expenses or financial instability.
  • Health concerns: Occupants may experience health issues related to metabolism or the reproductive system.
  • Increased stress: There could be more conflicts or stress among family members.

To maintain harmony and positive energy flow, it’s advisable to keep the South East corner balanced without extensions. If an extension is unavoidable due to architectural constraints, consider consulting a Vastu expert. They can recommend remedies or adjustments to mitigate any negative effects

Conclusion

In Vastu Shastra, south-east-facing homes are considered auspicious, but certain guidelines must be followed when designing and building one. By selecting the right plot, placing rooms in the correct direction, and following other Vastu guidelines, we can create a home that is not only beautiful but also promotes prosperity and well-being.

Are you interested in building a Vastu-compliant home? Then, Brick & Bolt is here. The leading construction company in Mysuru, we can build your dream home that aligns with your requirements and Vastu principles, along with superior craftsmanship and 470+ quality checks. In addition, we provide an extensive collection of floor plan designs for free to find the perfect layout for your home.

Unlocking Harmony: Borewell Vastu Guidelines for Your Home’s Well-Being

0
Borewell drilling image

Many people think that using Vastu Shastra effectively can bring peace and wealth. It is an ancient Indian science of architecture and design. Placing water sources, especially borewells, is one of the most essential components of Vastu Shastra. In this blog, Brick & Bolt will discuss about borewell’s Vastu and how these guidelines can help you in the placement of borewells. We will also discuss many things, such as the Vastu-compliant borewell location and important tips to ensure your borewell is Vastu-compliant.

What is Vastu Shastra, and What is its importance?

Vastu Shastra is the ancient Indian architectural and design system places a strong emphasis on aligning buildings and other structures with the forces of nature. You can also apply these principles of Vastu Shastra for homes to improves health, wealth, prosperity, and happiness by fusing astronomy, astrology, and science. Utilising and balancing the positive energy of nature within living areas is the main goal of Vastu.

Borewell Vastu principles determine the ideal placement and direction of water sources, ensuring that they don’t disrupt the flow of positive energy. A borewell placed incorrectly might result in health problems, financial difficulties, and other hardships. Thus, understanding and implementing the right borewell direction, as per Vastu, is crucial for a harmonious living environment. 

Key Consideration for Vastu-Compliant Borewell Placement

Vastu rules must be followed, and careful planning is necessary when digging a borewell or tubewell. To make sure your borewell is placed correctly, follow these 

steps:

  • One of the most important decisions to make when designing a new home or house plan for the building is selecting the best vastu compliant plot.
  • Before beginning any digging work, have your property checked by a Vastu expert who can also recommend the best borewell location as per Vastu.
  • According to Vastu Shastra, new projects should be started on auspicious days and times. Make sure the day you choose to dig the borewell is auspicious.
  • By testing the soil, you may determine whether the borewell can be built in the chosen location as per Vastu and make sure it is not contaminated.
  • Before beginning the digging process, perform a Vastu Pooja to help create beneficial energies and eliminate any negative effects.
  • As per Vastu, the placement of the borewell should follow certain directional guidelines, which we will discuss in detail in the subsequent sections. These procedures will help you ensure that your borewell not only produces clean water and operates efficiently but also adheres to Vastu principles. 

What is the Best Borewell Direction, As Per Vastu?

In the borewell Vastu, the location and direction of the well is very important. Vastu Shastra says that the best location for a borewell is in the property’s north, northeast, or east-facing directions. Here are the reasons why these directions are preferred:

North: 

This direction is related to wealth and success. Building the borewell in the north direction can bring stability and financial growth. A borewell in this direction can also enhance wealth accumulation.

Northeast: 

According to Vastu Shastra, the Northeast is the best direction. It is called the Ishanya Corner. Because people think that it will bring them health, peace, and wealth. 

East: 

Turning toward the east means the rising sun and fresh starts. A borewell in the East can bring positive energy and health to the family. Also, it is believed that east-facing houses with Vastu guidelines will naturally bring good energy into your home, making your living areas feel alive and refreshed.

Directions to Avoid for Borewell Placement As Per Vastu

It is essential to avoid these following borewell directions as per Vastu

Southeast: 

Borewells in the southeast direction can cause health issues and financial trouble.

Southwest: 

This direction is linked to negative energies, and putting a borewell here could cause major problems. In addition, houses that face southwest may come up with some issues, but these issues can be solved by following southwest-facing house Vastu guidelines

Southeast: 

This direction is known to be aligned to fire, and putting a borewell here can cause health problems and conflict.

Vastu Guidelines for Borewell Placement

If you follow these tips, you can avoid the problems of placing a borewell in the wrong place and ensure that everyone gets along. Here are some Vastu tips for borewell placement:

  • Avoid the south or southeast corner; placing a borewell here could change things and cause insecurity and health problems.
  • The centre of the property, called the Brahmasthan, shouldn’t have any heavy buildings or borewells. People think of it as the property’s heart, so it should stay open to maintain balance.
  • Make sure the borewell is installed away from toilets and septic tanks to keep the water clean.
  • Check and maintain the borewell regularly to ensure it works well and is in accordance with Vastu principles.

In conclusion, understanding and implementing the borewell direction as per Vastu is important for attracting good energy and making sure of everyone’s health. By following these borewell location as per Vastu and choosing the right directions, you can improve your health, finances, and general well-being.

Remind yourself that the northeast direction is always best for borewells. Avoid placing the borewell in the south, southwest, or southeast to prevent negative outcomes. Following the Vastu tips for placing the borewell and doing regular maintenance can also help ensure that your borewell has a positive effect. If you are planning to build or renovate your home with Vastu guidelines, contact Brick & Bolt, the best construction company in Hyderabad. Also, use our cost estimator to calculate your house construction cost and plan your budget accordingly.

Exploring Laterite Bricks: The Eco-Friendly Building Material

0
Laterite bricks

Laterite bricks are special types of bricks generally used for constructing homes and other types of buildings in certain parts of South India (such as Karnataka, Kerala, and Andra Pradesh). They are the most sustainable construction materials and offer better aesthetics.

In today’s blog of Brick & Bolt, you will learn about laterite bricks, their types, manufacturing process, advantages, limitations, and why they might be the right choice for your next building project.

What Are Laterite Bricks?

Laterite is a type of soil that is rich in iron and aluminium oxides. Laterite soil is formed by the weathering of rocks in tropical and subtropical regions. Laterite bricks are produced from this type of soil.

Types of Laterite Bricks 

Laterite bricks are classified based on their manufacturing process and the consequent properties. The following are the types of laterite bricks:

  1. Natural Cut Laterite Bricks
  2. Compressed Laterite Bricks
  3. Burnt Laterite Bricks

1. Natural Cut Laterite Bricks or Porous Laterite Bricks:

These types of naturally cut laterite bricks are porous in nature, hence it’s called porous bricks. They are traditionally cut directly from laterite deposits. Later, they are manually shaped into bricks, retaining a raw, rustic texture. Natural cut laterite bricks provide good thermal insulation but may require additional treatment to improve water resistance.

2. Compressed Laterite Bricks

Compressed laterite bricks are produced by compacting laterite soil mixed with a specific amount of cement or lime under high pressure. This procedure increases the strength and uniformity of the bricks, making them less porous and longer-lasting than natural cut laterite bricks. These types of bricks are also called stabilised laterite bricks and are generally utilised in modern buildings.

3. Burnt Laterite Bricks

Burnt laterite bricks are made by heating natural laterite bricks in a kiln, much like clay bricks. This boosts their strength while decreasing porosity, making them better suited for load-bearing constructions. The firing process makes these bricks tougher and more weather-resistant.

Advantages of Laterite Bricks

laterite construction

As laterite bricks offer countless benefits, they became a popular choice for construction. The following are some major advantages of using laterite bricks:

Cost-effective

Laterite bricks are mostly used in locally available areas, reducing transportation costs. The relatively simpler production process makes laterite bricks an affordable construction material choice compared to other building materials. Because of their larger brick size, fewer bricks are sufficient for the overall project. The standard laterite brick size is 300x200x150 mm.

Thermal Insulation Property

For buildings located in hot regions, laterite bricks will be very beneficial. They have better thermal insulation properties and allow you to adjust to the weather.

Sustainability

Laterite brick production involves eco-friendly construction materials. Since laterite bricks are often cast in situ, they do not contribute to the generation of greenhouse gases, which helps lower carbon dioxide levels. 

Durability

Laterite bricks have excellent durability, as they can thrive adverse weather conditions and remain in good condition for years on end.

Fire-resistant

Laterite bricks are a safe choice for building. They’re highly fire-resistant and can sustain high temperatures, offering additional safety to buildings and occupants.

Applications of Laterite Bricks

Laterite bricks house

The following are some of the best applications for laterite bricks:

Residential Construction: Laterite bricks are often employed in residential construction projects. They’re best suited for constructing walls, foundations, and even floors. Their excellent compressive strength and resistance to weathering make them a solid alternative for long-lasting laterite brick houses.

Commercial Buildings: Laterite bricks are best suited for commercial buildings such as schools and hospitals. These bricks offer excellent thermal insulation, reducing the need for air conditioning and heating. In addition to saving energy, they also reduce utility bills. 

Landscaping: Laterite bricks are a popular choice for landscaping projects due to their aesthetic appeal in paths, walls, and structures. They are used to design visually beautiful paths and retaining walls and as decorative interior elements or decorative structures for gardens and outdoor areas. The natural colour and texture of laterite bricks add to the visual appeal of landscaping ideas.

Decorative structures: Laterite bricks are commonly employed as eco-fiendly decorative elements in modern buildings. They can be used to create feature walls, facades, and other design features that give a natural charm to structures.

Limitations of Laterite Bricks

You need to consider the following limitations of Laterite bricks before choosing them as construction materials

Availability

Laterite bricks are only available in some parts of India. If the bricks must be supplied from a remote location, this limited availability can result in greater transportation expenses. 

High Porosity

Laterite bricks have a high porosity, allowing them to quickly absorb water. This can cause issues like dampness and seepage in buildings constructed using these bricks. Additional waterproofing may be necessary to avoid these issues.  

Prone to Erosion

Laterite bricks are prone to erosion over time, particularly in places with significant rainfall. Regular monsoon home care is required to maintain the lifespan of constructions constructed using laterite bricks. 

Conclusion

Laterite bricks are eco-friendly construction materials, more affordable compared to other types of bricks. Whether for creating enduring residential homes, energy-efficient spaces, or visually appealing landscapes, laterite bricks offer a versatile and sustainable solution. However, the overall cost of construction using these bricks can be higher due to the need for additional measures to address their disadvantages. Therefore, it is essential to evaluate the requirements of specific projects and local conditions carefully. Laterite bricks could be an excellent sustainable construction material choice for those interested in green buildings, provided their limitations are addressed.

If you are also seeking long-lasting and durable construction, Brick & Bolt is here. As a leading construction service provider in India, Brick & Bolt offers a wide range of expertise to your project. They can also assist you in selecting the right construction materials and house floor plans. In addition, you can check your building cost estimation by using our exclusive building cost estimator tool. 

Khata B: An Essential Guide for Property Owners in Bangalore

0
Khata B image

Becoming a property owner in Bangalore requires a unique combination of paperwork and governmental processes. The Khata certificate is one of the important documents. It is important to know the ins and outs of Khata B regardless of your experience level as a property owner or with knowledge about the real estate market. In this blog, Brick & Bolt will cover the definition of Khata, its significance, and the several varieties that are available, with a particular focus on Khata B. Along with explaining the main difference between Khata A and Khata B, we will also guide you through the application procedure.

What is a Khata?

Khata is a legal document that indicates a property’s worth for tax purposes. It clearly shows who owns the land by listing the property’s name, size, location, and other useful details. As it proves legal ownership and makes paying property taxes easier, this document is essential for property owners.

The Importance of the Khata Certificate

For Bangalore property owners, having a Khata is more than just a formality. The khata and khata transfer in Bangalore is quite important. In order to complete any legal transactions concerning the property, it is, first and foremost, necessary to have proof of ownership. In addition, it guarantees that property owners are in compliance with municipal laws and allows them to make timely property tax payments.

Types of Khata

Khata mostly comes into the two following types: 

  1. Khata A 
  2. Khata B

What is Khata B?

Properties with Khata B are those that are considered unauthorised or that deviate from the authorised building plans. These differences may be as small as variations in the building’s dimensions or as big as unapproved constructions. Although Khata B properties are recognised by the BBMP for tax purposes, they may face some challenges when trying to get building licenses and using municipal services.

The construction industry is always growing, so it’s important to know the latest building codes and standards. This means that everyone involved needs to stay alert and take action to ensure that they are following the rules.

Can I Get a Loan Against B Khata Properties?

One common concern for property owners with Khata B is whether they can get loans against their properties. Getting a loan against properties with Khata B can be more difficult than with properties with Khata A, however, it is still possible.

The risks involved with providing loans against Khata B properties may lead banks and other financial institutions to impose higher standards and criteria. Khata B properties are riskier for lenders since they are thought to have unlawful developments or modifications.

Even so, there are still certain restrictions on the loans that certain banks and non-banking financial organisations may be able to provide secured by Khata B properties. In order to reduce the risks, these conditions might include lower loan-to-value ratios, higher interest rates, and more supporting documents.

Property owners who have Khata B must carefully consider all of their alternatives and speak with multiple lenders in order to get the best conditions on a loan secured by their property. Additionally, working towards regularising any deviations or obtaining necessary approvals from the relevant authorities can improve the chances of securing a loan against Khata B properties.

Difference Between Khata A and Khata B

AspectKhata AKhata B
Legal StatusIt is legal and fully compliant with regulations set by BBMP.It is issued for properties with deviations or unauthorised constructions.
Municipal ServicesIt has access to all municipal services and amenities provided by BBMP.It may face restrictions in accessing certain municipal services.
Property ValueGenerally, Khata A has a higher market value.Khata B may have a lower market value due to associated risks.
Building ApprovalsIt is fully compliant with approved building plans.It may have deviations from approved building plans.
Loan EligibilityIt is easier to get loans against.More challenging to get loans and may require higher interest rates and additional documentation.
Tax ComplianceIt is fully compliant with property tax regulations.It is allowed to pay property taxes, but may have challenges in obtaining tax benefits and exemptions.
Market PerceptionKhata A is considered lawful and desirable.It may be perceived as having legal uncertainties.

In conclusion, for owners of properties with deviations or unapproved constructions, Khata B is essential in the world of property ownership in Bangalore. Even though there can be some difficulties, it is not completely impossible to get a loan against Khata B properties. Property owners in Bangalore may confidently investigate possible financing choices and successfully negotiate the challenges of property ownership by being aware of the intricacies of Khata B and striving for regulatory compliance. If you want to construct your dream home in Bangalore, then you can visit the no.1 tech-enabled construction company and experience the hassle-free construction process with our experienced architects. To learn about your dream home’s cost estimation, use our cost calculator and plan your budget accordingly.

The Importance of Curing of Concrete for Building Strength

0
Curing of concrete

Acquiring significant compressive strength is crucial for any lasting building or structure. But have you ever considered how buildings achieve these strengths for intended loads? It is achieved by undergoing the curing process. Are you curious to know more about this curing process?

Today’s blog of Brick & Bolt will explore in more detail the curing of concrete, its importance, the various methods used, and factors that affect the curing process.

What is the Curing of Concrete?

After the concrete is placed, it is necessary to keep the moisture and temperature conditions sufficiently wet and warm to guarantee that the cementitious components in the mixture properly hydrate. This process is known as concrete curing. The hydration process continues during curing as cement particles react with water to create chemical bonds that hold aggregates—such as crushed rocks, gravel, and fine sand—together. 

Importance of Proper Curing of Concrete

Concrete curing is a crucial step in achieving strength and durability, especially for reinforced cement concrete structures. Following are some reasons why concrete curing is crucial:

  • Properly cured concrete gains increased flexural and compressive strength, ensuring that it can support loads and stresses, including in high-strength mixes such as M20 concrete and M25 concrete.
  • Proper curing enhances concrete durability by minimising surface cracks and increasing resistance to environmental challenges, including freeze-thaw cycles, chemical exposure, and abrasion.
  • Proper curing can reduce surface defects, such as scaling and cracking on concrete surfaces. Maintaining adequate moisture levels can significantly reduce the likelihood of shrinkage, cracks, and other surface imperfections.
  • The curing process plays a major role in the adhesion between cement paste and aggregates.

Methods of Curing of Concrete

Proper concrete curing is important for both onsite and offsite construction methods with different types of concrete. Different curing methods are adopted at the site depending on the site conditions, structural type and other material parameters. Methods of curing concrete fall into the following categories:

  1. Water Curing of Concrete
  2. Membrane Curing
  3. Steam Curing Method

1. Water Curing of Concrete

The water curing method involves adding water or preventing water loss from the concrete surface. It is the best method of curing concrete because it satisfies all the curing requirements—

  • absorption of the heat of hydration
  • eradication of shrinkage
  • promotion of hydration

Water curing is conducted by adding water to the concrete surface to ensure continuous moistness. When moisture from the concrete body is retained, it ensures that there’s enough moisture content available for proper hydration to take place.

Water curing methods are:

  • Spraying of Water
  • Ponding
  • Wet Coverings
  • Immersion

Spraying of Water: This method involves spraying water with house pipes.

Ponding of Water: In this method, concrete slabs are kept underwater by making small ponds. Temporary barriers are utilised to create shallow ponds on the concrete surface, typically no deeper than 5 cm. These ponds are kept filled with water for a long duration. This method is most suitable for curing concrete during hot weather.

Wet Coverings: In this method, wet coverings are wrapped to the concrete surface to maintain the moisture content over concrete.

Immersion: In the Immersion method, the precast concrete elements are immersed in curing tanks for a certain duration.

2. Membrane Curing of Concrete

The membrane curing method is also known as water retention method by curing compounds or the chemical method of curing concrete. The procedure involves spraying solvents with some suitable dissolved chemical compounds. As the solvent evaporates, a thin film of the chemical compound applied over the concrete surface will leave behind. This thin film prevents evaporation from the concrete.

Thus, if sufficient water is added at the time of concrete preparation, it will set and harden nicely without asking for extra water. The thick film of the chemical compound starts to peel after 2-4 weeks leaving behind the properly cured concrete. 

3. Steam Curing Method

Steam curing method

The steam curing process includes curing with hot water vapor at a temperature between 40 °C and 100 °C for a limited period. It raises the concrete’s temperature while ensuring that the surface stays moist. It creates humidity surrounding the concrete to accelerate the concrete’s hardening and rate of strength development. 

How To Cure Concrete?

The concrete curing process has two major stages:

Initial curing: The initial curing phase initiates soon after the concrete has been placed and finished. This time requires continual moisture to ensure that the cementitious components are properly hydrated.

Curing methods include:

  • Sprinkling water.
  • Covering it with damp burlap bags.
  • Applying curing agents for the first seven days.

Final curing: Concrete requires continuous care, including final curing after the initial period, to increase strength and durability. This stage lasts from 7 to 28 days, ensuring ongoing hydration and strength development.

Factors Affecting Curing of Concrete 

Curing process

Several factors can influence the result of the curing process, and they must be considered to provide the best results:

  • Temperature: The temperature of the environment where the concrete is curing is very important. Extreme temperatures, whether hot or cold, might disrupt the hydration process and result in incorrect curing.
  • Humidity: High humidity levels help to keep moisture in the concrete, whereas low humidity causes rapid evaporation and premature drying.
  • Wind: Wind can accelerate the evaporation of moisture from the concrete surface, resulting in insufficient hydration. Windbreaks or protective covers can help to reduce this effect.
  • Concrete Mix Design: The mix design, which includes the water-cement ratio and the usage of admixtures, can affect the curing process. Some admixtures can fasten or slow the setting time, influencing the curing time.
  • Surface Area and Volume: Larger surface areas and thinner parts of concrete tend to lose moisture faster than thicker parts. Curing processes may need to be adjusted to account for these variances.

Conclusion

The curing of concrete is essential for achieving significant concrete strength and durability in concrete structures. It involves maintaining sufficient moisture and temperature conditions to ensure proper hydration of the cementitious materials. By understanding and implementing best practices in concrete curing, the durability and performance of concrete structures can be significantly improved.

If you are also looking for long-lasting and durable construction, Brick & Bolt is here. As a leading construction service provider in India, Brick & Bolt provides a wide range of expertise to your project. They can also assist you in selecting the right construction materials and house floor plans. In addition, you can check your building cost estimation by using our exclusive building cost estimator tool. 

Understanding the Types of Stone Masonry: Materials and Techniques

0
Different types of stone masonry

From historical constructions to recent contemporary building structures, stone masonry is one of the major building practices. Stone masonry offers both aesthetic and structural benefits.

In this blog of Brick & Bolt, you will learn about stone masonry, the materials used for it, and the different types of stone masonry.

What is Stone Masonry?

Stone masonry is a building construction technique that uses stones and mortar. This technique is used for home foundations, floors, retaining walls, arch designs, and columns. The stones used for masonry construction are natural rocks. 

Materials Used for Stone Masonry

The following are the materials used for stone masonry:

Stones

The stones used in masonry construction are not just any rocks. They must be hard, tough, and free from sand holes, cracks, and cavities. The choice of stone for a project and different types of stone masonry is influenced by its availability and the structure’s requirements. Common types of stones used in stone masonry include limestone, sandstone, granite, marble, and laterite. Usually these types of stones are used to construct walls, stairs, columns, floors, etc.

Mortar

The mortar is the binding material utilised for masonry construction. Cement and sand with water form the mix for masonry mortar. This mortar mix should be uniform. The following are two key factors influencing the selection of mortar for the different types of stone masonry:

Different Types of Stone Masonry

Types of stone masonry walls

Stones are abundant in nature, and when cut and polished to proper shapes, they offer an economical construction material for various parts of the building. Stone masonry can be classed according to the thickness of joints, course continuity, and face finish. The following are types of stone masonry:

1. Rubble Stone Masonry

2. Ashlar Masonry

1. Rubble Stone Masonry

In rubble stone masonry, irregular stones are used with mortar to form the masonry. This masonry is indicated by its wide joints, which result from utilising stones of varying sizes.

The rubble masonry is again classified based on the shape of the stones used as follows: 

  1. Uncoursed Random Rubble Masonry
  2. Coursed Rubble Masonry
  3. Polygonal Masonry
  4. Flint Masonry
  5. Dry Rubble Masonry

1. Uncoursed Random Rubble

Uncoursed random rubble masonry refers to the use of the stones that are not treated in any way. It can involve highly contrasting sizes and irregular shapes. Hence, careful placement is required to ensure even pressure distribution across a wider surface area. Some large stones are used in specific positions to make the structure stronger. Each stone is positioned differently, giving the finished structure a unique look.

2. Coursed Rubble Masonry

This is the simplest and most affordable way of building a stone wall. Coursed rubble masonry involves stones of any size between 50 and 200 mm. This stone masonry has regular square rubble masonry, This stone masonry method is usually used in churches, schools, and hospitals.

3.  Polygonal Rubble Masonry

Polygonal rubble masonry uses stones with multiple sides that are irregular in shape and size. These stones are cut into multi-sided figures, creating distinct patterns on the structure, which enhances its aesthetic uniqueness.

4. Flint Rubble Masonry

Flint rubble masonry uses flint or cobbles, a very hard and durable type of stone. This stone is known for its strength and is suitable for constructing durable structures. Flint is used with a varied width and thickness from 7.5 cm to 15 cm and length from 15 cm to 30cm. Flint rubble masonry is quite prevalent in regions where flint is readily available. 

5. Dry Rubble Masonry

These are rubble masonry structures constructed without the use of mortar. Smaller stones are used to fill narrow gaps. They are used to pitch earthen dams and canal slopes.

2. Ashlar Masonry

Various types of stone masonry

Ashlar Masonry utilises stone blocks that are either square or rectangular in shape. Some of the courses are lower than others, and the stones are between 250 and 300 mm high. Since it costs more, ashlar masonry is used only for the outside face of a wall.

Based on the types of polishing used to smooth the surface, they are categorised as follows:

  1. Ashlar Fine Masonry
  2. Ashlar Rough Masonry
  3. Rock and Quarry Faced Masonry
  4. Ashlar Block in Course Masonry
  5. Ashlar Chamfered Masonry

1. Ashlar Fine Masonry

In ashlar fine masonry building, each stone is cut to a regular size and shape, almost rectangular in shape. This design enables ideal horizontal and vertical connections with the adjacent stones. Ashlar fine masonry construction is quite expensive.

2. Ashlar Rough Masonry

Ashlar Rough Masonry preserves some of the natural textures and intricacies on the stone’s face while keeping the precision of square or rectangular shapes. This creates a unique combination of rough, natural appeal with the accuracy of squared corners, resulting in a more rustic yet organised appearance.

3. Rock or Quarry Faced Masonry

The Rock-faced or Quarry-faced masonry technique is a subset of Ashlar masonry. The stones have finely cut edges, but their faces are left in their natural state as they emerge from the quarry. This process keeps the natural texture on the face of the stones, providing an appealing contrast to the carefully cut edges. 

4. Ashlar Block in Course Masonry

Ashlar block in course masonry combines both ashlar and rubble masonry techniques. The front face of the wall has rough or hammered stone surfaces that form a pattern, while the back wall is built with rubble masonry. This creates a fascinating aesthetic contrast because the irregularity of the rubble-stone back is balanced by the prominent, ordered front face.

5. Ashlar Chamfered Masonry

This kind of masonry follows the traditional ashlar masonry principles, with stone blocks cut into precise shapes. Yet, in this form of stone construction, the edges are bevelled or chamfered rather than sharp and straight. This means the edges are cut at an angle, resulting in a sloping look. This not only improves the structure’s visual attractiveness but also increases architectural durability because chamfered edges are less susceptible to harm from external sources over time.

You can also read more about plum concrete, another popular building material, including its benefits, preparation, and applications.

Conclusion

Stone masonry is an ancient construction technique that has been incorporated into modern architecture. It stands out due to its visual appeal and structural integrity. The method entails carefully selecting and using natural stones that are strong and free of flaws, as well as using mortar as a binding agent. Regardless of the building type, stone masonry remains a popular choice among architects and builders seeking both efficiency and elegance in their projects.