Home Blog Page 77

CMDA Approved Layout

0
Chennai Metropolitan Development Authority (1)

CMDA (Chennai Metropolitan Development Authority) is a regulatory body that governs the construction and plans development activities within the Chennai Metropolitan Area (CMA). It was established in 1972 as MMDA (Madras Metropolitan Development Authority) and was later changed to CMDA.

What Is The Meaning Of CMDA Approved?

The CMDA controls the planning and development of the 1,189 square kilometers of the Chennai metropolitan Area, including parts of the Thiruvallur and Kanchipuram districts. 

A CMDA approval means that the CMDA has verified and authorized your plot of land or a building project. The CMDA has a set of rules and regulations that should be followed. You can get a CMDA approval once the organization has verified that your property follows them. 

Some factors that might be verified by the CMDA are

  • Confirming that the property is used as per the designated zoning regulations of the area.
  • Verifying whether the construction project meets environmental guidelines. 
  • Verifying whether the project adheres to the established safety standards of a construction project.

The Role Of CMDA (Chennai Metropolitan Development Authority)

The CMDA is responsible for the planning and development of Chennai and its surrounding metropolitan areas. Below are some of the CMDA’s roles and responsibilities.

  • Preparing comprehensive master plans outlining future development plans, including infrastructure needs, zoning regulations, population growth, etc.
  • Planning and coordinating the construction of essential infrastructure like transportation and water supply systems, sewage treatment facilities, etc. 
  • Issuing building permits after assessing whether a plot or construction project adheres to established rules and regulations. 
  • Implementing slum improvement programs and incorporating environmental sustainability practices into projects. 

Benefits Of CMDA-Approved Layouts

Benefits Of CMDA-Approved Layouts

Peace Of Mind

For property owners, having CMDA approval can provide great peace of mind and assurance that their plot or project has undergone a proper verification process and that they do not need to worry about any legal repercussions. 

Legality and Transparency

A CMDA approval is issued by the government and is legal. It is also transparent in its verification process. So, this can give buyers assurance that the property is safe to purchase or do a construction on.  

Planned Development

A CMDA approval also implies proper planning for essential infrastructure for roads, water supply, drainage systems, etc. This can improve the living conditions of future tenants and avoid issues like inadequate utilities or flooding. 

Enhanced Property Value

Getting a CMDA approval can considerably increase the value of your property. This will also serve as an assurance for buyers that the property is legal and safe to purchase. 

Approval Process and Documentation of CMDA

There are several steps you should follow to get approval from the CMDA. they involve site inspection, document verification, and so on. Below is the step-by-step process for CMDA approval. 

Site Inspection

The CMDA officials will first visit the site and do an inspection. They will assess the feasibility of the projects and ensure they adhere to the land use laws and zoning regulations. 

Submitting the Application

After inspection, you should submit a formal application for approval. The application should contain all the details of the project, such as building designs, intended property use, and other required specifications. 

Technical Review

The CMDA personnel will review the technical details of the application, such as structural calculations, building designs, and specifications. They will assess whether it complies with building norms and standards. 

Fee Payment

If the CMDA approves your project, they will issue an approval letter. You will then have to pay the necessary fees to get the final approval.

Submitting The Documents

You will then be required to submit the necessary documents. These include:

  • The project’s layout plan,
  • Encumbrance certificate, and
  • No Objection Certificate (NOC) from the local authorities. 

Plan Approval

After verifying all the relevant documents, the CMDA will issue a letter of approval. The letter will contain details regarding the approved building design, specifications, and other data. 

Building Permit

After getting CMDA approval, the next step is to apply for a building permit. To get this permit, you might need to submit documentation like a structural stability certificate, a fire safety plan, an electrical layout, etc. 

Final Inspection

After construction is complete, the CMDA officials will conduct a final inspection to verify whether the construction adheres to all the relevant rules and regulations. 

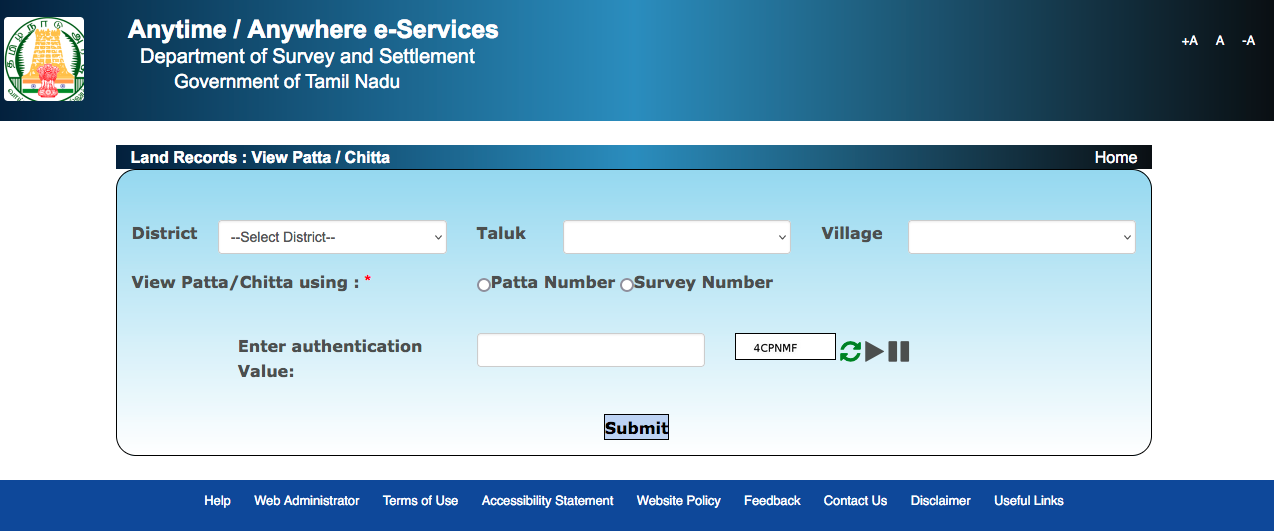
How To Find CMDA-Approved Layouts

CMDA Website

The first place you can go to search for a CMDA-approved layout is the CMDA website itself. The site had a separate section for CMDA-approved layouts. 

Visit the website and look for the “Approved Layouts” section on the Home page. You can also find them in the “Planning” or “Development” sections. Here, you can find the approved layout by the year of approval, specific areas, or locality. 

Online Real Estate Platforms

Many real estate websites have filters that you can use to narrow down your results. So, you can use these filters to narrow down your results to only CMDA-approved properties and choose the one that matches your desired location and price. 

Reputable Real Estate Agents

If you have trouble finding CMDA-approved layouts on your own, you can get the help of reputed real estate agents in the area. These agents will have a wide network that they can leverage to find CMDA-approved layouts that meet your expectations. 

Conclusion

Getting CMDA approval for a property is essential to ensure there are no issues with the property. So, if you have a property in Chennai, ensure you get CMDA approval for quicker selling. 

If you are looking to buy a property, ensure the property is CMDA-approved and has satisfied all legal requirements. 

FAQs

1. How Do I Find Out Whether A Plot Is CMDA-Approved?


You can visit the CMDA website and look for the “Approved Layouts” section. In that section, you can find CMDA-approved plots and even categorize them based on location, year, layout name, etc. You can also consult a reputed real estate agent or visit real estate platforms to find these layouts. 

2. What Is The Cost Of CMDA Approval In Chennai?


The cost of CMDA approval in Chennai is not fixed. The cost may vary depending on factors like plot size, project type, location, etc. 

3. What Is The CMDA Area Limit?


The CMDA area limit has expanded from its initial area. In 1974, the CMDA covered 1,189 sq. km. of Chennai. After a revision in 2022, the CMDA now covers approximately 5,904 sq km.

Building plan approval process in Tamilnadu

0
Building plan approval process in Tamilnadu

Getting approval for a building plan in Tamil Nadu is vital and complex and must be done before construction. This reduces risks to the building’s structure, legal ambiguities, and other concerns. 

This blog explains each approval stage for the building plan in Tamil Nadu, from the most basic to the crucial level. It covers the proper awareness of vital requirements for building approval and local laws.

Preparing the Building Plan

One must prepare a building plan carefully before applying for plan approval. This means hiring architects or civil engineers or mapping out a plan that follows physical laws and structural requirements. These include setbacks and other legal Approval Rules  

The building plan should also have architectural diagrams and a structure plan. It should also have the site’s layout and other needed things.

Documents Needed for Building Plan Approval

Documents Needed for Building Plan Approval

To get approval, you have to be prepared with many documents that offer the needed information to evaluate the proposed construction. These documents can be categorized as mandatory and non-mandatory, as outlined below:

DocumentMandatory/Non-Mandatory
Building Plan (.dxf files only)Mandatory
Road Width Sketch fileMandatory
Plot Approval copy file for checking site extentMandatory
Regularization Copy Of Order fileMandatory
Land Ownership PhotosMandatory
Land Ownership Detail DocumentsMandatory
Encumbrance CopyNon-Mandatory
Patta CopyNon-Mandatory
Adangal CopyNon-Mandatory
FMB DocumentNon-Mandatory
Combined FMB DocumentNon-Mandatory
Form AMandatory
Form BMandatory
Form CMandatory
Residuary Plot DetailsMandatory
Super Imposed drawing of FMBNon-Mandatory
A RegisterNon-Mandatory

Application Submission

  • The applicant should apply to the concerned local authority following the necessary documents and the building plan that has been prepared. 
  • The procedure should accompany the fees, and adhere to the format and requirements to be set.

Scrutiny & Verification

  • The application of rules and laws of construction and usage of land also involves some formalities, once the form is filled and all the documents are enclosed.
  • The authorities examine all those documents that were attached to the form and cross-check all the records to make sure that all the rules and norms of construction, irrespective of building, land use, and safety laws, have been met. 
  • The development of the construction plan at this stage requires
    • an analysis of the architecture 
    • construction of the building, 
    • the characteristics of the site, 
    • and the applicable legal conditions.

Site Inspection

Site Inspection
  • Another important step is for authorized persons to inspect the site to be used for the investment project. 
  • This on-site visit confirms the correctness of the submitted plans and checks their viability and compliance with the standard or regulation.
  • And the state’s laws in the construction plan to avoid environmental degradation.

Approval or Rejection

  • After scrutiny and verification, along with the site inspection, the authorities decide whether to permit or reject the building plan. 
  • Whenever they reject the particular plan, they notify the applicant of the particular problems and areas that require adjustment, followed by a resubmission of the plan with corrections made.

Compliance & Permission

  • In the case of approval, the applicant has to keep to conditions as prescribed in approval and acquire clearance from the related departments of the government for the requirement. 
  • It also ensures that all the requirements and conditions laid out have been met before beginning construction work. 
  • This involves ensuring the necessary clearances from the fire department, pollution control board, and any other relevant bodies depending on the magnitude of the project.

Validity and Renewal

  • The time that a given building plan approval is effective may take one to three years, depending on the regulation of the local authority. 
  • In case of non-compliance with the above-stated timeline of construction, an applicant shall be required to apply for renewal of the approval before the set expiration date.

Conclusion

By understanding the detailed steps involved, the significance of each document required, and the adherence to regulatory norms, applicants can navigate the approval process effectively and embark on their construction projects with confidence and compliance.

Types of Granite

0
types of granite

Granite is an igneous rock composed of feldspar, mica, and with at least 20% quartz. One of the widely used construction materials ideal for its enhanced strength, durability, elegance and hardness. 

It plays a pivotal role in the stone industry available in numerous shades and colors to décor your space aesthetically. Surprisingly, you can find more than 500 different colors in the market.

It is a natural stone widely used for decorating both interiors and exteriors. Though the stones have different names, their properties would be the same. People can make informed decisions based on their tastes and budget.

The granite choice may vary depending on the purpose. This article explores the types of granite that are going viral in the market today.

4 Types of Granite

Here are the lists of the top 4 granites that you should consider as a top priority.

White Granite

white granite

Unlike man-made stones, granites are not available in perfect white. It looks unique and artistic and adds timeless beauty to your interior space. Becoming a widely purchased decorative material, it provides a classy, fresh, and elegant look. It has many options, and some of them are explained below:

1. Andino White

Andino white is a kind of white granite perfect for elevating the elegance of your countertop. You can find it in white and gray mixed colors, and offers smooth finishes to both residential and commercial projects. Being a low-maintenance stone, it is best suited for kitchen islands, backsplashes, flooring, countertops, and landscape features.

2. Moon White

One of the beautiful stones exists in the white granite category. It is a natural stone that withstands heat and abrasion and is suitable for regular use in the kitchen. The stone is entirely found with beautiful gray spots that add a luxurious feel to your space.

3. White Ice

White Ice granite is featured with black, white and gray speckles. This stone works great in various applications like bathtub surrounds, countertops, backsplashes, bathroom vanity tops and more. It is available in different captivating patterns that add a sense of touch to your home.

Black Granite

Black Granite

Black granite is an excellent choice, accessible in various colors and patterns. It includes endless options; you can choose either a light or dark color to give a unique and polished look. Herewith the types of best black granite are listed below:

1. Absolute Black

Absolute Black is a solid black granite recommended for both interior and exterior décors. The color and texture are consistently perfect for floors, outdoor cladding, countertops, and architectural features. It brings a smooth finish and ultra-durable luxury to the floors.

2. Black Galaxy

The installation of black galaxy granite improves the overall appearance with small white and gold specks. These classy specks can range from small to large (i.e.,) exceptionally durable, easy maintenance and moisture resistant. Black galaxy granite is mostly used in staircases for a more elegant look

3. Ubatuba

Ubatuba granite is extremely shiny and available in gold, green, and gray shades. It is a statement piece in your kitchen that provides drastic transformation. This type can withstand high temperatures and high use.

Gray Granite

Gray Granite

Gray granite stones are aesthetic, classy and elegant. You can discover striking effects in different colors. Similar to other kinds of granite stones, it also contains an abundance of reds, golds, rusts, blacks, creams and silvers. It is perfect for a kitchen remodel project that seems convenient and affordable.

1. Bianco Antico

It looks simple and luxurious, appearing mostly in lighter brown, grey, and white. The detailed design and texture scattered throughout the stone adds extra elegance to your space.

2. Costa Esmeralda

Costa Esmeralda is a beautiful and durable granite that suits both interior and exterior projects. It works great for commercial and residential landscapes like countertops, backsplashes and more.

3. New Caledonia

Caledonia is recommended for all outdoor and indoor spaces, including flooring, countertops, and more. The shades are available in the white and gray range from charcoal to light gray.

Brown Granite

Gray Granite (1)

Brown Granite is quite popular among designers and homeowners who love to go with natural wooden and neutral kitchen cabinets. If you crave for earthy and natural tones, this will be your ultimate option.

1. Giallo Ornamental

Giallo ornamental is a luxurious variety that comes in dark gray, creamy white background and brown veins. It is well-suited for both commercial and residential applications like flooring, walls and granite countertops.

2. St. Cecilia

St. Cecilia is a great fit for people who want a durable and attractive option. This is a great fit for any home that features grays, warm beiges, and yellow. Recommended for interior and exterior projects, including walls, landscaping, flooring, countertops, and backsplashes.

3. Venetian Gold

Venetian gold granite provides a smooth and polished look and features beige and golden tones. It is best for tiles and slabs but also works great in backsplashes, countertops, and more.

Conclusion

Though granite is a construction material, it elevates your house look in different aspects. Based on your preference and infrastructure, choose the best granite type that looks great to your space. In this article, you could understand the list of top selling granites available in ideal color patterns and textures. With this knowledge, your choice of selection might be easy and efforless.

Home Gate Designs

0
home gate design

Home gate designs play a crucial role in defining the entrance to your property. Gates beautify the house, where many styles and materials are available. Choosing the right gate design can greatly improve your home’s look and function. 

The options range from old wrought iron gates to new sliding gates and low-upkeep vinyl ones. Each design has unique features and benefits. A well-designed gate not only secures your property but also adds to its curb appeal, making it an integral part of your home’s exterior. 

This guide explores the many options in home gate designs. It will help you pick the perfect gate that fits your needs and complements your home’s style.

Top 10 Home Gate Designs

Picking the right gate for your house is about the first impression your home makes.

You can choose the gate based on material and design.

However, it’s also crucial that the design does not compromise safety and security.

In general, home gates are chosen based on their material and unique designs.

Material-Based Gate Designs

Wrought Iron Gates:

Wrought Iron Gates:

It is known for its strength and durability, making it a popular gate choice.

These gates can be designed with patterns and motifs, adding an elegant and classic touch to your home.

They require regular maintenance to prevent rust and maintain their appearance.

Steel Gates

Steel Gates

Steel gates provide exceptional strength and security.

They can be customized in various designs, from modern gate design to traditional gate design. It generally needs low maintenance but may require occasional painting to prevent rust.

Aluminum Gates

Aluminum Gates

Aluminum gates are lightweight and easy to install. They are resistant to corrosion, making them ideal for coastal areas.

It can be available in various designs and finishes, complementing any architectural style.

Wooden Gates

Wooden Gates

Known for their natural and warm touch to your home, they can be carved and styled to match traditional and rustic home designs.

Wooden gates require regular treatment to protect them from weather damage and pests.

Vinyl Gates

Vinyl Gates

These gates are popular for residential and commercial properties due to their durability, low maintenance, and aesthetic appeal. Vinyl gates are resistant to rot, rust, and pests, requiring minimal maintenance.

Due to its availability in a range of colors and styles, vinyl gates can mimic the look of wood or metal.

While not as strong as metal, they are durable and long-lasting.

Design-Based Categories

Swing Gates

Swing Gates

Swing gates can open inwards or outwards, similar to a door.

They require ample space to operate, making them suitable for larger properties, and often have a more traditional and elegant look.

Sliding Gates

Sliding Gates

Sliding gates run along horizontal tracks and are thus very useful across places with limited space. It is well-known for its space-saving design and ease of automation, making them an excellent choice for various applications. 

This ensures access control to residential, commercial, and public properties with safety, besides offering elegant looks.

Bi-Folding Gates

Bi-Folding Gates

These gates fold back in sections, allowing for wider openings without requiring much space.

Bi-folding gates are convenient for properties with limited driveway space.

They provide a contemporary and stylish look to your home.

Automatic Gates

Automatic Gates

Automatic gates can be operated remotely, adding convenience and security.

They can be integrated with various security systems like intercoms and cameras.

In swing, sliding, and bi-folding designs, automatic gates can be customized to any style.

Pedestrian Gates

Pedestrian Gates

These gates are smaller and designed for pedestrian access.

They can complement the main gate design, providing a cohesive look.

Pedestrian gates often include features like keypads or intercom systems for added security.

Conclusion

Thus, it goes without saying that there are tons of ideas for home gate designs, most of which have their benefits and look wonderful. That is why the right design for your home gate is a mighty important thing in terms of security and functionality, as well as aesthetics.

From the slightest classic wrought iron to a modern sliding gate, and a low-maintenance vinyl gate, each type has unique benefits that may improve the overall value and enhance the look of your property.

Therefore, space, security needs, and design tastes should be considered when choosing a gate.

FAQs

What materials are typically used in home gates?


Home gates typically use steel, aluminium, and wrought iron. They also use glass, wood, and other materials.

Which material is best to use in home gates?


Metals are the usual choice for home gates. They are strong and last a long time.

What is the cheapest material to use in home gates?


The cheapest materials you can use in home gates are vinyl and chain links.

How to Get Land Patta in Tamil Nadu

0
Land Patta in Tamil Nadu

Patta is a land revenue record possessed by the Tamil Nadu Government. It plays a paramount role in property-related transactions like legal opinions, transfers, pledges, etc. The document incorporates crucial details including the area of land location, land ownership, and more.

One must ensure the patta document is present before purchasing land in Tamil Nadu. It acts as a record that you are making a legal transaction with the landowner, Before applying for a patta make sure to know the Rules of patta

In this blog, you’ll learn the eligibility criteria for land to get a patta, step-wise procedure to apply, track the application, and more. Let’s get into detail.

Land Eligibility Criteria to Get Patta in Tamil Nadu

Land Eligibility Criteria

To be eligible to obtain a Patta (land ownership record) in Tamil Nadu, applicants must meet specific criteria and provide the necessary documentation. 

Here is the checklist:

1. Ownership Proof:

The applicant must have legal proof of ownership of the land. This includes sale deeds, gift deeds, or inheritance documents that clearly state the applicant’s ownership rights.

2. Residential or Agricultural Land:

Patta can be issued for residential as well as agricultural land. The land must be categorized under these types in the local land records.

3. Government Approval:

If the land was allotted by the government (e.g., for agricultural purposes or as part of a land grant scheme), the applicant must provide the relevant government orders or allotment letters.

4. Encumbrance Certificate:

An Encumbrance Certificate (EC) is required to ensure the land is free from any legal dues or mortgages. This certificate covers the history of the land’s transactions and confirms there are no encumbrances.

5. Survey and Sub-Division:

If the land has been sub-divided, the applicant must have the official survey and sub-division records. The land must be clearly demarcated and measured.

6. Previous Patta (if applicable):

If applying for a Patta transfer or update, the previous Patta document must be provided. This is essential for verifying the continuity of ownership.

7. No Legal Disputes:

The land should not be involved in any ongoing legal disputes. A court clearance may be required if there were past disputes that have been resolved.

8. Occupancy Proof:

Proof of occupancy, such as property tax receipts or utility bills, may be required to establish the applicant’s physical possession of the land.

9. Local Residence Proof:

The applicant may need to provide proof of residence, such as an Aadhaar card, voter ID, or ration card, to establish their local address.

Steps to Apply Patta for Land

The government of Tamil Nadu enables the patta application process online in simple steps as mentioned below:

Step 1: Visit the Patta Chitta Website

To apply online, click on the government’s official land record website, www.eservices.tn.gov.in. The details are available in Tamil or English.

Step 2: Select the Option of Patta/ FMB/ Chitta/ TSLR Extract

Select patta/FMB/chitta or TSLR extract. Then, choose the district from the drop down menu and area of the property located. 

Step 3: Information on Property

Select Taluk and village name from the drop down box. On the same page below, enter the patta number or survey number in the respective fields. When choosing the survey number, you need to enter the land type and subdivision number.

Step 4: Enter Authentication Number

Once filling in the required property details, enter the authentication number correctly, which you can find below the page. Then click on submit.

Step 5: View Patta Chitta from the Town Survey Land Register

If the property details are submitted successfully, you will be issued with the certificate from the Town Survey Land register included with the property details. It contains the municipal door number, type of construction on your property, type of land, locality, etc.

Steps to Check the Status of Land Patta

Similar to the application process, you can check the status of patta/Chitta online with these simple steps. 

Step 1: 

To check the status of land patta, you need to log into the official e-District website (https://edistricts.tn.gov.in/revenue_report/status.html). 

Step 2: 

Enter the Application ID and captcha values, then click on the ‘Get Status’ button. 

Step 3: 

Once loaded, the status of your land patta will be reflected.  

How Much Will It Cost to Get Patta in Tamil Nadu?

Patta can be obtained online for Rs. 100. The Government of Tamil Nadu charges this nominal fee to maintain all the land records online. This helps citizens ensure that the land is purchased from the rightful owner.  

How Many Days Is the Patta Transfer in Tamil Nadu?

The time to process a Patta in Tamil Nadu depends on many factors. These include the application’s status. They also include the speed of the local revenue office. And they include possible hitches during verification. 

Normally, a Patta could be issued within 30 to 45 days from the date of submitting an application. This is the time needed for document verification. It also includes field inspection and approval by the authority.

In some cases, applicants may request expedited processing, especially if there are urgent requirements. Fast-track processing can reduce the waiting period to around 15 to 30 days, but this often involves additional fees and prioritization by the local revenue office. Also, pattas change automatically if there are no subdivisions

For applications submitted through the Tamil Nadu e-Services portal, the processing time might be slightly faster due to streamlined digital workflows. However, the average time still remains around 30 to 45 days

FAQs

1. Is Patta a Legal Document?


Yes, the patta is a legal proof or document to be shown that you are the legal owner of the land mentioned. It denotes the ownership of a person with clear land details.

2. Is Patta Enough for Registration?


A land or property can be registered to someone’s name either by submitting the parent document or the patta document of the land.

3. How Many Types of Patta are there in Tamil Nadu?


There are 4 different types of Patta for various purposes in Tamil Nadu including AD condition Patta, Natham patta, Land Handover Patta and TSLR patta. Each type of patta is used as a record for various needs.

Documents Required For Power Of Attorney

0
POA

Power of attorney is legal permission by the principal (you) to authorize another person, known as the agent, to act for them. This is especially true in legal and business issues. This document may be essential when the Principal can’t exercise their functions or powers, temporarily or otherwise. 

There are five power of attorney forms. Here, we will see what documents are needed to make one. We will also cover the benefits of having this legal relationship.

Types of Power of Attorney

Types of Power of Attorney

There are several types of Power of Attorney, each serving different purposes based on their features:

General Power of Attorney

  • A General POA covers broad powers. 
  • It includes the powers to buy or sell property, run a business, and handle banking. 
  • Nevertheless, this type of POA is unenforceable upon the incapacitation of the Principal.

Durable Power of Attorney

  • Like a General POA, the Agent is given the authority to act for the Principal. 
  • But, it applies even if the Principal is incompetent. 
  • For this reason, it is worthwhile to adopt it within the context of long-term strategic formulation.

Special or Limited Power of Attorney

  • This gives the Agent powers to do certain deeds or make determinations. 
  • These include selling property, making some financial transactions, or taking legal action. 
  • It does not encompass all the spheres of the Principal’s activity as it might be supposed.

Medical Power of Attorney

  • A Health Care POA designates the Agent to decide on healthcare issues for the Principal. 
  • This happens if they cannot decide. 
  • A living will, which usually comes with a Health Care POA, outlines the Principal’s desires about life support.

Key Documents Required for Power of Attorney

To ensure the POA is legally binding and effective, certain essential documents are required. 

These documents not only validate the POA but also help protect the principal and the agent by clearly defining the scope of authority and responsibilities. 

1. Power of Attorney Document: The main legal document that grants authority to the agent, clearly outlining the powers given.

2. Identification Proof of Principal and Agent: Government-issued IDs such as a passport, driver’s license, or Aadhaar card (in India).

3. Address Proof of Principal and Agent: Utility bills (such as electricity, water, or gas bills), bank statements, or any official document showing the current address.

4. Photographs: Recent passport-sized photographs of both the principal and the agent.

5. Property Documents (if applicable): Deeds, titles, or any documents related to the property if the POA involves property transactions.

Witness requirements

Witnesses attest to the principal’s identity, mental capacity, and willingness to sign the document without coercion. Most jurisdictions require that a Power of Attorney (POA) be signed in the presence of one or more witnesses to ensure the authenticity and voluntariness of the document.

The number of witnesses required can vary by region. Typically, at least two witnesses are necessary to observe the signing of the POA document.

Identification and Address Proof of Witnesses:

-Witnesses must provide valid identification, such as a passport, driver’s license, or other government-issued ID.

-Witnesses may also need to provide proof of address, such as utility bills or bank statements, to confirm their current residence.

-The identification and address proof of witnesses are recorded to maintain transparency and for future reference in case the authenticity of the POA is questioned.

Notarization and Registration

Notarization and Registration

Notarization adds an extra layer of authenticity and reduces the risk of fraud. This involves a licensed notary public who verifies the identities of the parties signing the POA and witnesses the signing.

In many jurisdictions, notarization is a legal requirement for the POA to be considered valid and enforceable.

Steps for Registering a POA:

1) Ensure the POA document is accurately prepared, including all necessary details and signatures.

2) Visit to the local Sub-Registrar’s Office. Both the principal and the agent, along with witnesses, must visit.

3) Present identification proofs and address proofs of all parties involved.

4) Submit the original POA document along with photocopies for registration.

5) Pay the required registration fees, which may vary by jurisdiction.

6) The Sub-Registrar records the details of the POA in the official register and provides a registration number.

7) Collect the registered POA document after the completion of the registration process.

Common Legal Pitfalls to Avoid:

1) It is mandatory to ensure the POA document is straightforward to avoid misinterpretation.

2) You should define the scope of the agent’s authority precisely to prevent abuse of power.

3) Ensure the required number of witnesses is present and properly documented.

4) Verify that notarization is done correctly by a licensed notary public.

Cost of Making Power of Attorney

The price for preparing a Power of Attorney depends on: 

  • The location of the attorney.
  • The legal system of the state or country.
  • The way of preparation. 

It can be an attorney’s work or an online form. Templates are generally cheaper than actual lawyers or legal services. This is due to their availability online and the fact that they can be easily copied and distributed.

Conclusion

By exploring the sort of POA and documents needed to make one, you will be in a better position to make good choices that would enhance your legal and financial position. The document requirement varies for general POAs and specific POAs, Be advised to seek advice from legal advisors since Powers of Attorney documents will be modified according to the legal requirements of the country where the client resides.

Can Power of Attorney Holder Sell Property?

0
power of attorney

Yes, a Power of Attorney (POA) holder can sell property for the principal (the person who grants the POA). But, there are specific conditions and legal requirements that must be met. Selling property is usually complex. This is especially true when it involves a Power of Attorney (POA). You may know that a Power of Attorney is a legal document. It allows one person, the principal, to grant another person, the agent or attorney-in-fact. They have the authority to make decisions and act for them. But real estate transactions are different. You must understand the scope and limits of a POA.

If you are you a property owner considering granting a POA Or if you are an agent entrusted with this big job, you need to know the basics of a smooth and legal transaction.

Factors to Consider for Selling Property with a POA

Selling Property

Scope of Authority

The agent’s authority to sell a property is mainly given based on provisions filtering from the Power of Attorney Document. This is the document including the ability of an agent to sell that property or otherwise by law, shall not be able to.

Where the principal’s POA contains express language authorizing the agent to sell, they are legally qualified to sell real property on behalf of the principal. An effective POA should be drafted stating in clear detail all of the powers expected to be exercised to avoid legal ambiguities or problems at any step in the respective transaction.

Specific vs. General POA

General Power of Attorney:

1. It grants broad authority to the agent to act on behalf of the principal.

2. It covers a wide range of activities, including financial transactions, business operations, and personal affairs.

3. General POA may not include the power to sell property unless explicitly stated.

4. It requires a clear definition of the agent’s powers to ensure they can perform specific actions.

Specific or Limited Power of Attorney:

1. It grants authority to the agent to perform particular tasks or conduct specific transactions.

2. On the term specific POA it precisely outlines the agent’s powers, such as selling a piece of real estate or handling a specific financial transaction.

3. It must explicitly state the authority to sell the property if that is the intended purpose.

4. This ensures the agent will act only within the defined realms of a POA and brings more control and limitation over the agent’s actions.

Fiduciary Duty

A person acting under a power of attorney holds a position of trust. He or she is to avoid self-dealing and not take advantage of his or her position to the detriment of the principal. Secondly, an agent should be transparent and accountable; hence he should have clear and accurate records of all actions on behalf of the principal.

Revocation and Termination

The principal has the discretion to revoke or withdraw the POA at any given time, especially if they discover the agent abuses authority or is guilty of a breach of the fiduciary duty. The POA may also be terminated if the principal becomes incapacitated or dies.

Can a Power of Attorney Holder Sell the Property to Himself?

Normally, a POA holder cannot sell the property to themselves. It involves conflict of interest and breach of duty.  The agent should work under the principles of very good faith, care, loyalty, and obedience. They should not put themselves in a position to do self-dealing transactions.

But this is not impossible. For example, the principal has expressly consented to the transfer in the POA agreement. Or the transfer is in the principal’s best interest and with the court’s permission. In such instances, the agent must ensure that the sale is reasonably priced and that the principal’s preference is well protected.

Key Considerations before selling the proper to himself

Key Considerations before selling

1) There is an inherent conflict of interest in selling a property to oneself. The situation can cast aspersions on the ability of the agent to act in the best interest of his principal, as enjoined by his Fiduciary Duty.

2) The Power of Attorney document must explicitly grant the power to the agent to sell property to themselves. Where this power is lacking, clearly denoted, the transaction could be void or voidable upon court challenge.

3) The agent owes a duty of full disclosure of all of the terms of the transaction to the principal. This places an affirmative duty upon the agent to provide a fair market value appraisal and to justify the consideration proposed to be accepted in the sale.

4) The property needs to be sold at its fair market value to prevent any self-dealing allegations. An independent appraisal should be obtained so that the worth of the property is clearly established and a fair price is received for the principal.

5) It is in the best interest of every agent to seek legal advice before selling. This will ensure conformance with all legal requirements and may also alert one to potential problems or conflicts of interest which may arise during the course of the transaction.

6) In case the principal is competent, his express approval regarding the transaction is mandatory. Such consent must be recorded as a safeguard for both parties and to avoid any ambiguity concerning proof of the principal’s consent.

7) There may be instances where judicial oversight is required to sanction the transaction. This may go a long way in protecting the rights of the principal and ensuring that it is properly carried out in a fair and lawful manner.

8) The agent is responsible for compliance with local laws and regulations governing the sale of property under a Power of Attorney, with due regard to proper documentation, notarization, and registration of the sale deed.

By taking into account the above-mentioned fundamentals, the agent will be able to negotiate all issues on sale of property to oneself while maintaining their fiduciary duties and avoiding probable legal complications.

Conclusion

In conclusion, a POA holder possesses certain powers or authority, like selling the principal’s property, which he must utilize appropriately and in the interest of the principal. 

If one has questions or concerns about the agent’s authority or actions, the best course of action is to seek legal advice.

FAQs

1. What are the rights of power of attorney in property?


A Power of Attorney (POA) grants an agent the legal authority to act on behalf of the principal in property matters. The specific rights and powers conferred can vary depending on the type and scope of the POA document. 

2. What if the POA doesn’t mention selling property?


If the Power of Attorney (POA) document does not mention the authority to sell property, the agent does not have the legal right to sell it. The agent’s powers are limited to what is specifically stated in the POA. For any property sale to be valid, the POA must clearly grant this authority.

3. How can I ensure my agent can sell my property with the POA?


In order to allow your agent to sell your property, you should recommend that in your POA document you state that it gives your agent authority to sell your property. This detail should be provided in the clause to ensure that there is a clear indication that the agent is allowed to sell the property; with some restrictions if any.

Home Loan on Power of Attorney

0
Home Loan on Power of Attorney

Getting a home loan takes time and involves dealing with legal papers like a Power of Attorney (POA). This will show how to get a home loan with a POA and what papers you need. It will also talk about the legal steps for selling a home.

Documentation Required for Obtaining a Home Loan on POA

A Power of Attorney (POA): It grants powers to an individual to fulfill the obligations of the borrower.

Identity Proof: It includes a passport, driver’s license, and voter ID.

Address Proof: It could be any letter or document that proves the borrower lives at the given address. For example, a utility bill, lease, or bank statement.

Income Proof: The proof must show that the borrower has regular income. This will enable him to repay the loan. It can include pay slips, tax returns, and bank statements.

Property Documents: Other relevant papers will likely relate to the Attorney’s property. They include the title deed, property registration certificate, and property tax receipts.

Procedure for Obtaining a Loan with POA

Obtaining a home loan using a power of attorney has a specific procedure.

1. Application Submission:

One of the loan application’s documents is the borrower’s power of attorney.

2. Verification:

Once you submit the application and documents, your lender will review them.

3. Appraisal:

The lender figures out how much the property is worth so they can use it as a promise for a loan.

4. Loan Approval:

After loan verification, your lender will approve your loan request.

5. Loan Disbursement:

After loan approval, the lender will disburse the loan amount into your bank account.

Legal Compliance and Regulations

Legal Compliance and Regulations

Valid Documentation:

  • Make sure to register and notarize the Power of Attorney.
  • The Power of Attorney clearly delegates home loan acquisition and management authority.

Legal Capacity:

  • Confirm that the principal (the person granting the PoA) has the legal capacity to execute a PoA.
  • Verify the agent’s legal capacity to represent the principal’s interests.

Jurisdictional Requirements:

  • Follow local and national laws about Power of Attorney and home loans.
  • Check if some places require more documents for powers of attorney. These powers of attorney are for financial transactions.

Bank Policies:

  • Verify that the lending institution recognises and accepts PoA for home loans.
  • Follow the bank’s protocol for submitting and validating PoA documents.

Risk Mitigation and Due Diligence

Verification of Authority:

  • Thoroughly verify the authenticity and scope of the PoA.
  • Ensure the PoA is not revoked or expired.

Identity Verification:

  • Confirm the identities of both the principal and the agent.
  • Conduct background checks if necessary.

Clear Communication:

  • Maintain clear and documented communication with the principal and agent.
  • Ensure both parties are aware of their responsibilities and the terms of the loan.

Legal Review:

  • Having the Power of Attorney (PoA) and related documents reviewed by a lawyer is crucial. This ensures that everything follows the law and best practices. It brings peace of mind and prevents future problems.

Financial Assessment:

  • When you want to borrow money for a house using Power of Attorney, check if the borrower and the helper can pay it back. This way, you can make sure the loan is taken care of and paid easily.

Loan Repayment and Obligations

Loan Repayment and Obligations

Repayment Terms:

  • Specify repayment terms, rates, and consequences of missed deadlines.
  • Make sure the agent understands the repayment terms. They will agree to them on behalf of the principal.

Monitoring Payments:

  • Track loan repayments closely to guarantee on-schedule payments.
  • Establish automated payment reminders or systems to avoid defaults.

Communication of Obligations:

  • Make sure the principal and agent know the loan obligations. They should also know the consequences of not following them.
  • Provide detailed documentation outlining the repayment obligations and any associated penalties.

Account Management:

  • Maintain accurate records of all payments made towards the loan.
  • Provide regular account statements to both the principal and the agent.

Legal Considerations and Precautions

  • When obtaining a home loan with a POA, it’s crucial to consider the legal implications. You must take necessary precautions.
  • Make the POA a formal, enforceable contract. It also must comply with the laws of the state in which the property is situated.
  • Verify the borrower’s identity. The lender has to prove the borrower’s identity so the loan goes to the right person.
  • Conduct thorough checks. These require the lender to do credit checks on the borrower. 

Alternatives for Obtaining a Loan

If a borrower is unable to get a loan using a POA, there are alternative options available:

  • The borrower can get a joint mortgage with another person. This can be a co-applicant or co-borrower.
  • A borrower can pledge the security of a guarantor. The guarantor handles repaying the borrowed amount if the borrower fails to do so.

Conclusion:

Thus, after following this guide, clients will be aware of the POA process to obtain a home loan. They can then complete the transaction successfully. It is crucial to ensure the POA is valid and follows the law. This is to avoid breaking the law. It also includes checks on the borrower’s credit, income, and property documents.

FAQs

What is a Power of Attorney (POA) in the context of obtaining a loan?


A Power of Attorney (POA) allows someone to act on your behalf in loan matters if you’re unable to. It grants legal authority to make decisions and sign documents.

Can a loan be obtained solely based on a Power of Attorney?


To get the loan, the borrower must provide the right documents. They must also meet the loan’s requirements.

Difference Between M Sand And River Sand

0
M sand vs river sand

M Sand is the new sand that has been replacing traditional river sand in recent times. M Sand and river sand have distinct benefits and can be used interchangeably most of the time.

M Sand is the abbreviated term for “Manufacture Sand” and is a commonly employed sand variety in construction. It is considered to be one of the best alternatives for river sand. 

River sand, on the other hand, is a naturally available resource and a suitable sand variety for construction. However, due to its rapid depletion due to uncontrolled exploitation, alternative sand varieties, such as M Sand, have been sought after.

Difference Between M Sand and River Sand

The differences between M Sand and river sand are important to understand so that appropriate sand can be selected for the intended application in construction. 

Some of the key differences between M Sand and river sand are given in the following table.

M SandRiver Sand
OriginArtificially created by breaking down rocks, granite, or limestone into smaller particles.Naturally occurring sand originated from the erosion of rocks by water currents of the rivers.
ShapeAngular shaped.Round shaped.
TextureAngular and roughSmooth textured.
SizeParticle size ranges between 0 and 4.75 mm.Particle size generally ranges between 0 and 4.75 mm and can vary depending on the river source.
StrengthDue to its angular shape and consistent grading of particle size, it helps make stronger concrete mixes.The strength of river sand depends upon its source. Well-graded river sand can help make stronger concrete mixes.
ImpuritiesDo not contain many impurities like clay or dirt.It contains impurities like clay, silt, and other matters that must be washed and screened before usage.
WorkabilityThe angular shape of the sand would require more water dilution to form good concrete mixes. The particles’ rounded shape enables good workability in concrete mixes.
ApplicationsM Sand, or Manufactured Sand, is used in concrete production due to its consistent size and shape, enhancing strength and durability. It is ideal for constructing load-bearing structures like beams, columns, and slabs, and is also used in bricklaying and block making. M Sand is preferred in road construction and other civil projects for its stability and sustainability.River Sand is traditionally used for plastering and finishing walls, providing a smooth surface due to its fine texture. It is also used in brick and block laying for its excellent binding properties. Additionally, River Sand is favored in concrete production for high workability and smooth finishes, though its overuse raises environmental concerns.
CostM sand cost-effective option than river sand.Traditionally cost-effective. But has been growing costlier due to restrictions on procuring of river sand.
Environmental ImpactA sustainable alternative to river sand as it does not include extraction from riverbeds.Exploitation of river sand can hurt river ecosystems.

Pros and Cons of M Sand

M Sand has advantages and disadvantages, although it is preferred as an appropriate alternative to river sand.

M sand

Pros of M Sand

The primary advantages of M Sand are its sustainability aspect and extensive availability compared to river sand. Its fine grading, strength, and durability make it highly workable with mortar and concrete mixtures.

Cons of M Sand

M Sand is not applicable in plastering functions. The angular shape of the M Sand particles demands high water for mixing. The availability of M Sand in all places, alongside its cost-effectiveness, is also doubtful.

Pros and Cons of River Sand

river sand

Pros of River Sand

The pros of river sand include its natural and ready availability. It is preferred widely over other varieties of sand due to its high workability. Its rounded sand particles make it easy to mix with water and apply the required purposes.

Cons of River Sand

River sand is becoming increasingly inaccessible and costly due to stricter rules and regulations for procuring it. 

The quality and strength of the river sand particles are also inconsistent due to the varying river sources.

Conclusion

M Sand and River Sand have distinct differences in their origin and properties. M Sand, made by crushing granite, has an angular and rough texture, making it ideal for strong concrete and structural applications. It supports sustainable construction by reducing the need for natural river sand. 

River Sand, with its smooth and rounded texture, is best for plastering and finishing but its overuse harms the environment. Understanding these differences ensures you choose the right sand for your construction needs, balancing quality and sustainability.

Always compare the pros and cons of M Sand and river sand and choose the right fit for you!

FAQs

Can we mix river sand and M Sand?


You can technically mix and use river sand and M Sand. However, they may pose threats, such as inconsistent quality and workability issues.

What is the difference between river sand and building sand?


River sand is naturally occurring sand with smooth, rounded particles, ideal for plastering and finishing. Building sand, often M Sand, is manufactured by crushing stones, resulting in angular, rough particles, perfect for strong concrete and structural uses.

Difference Between M Sand and P Sand 

0
p and m feature image

In the construction industry, the quality and type of sand used play a crucial role in determining the strength and durability of the structure. Two commonly used sands are M Sand (Manufactured Sand) and P Sand (Plastering Sand). Both these sands are produced using advanced technology to ensure consistency and quality, but they serve different purposes and have distinct characteristics.

M Sand, or Manufactured Sand, is produced by crushing hard granite stones in a controlled environment using advanced machinery to achieve the desired shape and size. It is primarily used as a substitute for river sand in concrete and construction applications due to its superior strength and durability.

On the other hand, P Sand, or Plastering Sand, is specifically processed to meet the stringent requirements of plastering applications. It is finer and smoother than M Sand, making it ideal for creating a smooth and even finish on walls and ceilings. The production of P Sand involves additional screening and washing processes to remove impurities and achieve the required fineness.

What is M Sand?

M Sand stands for Manufactured Sand. As the name implies, M Sand is an artificially developed material. It is produced by crushing big boulders or stones into tiny particles. The small particles are washed, ground into powders, and graded based on size.

M sand is a popular alternative to the scarce and costly river sand. M Sand Price in various locations It is widely used in mortar and concrete mixtures

The density of M Sand falls between the range of 1,750 to 1,850 kg/m³. The specific gravity of M Sand will depend on the source of the boulder or rock from which it was derived. However, generally, the particular gravity of M Sand is between 2.5 and 2.9.

What is P Sand?

P Sand

P sand stands for Plastering Manufactured Sand or simply Plastering Sand. It is also referred to as crushed sand or manufactured fine aggregate. P Sand’s primary purpose is to serve in construction activities, particularly in rendering, masonry, and plastering processes. It is specifically engineered to provide optimal consistency and fineness, ensuring superior bonding and a smooth finish in these applications.

P sand is often appreciated for its fine and smooth texture, which enables a smooth finish on building surfaces.

P Sand is often confused with river sand. However, P Sand is not just regular river sand; it is made by refining river sand through a detailed process. The river sand is thoroughly screened and washed to make P Sand, which is perfect for plastering because it is clean and has a smooth consistency.

The density of P Sand ranges between 1,440 to 1,710 kg/m³. Its specific gravity is typically around 2.63 to 2.6.

Difference Between M Sand and P Sand 

M Sand and P Sand have unique characteristics and usefulness. The following table gives insight into the differences between M Sand and P Sand:

M SANDP SAND
OriginIt is artificially created by crushing bigger rocks or granite in smaller particles.P Sand is refined river sand, processed through thorough screening and washing, ideal for plastering.
AvailabilityAvailable extensively and is in high demand.Has a higher demand and is highly available
Particle ShapeIt feels coarser and looks more angular in shape.It feels finer and has a more rounded shape.
Particle SizeParticle size ranges between 0 to 4.75 mm.Particle size ranges between 0 to 2.36 mm.
ApplicationsIt is used as a substitute for river sand in concrete and construction applications due to its strength and durability. It is commonly used in the production of concrete, mortar, and for laying bricks and blocks, making it ideal for structural and load-bearing projects.It is primarily used for plastering walls and ceilings due to its fine and smooth texture, which ensures a neat and even finish. It is also suitable for rendering and masonry works, providing a clean and consistent surface.
ConsistencyIt has a variable consistency due to its wider particle size range.It has a higher definite consistency than M Sand due to its finer particle size.
PropertiesHas stronger interlocking properties.Has higher adhesive properties.
DurabilityDurable for concrete applications.Durable for plastering.
DensityBetween the range of 1,750 to 1,850 kg/m³.Between the range of 1,440 to 1,710 kg/m³.
Specific GravityBetween 2.5 and 2.9.Between 2.63 to 2.6.
Cost of AcquisitionMore cost-effective than P Sand. Costs around ₹1400 – ₹1800 per cubic meter (approx.).It is costlier than M Sand. Costs ₹1500 – ₹2200 per cubic meter (approx.).

Conclusion

Understanding the difference between M Sand and P Sand is crucial for selecting the right material for your construction needs. M Sand, with its robust strength and durability, is ideal for structural applications such as concrete production and bricklaying. similarly M sand and river sand have major key differences

On the other hand, P Sand, with its fine and smooth texture, is perfect for plastering and masonry work, ensuring a flawless and even finish. By choosing the appropriate type of sand for each specific application, you can ensure the quality, durability, and aesthetic appeal of your construction projects.

Follow the contractor’s or engineer’s instructions and choose the right sand kind for your construction projects.

FAQs

Is M Sand good for plastering?


No, M Sand is not considered good for plastering. Its coarse texture and angular shape prevent it from providing good adhesion properties. Thus, M Sand will not be able to offer the smooth finish typically expected of a good plastering sand material.

How do I check the quality of M sand?


M Sand’s quality can be checked via visual inspection or laboratory analysis. If you cannot do laboratory analyses like sieve analysis, fineness modulus, or strength tests, you can use visual inspection techniques on-site. Some visual methods include examining the color, texture, and presence of dirt in the sand. If the color is grey or off-white, the texture is rough and angular, and there is not much dirt in the sand, it can qualify as a good quality M Sand.