Home Blog Page 53

Cool Roof Tiles: Meaning and Benefits

0
Cool Roof Tiles

You might be very familiar with the term tiles and roof tiles. Roof tiles have been used in construction for centuries. They act as a barrier between the harsh environment and the interior structure of a building  Traditionally, roofing tiles are made from materials like clay, slate, plastic, terracotta and concrete, that are available easily However, if you wish to protect yourself and beat the heat inside your home, then, cool roof tiles are a good option available in the market. In this article, let’s explore the features and advantages of cool roofing tiles. Keep reading!

What are Cool Roof Tiles?

Cool Roof Tiles

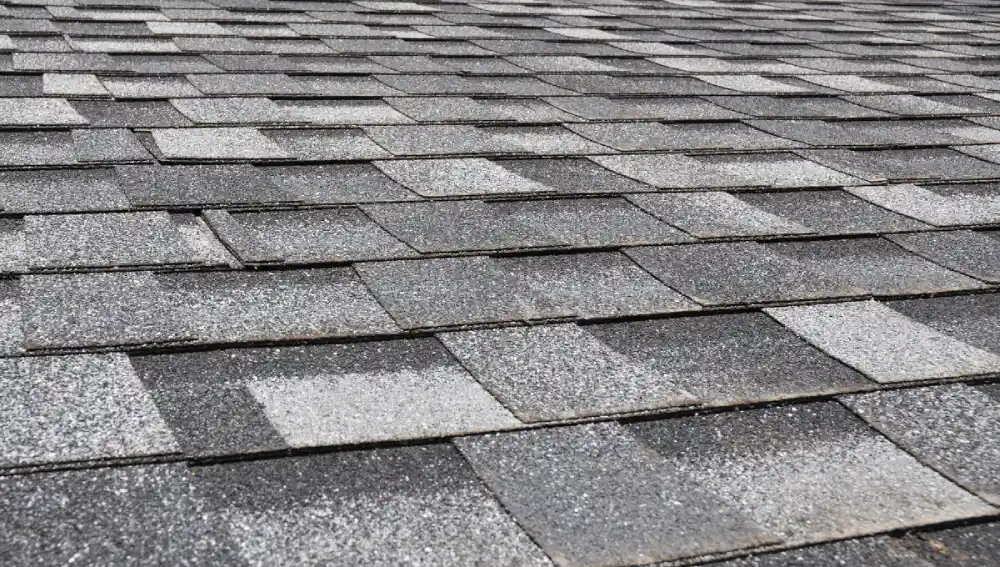
 As the name suggests, cool roof tiles are designed specifically to reflect the sun’s warm rays and prevent heat. It is a perfect choice for anyone who wishes to bring down the temperature in their residential or business premises. Cool roof tiles do an excellent and simple service just by reflecting sunlight, absorbing less solar energy, and thus helping to keep our home cooler even in the summer. It is an innovative solution designed for more energy efficiency compared to materials used in traditional roofing methods. It is mainly recommended for balconies, terraces, open flooring spaces and, outdoor which experience excess heat.      No matter where you live, whether in a tropical climate or a dry region, cool roof tiles  can lower carbon footprints and bring down energy bills. These roofing tiles are made from long-lasting ceramic materials that are tough and durable. 

Benefits of Cool Roof Tiles.

Benefits of Cool Roof Tiles

There are multiple benefits offered by cool roof tiles, such as: 

  • Reduced Energy Bills: The major contribution by cool tiles is reflecting the harmful and heated UV rays, thus providing a cool, comfortable and desired indoor environment. It maintains a pleasant temperature and reduces or eliminates the need for air conditioners and fans, lowering your electricity bills by up to 50% even in summer.
  • Increased Comfort: With the aid of a cool roof, the intense heat in interior spaces such as, attics and living rooms will be lower. This helps in creating more thermally comfortable spaces, which can improve mental health. 
  • Lower Environmental Impact: Cool roof tiles play a vital role in lowering the environmental impact by reducing dependency on cooling devices.They are also environment friendly and can withstand harsh climatic conditions.
  • Extended Roof Lifespan: High quality cool roof tiless are very strong and long-lasting. They can live up to 50 years.
  • Fire Safety: The most important quality of cool roof tiles is that they  guarantees fire safety. Unlike conventional tiles, they are generally made of  materials  which are naturally fire resistant.  
  • UV Protection and Moisture resistance: Cool roof tiles can protect you from extremely hot and harmful UV rays as they have a  reflecting coating. They  can also resist heavy moisture during the monsoon . 

These tiles are designed with a special enamel process with compounds that do not allow the heat to get inside the room. Due to this advantage, the buildings remain cool and comfortable. 

Ordinary Tiles Vs Cool Roof Tiles.

There are some unique and visible differences  between normal and cool roof tiles, such as: 

 Features  Ordinary Tiles Cool Roof Tiles.
DurabilityThough it hasis low water absorption, it needs an extra layer of glazinge during humid climates for better durabilityIt has low water absorption. It is designed in a way that it can sustain any climatic condition.
Reflective PropertyIt has a low reflective index.It is known for its high reflective energy. It can reflect solar or harmful UV rays and radiate heat.
AdvantagesIt has lower abrasion, scratch, and stain resistance.It has high resistance to scratches, abrasion and stain .
AffordabilityIt is affordableComparatively, it is costlier than normal tiles.

Conclusion.

Cool roof tiles are positively recommended for rooftops and terraces. Since they have both quality tiles to reflect heat during summer and to prevent  moisture during the rainy season, it is ideal for outdoor usage. They aid with  energy savings and help create thermally comfortable spaces . There are a variety of styles, shapes ,colors and designs available in cool roof tiles, which enable versatility and customisation.  

FAQ:

1. How do Cool Roof Tiles Work?

Cool roof tiles do an excellent and simple service just by reflecting sunlight, absorbing less solar energy and thus helping to keep our home cooler even in the summer.

2. What are some additional benefits that cool roof tiles offer?

No matter where you live either in a tropical climate or a dry region, it can lessen carbon footprint and bring down energy bills. These roofing tiles are made from long-lastingmaterials that are tough and durable.They can also resist moisture. 

3. Where can cool roof tiles be installed?

Cool roof tiles are ideal for both internal and external spaces  It is mainly suitable for terraces, balconies, courtyards, external facades and outdoor areas which face excess heat.

A Comprehensive Guide to Acrylic Wall Putty 

0
Acrylic Wall Putty

Want a damage-free wall surface? Then, acrylic wall putty is your best choice. An acrylic wall putty is an alkali-resistant undercoat that protects your walls from cracks and other damages. 

You can opt for this method for newly constructed homes to prevent damages in the future or to cover up an existing damage. Acrylic putty is a valuable material in construction. 

In this article, we will look in detail at acrylic wall putty, including its features, benefits,  and methods of usage

What is Acrylic Putty?

Acrylic Wall Putty

Acrylic wall putty is an alkali-resistant, water-based undercoat made with special acrylic binders. It has a peanut butter like consistency that seems white in colour. It helps cover up cracks or holes in walls and also acts as an undercoat before painting surfaces like walls and ceilings 

Acrylic putty can smooth out any dents or cracks in the wall surface. Painting the wall after this process can give a rich, and flawless look. This method is time-saving and can extend the life of the paint coat, providing a new look to your home even after several years. 

It can be used in both interior and exterior walls; you can particularly use it on wooden surfaces, concrete, plastered walls, asbestos, etc. This putty also helps repair broken tiles or wallpapers. 

Features of acrylic putty

  • Alkali-resistant: It prevents the wall surface from significant damage, like fading. It extends the life of your paint and gives a neat finish. 
  • Water-based: This acrylic putty is completely water-based and eco-friendly. Its low odour property makes it an ideal choice compared to solvent-based solutions. 
  • Gives a smooth white finish: One of the main features of acrylic putty is filling up the cracks or holes in walls easily. This leaves behind a smooth white finish that you can later paint upon, erasing the trace that there was even a crack before. 
  • Durable: Acrylic putty is strong and durable. It can last long and give your walls a smooth and sleek finish for several years. 
  • Dries quickly: Acrylic putty dries more quickly than other types of putty. It also has good adhesion and binds well with the wall soon after application.

How to use acrylic putty for your walls

use acrylic putty for your walls

Acrylic putty is easy to apply and can be applied using some simple techniques.

Prepare the surface

Before applying putty, ensure that the wall surfaces are uniform. Clean the wall and keep it free from dust or dirt. Ensure the wall is dry and smooth before applying the putty. You can also lightly sand the wall for better adhesion.

Get the tools ready

Go through the tools you might need to apply putty and get them ready. This might include a putty knife or a spatula. The size of these tools can be selected based on the application area. You can also get clean mixing tools if necessary.

Apply the putty

Use a putty knife to evenly spread the putty over the wall or any other surface. Ensure covering the entire wall without any cracks or holes. Use a broader putty knife to level the surface for a smoother look. Tricky corners might require spot knives or other such tools for coverage. 

Let it dry

Give the putty adequate time to dry before starting the next step. Acrylic putty dries quickly, generally within a couple of hours.

Sand the surface

Make sure to sand the surface after applying the putty. This can remove any excess putty from the surface. Use  sandpaper to smoothen the wall. 

Apply primer

Apply primer to seal the putty into your wall. The primer will also be a good base for your paint, providing enhanced adhesion and a white base coat to ensure accuracy of paint colours. 

Paint the surface 

After the process is complete, you will get a smooth and sleek surface. You can check if the surface is dry and start painting the wall to your liking. Generally, atleast two coats of paint are required to ensure full coverage and uniformity.  

Benefits of using acrylic putty for your walls

  • Superior quality: Acrylic putty is of a higher quality than other types of putty. It gives a flawless look to your paint and enhances overall appearance. 
  • Non-toxic: Acrylic putty is non-toxic, making it safe to be used in homes where there are children or pets.
  • Cost-effective: Though acrylic putty can be somewhat expensive, it is of high quality. This considerably reduces the number of coats of paint you need to apply to get the desired result. This can reduce your overall costs. 
  • Fast working time: It takes less time to set, so you can move forward to the next step quickly.
  • Long life: Acrylic putty has a long shelf life and resists cracks or shrinks. It also protects the paint and prevents it from peeling off and fading. 

Conclusion

Acrylic putty is an excellent material that helps to fill up cracks and other damages. Its thick, buttery consistency makes it easier to fill up the damage and make it look as if it was never there. Acrylic putty has more features than normal wall putty, Its superior quality and durability make it a material that is commonly used in construction and renovation projects. 

Ensure you buy high-quality acrylic putty for your homes. You can consult a professional if you need help buying it. 

FAQs

1. Will acrylic putty be outdoor-friendly?

Yes, acrylic putty can be used both indoors and outdoors. Use it to cover up any cracks or dents in the surface. You can paint the surface later to make it look fresh and new. 

2. Does acrylic putty crack?

Acrylic putty is highly durable and long-lasting. It helps prevent the walls from cracks and other damages.

3. How long will it take to dry?

It generally takes around 20–30 minutes to dry completely. Then you can apply primer and paint over the surface.

Types Of Compound Walls to Highlight Your Home’s Front Elevation

0
Types Of Compound Walls (1)

The main aspect that protects a property from external sources is the compound wall encircling it. Whether to mark your boundary or to prevent outsiders from entering your premises, a compound wall can help you with numerous things. 

This does not mean it should be strong, sturdy, and bland without any design. You can choose from multiple designs to decorate your compound wall. These ideas ensure security and are also visually appealing. Let’s look at some common types of compound walls in this article. 

What Is A Compound Wall?

What Is A Compound Wall

A compound wall encircles a building or property. It ensures privacy and protection against external sources. It prevents trespassers from entering your property. You can build a wall to secure your premises in several ways. They can be high or low and made with brick or other materials. 

There are infinite possibilities in how you can construct your compound wall. Every aspect of your home, including your compound wall, reflects your taste. So, ensure you get the best out of them. 

Types Of Compound Walls Based On Materials

You can use many sturdy and durable materials to make strong compound walls. You can use bricks, concrete, stones, wood, etc. Let’s look at some types of compound walls based on materials. 

Brick Compound Walls

Brick compound walls are a popular choice for their classy appeal. These walls are durable and able to withstand harsh weather conditions. Brick walls are not very expensive and do not need very regular maintenance. 

Stone Compound Walls

Stone compound walls are usually built using stones like granite, sandstone, or limestone. They are known for their longevity and aesthetic appeal. Stone walls can be left exposed without any plastering, to obtain a rustic or vernacular look for your house.

Wood Fencing

Wooden fences are often preferred by people who wish for a natural and affordable option for their compound wall. They are popular for their variety of colors and finishing options. However, wood fencing or walls need regular maintenance to prevent issues like rot and insect infestations. 

Concrete Compound Walls

Concrete compound walls are a good choice for a low-maintenance, durable, and affordable compound wall. They also cancel noise and can protect you against wind, noise, and intruders. Concrete walls can be plastered and painted or left exposed to obtain a raw finish.

Bamboo Compound Walls

Bamboo compound walls are made from bamboo poles. They are unique and eco-friendly. They are easy to install. However, they may not be able to withstand harsh weather conditions.

Metal Fencing

Metal fencing is good for properties that require high security. It can be built using metals like aluminum, wrought iron, and steel. They are sturdy and can be customized to suit your needs and preferences. However, they require regular maintenance, such as painting or polishing, without which they are vulnerable to rusting.

Vertical Garden Walls

Vertical garden is another eco-friendly option that can add a touch of nature to your compound walls. This involves planting climbers and letting them grow on your compound walls. 

Using flowering plants can add color to your garden wall and enhance its beauty. They can also provide shade, improve air quality, and regulate temperature. Consider factors like sun exposure, water requirements, and the look you desire while choosing plants for your vertical garden walls.

Jaali Compound Walls

A jaali compound wall is made of perforated stone or latticed screen. Jaalis can be made with blocks of terracotta or concrete, or even be sheets or screens with laser cut patterns. The walls have patterns like calligraphy, natural, or geometric patterns. The perforations in the wall allow natural air and sunlight to pass through. It also protects the property from outsiders. 

Gabion Mesh

Why go for regular compound walls when you can install a unique and interesting compound wall? A gabion mesh compound wall involves using strong wire mesh cages that are filled with stones and other gravel materials as your wall. 

This compound wall idea is a versatile option that is best suited for multiple terrains like slopes, waterfronts, and uneven grounds. They are generally permeable and allow water to seep through, which can help in directing water into the ground or soil part of gardens behind the wall.

Composite Compound Wall

A composite compound wall is a unique type of wall consisting of two or more materials joined together. Such walls may be made with a combination of materials like wood, plastic, brick, stone, concrete, etc. 

These walls give privacy and protection while combining the best features of different materials. 

Types Of Compound Walls Based On Finishing

Types Of Compound Walls Based On Finishing

Your compound wall is the first thing that outsiders see on your property. So, a neat finish is important. Let’s look at some kinds of finishing available for compound walls.

Plastered And Painted

Plastered and painted compound walls are a go-to option if you want a neat and smooth-finish compound wall. It is versatile and the plaster and paint can add several benefits for your wall structure. You can customize colors and patterns to your liking. 

Exposed Materials 

Constructing compound walls with exposed materials like wood, stone, brick, etc., is a good way to expose the natural beauty of the materials and bring about a rustic charm to your walls. It can add to your property’s beauty and become its primary focus point. 

Incorporate Lighting

Incorporating lighting into your compound wall is a great way to enhance your walls’ overall appearance, especially at night. It also helps mark out your boundaries and protects against intruders.  You can customize your lighting colors and designs to add more charm to your walls. 

Conclusion 

The above types of compound walls are some simple compound wall designs most people choose. You can choose any of these walls and further enhance its appearance with various materials. 

You can get in touch with a professional for more clarity. Whatever wall design you choose, ensure it can provide you with the highest security for you and your loved ones, while also matching with and enhancing the overall aesthetics of your house. 

FAQs 

1. What are some common materials used to construct a compound wall?

There are several materials you can use to construct a compound wall. Some common materials used are

Stones,
Bricks,
Concrete blocks,
Metal,
Precast concrete,
Wood. 

2. What is a masonry compound wall typically made of?

A masonry compound wall can be built using 

1) Bricks
2) Stone
3) Concrete blocks

3. What is the average compound wall height?

An average compound wall will be around 4 to 6 feet in height. The height can vary based on your personal preference and construction requirements.

Paint Peeling from Walls: Causes, Symptoms and Solutions

0
Paint Peeling from Walls

Paint does not last forever. It is common to see paint fall from doors, fences, decks, walls, etc. There are various reasons behind the peeling of paint. Multiple factors, such as moisture content, poor surface preparation, and incompatible paint types, can cause damage. But there are also some quick solutions to fix this issue 

Understanding its causes, effects, and solutions is essential for maintaining walls and other painted surfaces. Its underlying problems need necessary attention and should be addressed. Paint has the primary purpose of serving protection from. moisture, UV rays, and temperature fluctuation, while enhancing aesthetics.. It is therefore vital to know how to maintain this finish, read on to learn about it.

Causes of Peeling Paint 

Causes of Peeling Paint 

1. Moisture content 

High humidity can lead to excess moisture content. This results in the paint losing adhesive. Water makes its way between the paint and the wall; paint loses strength. It cracks, swells, and then eventually falls off. This is common in bathrooms and other wet areas.

Solution: Use the humidifier and exhaust fan to reduce humidity. This will improve ventilation and control moisture.

2. Poor Surface Preparation 

It is important to clean and sand the plastered surface properly before painting. Dust and impurities can peel paint as they result in a loss of adhesion between the wall surface and the paint. 

Solution: Ensure that plastered surfaces are smoothened and cleaned well before the painting process begins.

3. Inadequate Priming 

It is essential to follow the primer process. Using an effective and quality primer is necessary for the walls. When the primer is incorrectly or inadequately applied, under surfaces can be left exposed, leading to improper adhesion of paint. 

Solution: Remove loose paint using a scraper or wire brush. Apply primer properly before repainting.

4. Low-quality paint 

Using paint that lacks adhesion properties reduces durability.

Solution: Use well-known paint brands rather than local ones, to ensure good quality and durability. 

5. Temperature Extremes 

Very cold or hot temperatures can have an impact on the paint. Extreme heat can cause bubbles in the paint surface and lead to peeling.

Solution: avoid painting when the temperature is extreme. Never paint when the surface is wet. Always protect the paint from rain, direct sunlight, and wind.

6. Excessive sunlight 

UV rays can break the surface of the paint and create cracks that can develop into peeling surfaces. 

Solution: use high-quality and water-repellent paint for outdoor surfaces.

7. Water Leaks 

Any leakage during plumbing or from pipes can cause moisture to accumulate and thus lead to peeling. 

Solution: Apply a sealant to seal any crack in the roof or walls. Some waterproofing paints are formulated with waterproofing isomers and repellents. This can prevent water leakage and improve the lifespan of the paint.

8. Dirt and Grease 

Painting over dirt and grease will lead to peeling of the paint. A clean surface is required before starting the process of painting any surface. 

Solution: soap and hot water can be used to clean the grease that appears on the wall. 

9. Improper curing 

Curing is a process that takes place during the setting of concrete elements . When this curing is not done properly before painting, peeling occurs due to cracks developed in the undersurface of concrete.

Solution: Attention and expert supervision is required during the curing process.

10. Chemical exposure 

The walls, when exposed to any harsh chemicals such as acids or alkali solutions, can create a breakdown of paint. 

Solution: never use harsh chemicals like strong cleaning agents near the walls. Always try any chemical substance in a small area before using it on the whole wall. 

11. Mechanical damage 

Physical impacts caused by huge machines or abrasions can damage the wall, affecting the paint and causing it to peel. 

Symptoms of Paint Peeling 

Symptoms of Paint Peeling 

There are many physical indicators of peeling paint. 

  • Small to large cracks may appear on the painted surface,primarily due to structural movement or environmental factors. Immediate crack repair and high-quality paint should be used to avoid cracks. 
  • Bubbles forming can make the paint break. This causes peeling due to moisture traps or painting over a dirty surface. Fix moisture issues or paint in suitable conditions.
  • Paint flakes falling off the wall are primarily due to low-quality paint. Sometimes old paint or poor addition can also be a reason. Immediately remove the loose paint and sand the surface. Use high-quality paint as an overlay to cover the surface.
  • Chalking is a powdery residue on the paint surface that can result in paint peeling. It is mainly due to UV exposure, which causes degradation. Ensure a clean surface and apply a sealer before painting. 
  • Paint color changes due to moisture. When water leaks, humidity, or chemical reactions happen, it results in discoloration. The use of moisture-resistant paint is crucial. 
  • Cracks like alligator skin can appear before the paint peels. Using hard coat paint can cause alligatoring. It can also be due to incompatible paint. 
  • Paint peeling inof thin layers can be due to poor surface preparation. It is also called scaling. 
  • Paint surfaces appear as wrinkles. Application of paint in very thin layers can cause wrinkling. 
  • Paint sagging or dropping down the wall occurs  because of high humidity or too much paint coating. Applying paint with the right ratio is essential.
  • White powdery deposits called efflorescence occur due to salt deposits. Moisture on the walls creates salt deposits, which cause paint to crack and peel off. 
  • Black or green spots on the walls indicate mold growth. It is due to poor ventilation, high humidity, and moisture content on the wall. Improving ventilation and using high-quality paint can prevent this

Prevention and Protection 

A few tips to follow to prevent peeling of paint and protect painted surfaces are:

  • Identifying the cause of the paint peeling is essential. Check if the issue is related to moisture ventilation or any leakage and fix this. 
  • Lightly sand the plastered wall surface to create a rough texture that can help paint.
  • Proper filler selection that is compatible with the paint helps to ensure a uniform finish. 
  • Apply an undercoat of paint, especially on surfaces that have high porosity.
  • Provide adequate drying time for the paint. 
  • Apply a protective overcoat of paint for the exterior. This acts as an exterior protection and a shield against harsh weather conditions. 

Tools used for removing the peels

  • A blade or a puffy knife can be used to remove the peeling paint by scraping. 
  • Loose paint or debris can be removed from the wall using a wire brush. 
  • Paint scrapers are an effective tool for removing peeling paint. It is applicable for large areas of the wall. 
  • A  five-in-one tool can be used for various purposes like spreading, scraping, and cleaning. 
  • Fine grip sand paper can provide a smooth surface after scraping to remove the peels.
  • Heat Gun: For removing stubborn paint.
  • Chemical Paint Stripper: For tough areas (use with caution).
  • Electric Sander: For large areas needing sanding.
  • Vacuum Sander: To minimize dust.

Conclusion:

Peeling of paint can disturb the look of the wall. Achieving flawless and long-lasting paint involves more than just simple application. It is a comprehensive approach to follow desired preparation and production. The measures mentioned can help overcome the challenges posed by paint peeling. Preparing the surface before starting the wall painting is essential. Usage of the right tools can fix the issue of peeling. 

Careful selection of material considering the environmental conditions and drying the surface is important while painting. Investing time and high-quality material can make it durable. Regular maintenance and timely inspection can help prevent the wall from peeling paint. With more advanced technology and tools, taking preventive measures can ensure durability. Cleaning the wall, avoiding water and chemical exposure, and proper ventilation can allow the long-term existence of paint.

All You Need to Know About Building Plans

0
Building plans

In our daily lives, we make plans to achieve tasks, goals, and desires in the future without any chaos and confusion. Planning any activities provides a proper structure for our ideas and enables us to execute them seamlessly. It is like connecting dots to get a clear and beautiful picture. Similarly, in construction projects, whether it is a home, an office building, apartment, or any other infrastructure project, we need a proper building plan to complete the construction as we require. Read on to learn about this crucial aspect of building design and construction.

What is a Building Plan?

Building Plans

A building plan is a comprehensive visual representation of a building project that gives an outline of design and layout, including concepts,  technical specifications, and material requirements. It acts as a guideline for completing the project efficiently and effectively.

Types of Building Plans

  • Site plan: A drawing that shows the layout of a property, including its boundaries, dimensions, and surrounding features like roads, trees and nearby buildings. It also includes details about other infrastructure facilities like pipelines, drainage systems, electricity lines, and telephone cables. A site plan ensures the proper placement of a building by analysing all the environmental and physical factors of the surroundings.
  • Floor plan: It is  an illustration of the layout of rooms, placement of doors and windows, heights of thresholds, structure, and shape of rooms to ensure proper distribution of space and safety.
  • Structural plan: The main aim of structural design is to ensure safety and stability of a building. This is considered an important document because it guides construction, including the load-bearing capacity of the building, connection details, dimensions of columns, beams, footings and foundations, staircase position, roof structure, and other structural elements.
  • Landscape plan: Landscape refers to outdoor elements and spaces, a prominent part of which is the vegetation cover. A landscape plan is a colourful, detailed drawing of outdoor areas to convert them into usable, aesthetic spaces by placing lawns, flower beds, walking pathways, parking areas and sculptural elements.
  • Services plan: This includes details of services such as electrical and plumbing layouts. Such plans ensure the functionality and safety of buildings by incorporating sufficient lighting and electricity, fire safety, sanitary fixtures and water supply and drainage layouts.

These plans are created as separate drawings or documents by the experts in their respective fields, including civil engineers, architects, landscape designers and technicians. Each of these plans has a unique focus and different purposes.

Stages of Building Planning:

Stages of Building Planning
  1. Site Analysis: Examining the site regarding its geographical conditions, environmental factors, soil conditions, surrounding structures and underground water system helps in understanding the potential and limitations of the location before working on a plan.
  2. Conceptual development: This involves careful study of the site analysis results to develop conceptual forms and plans for the building. This process helps in obtaining a basic idea of the form and layout of a building. 
  3. Design: This includes the final layout of buildings, along with structural drawings of floors, roofs, elevations, sections, and landscape, and involves selecting materials. It helps in visualising the form and function of a building. It analyses the spaces for various rooms to be used and aims at optimal space distribution, allocating required space for activities, avoiding creating dead spaces and evaluating factors like proper lighting and ventilation. Space planning should accommodate the needs of occupants.
  4. Budgeting and cost estimation: This stage is crucial in determining the viability of construction by analysing financial sources and their allocation for different needs. It should be a realistic estimated budget, including cost factors of materials, transportation, labour charges, and other services specific to the project design. 
  5. Scheduling and timeline: Proper teamwork and coordination among engineers, labourers, and clients pave the way for timely completion of a project. By assigning different tasks to team members, fixing deadlines, and meeting milestones, consistent progress in the work can be achieved, which can reduce the wastage of resources.
  6. Approval of building plan: The building owner or engineer submits a plan to local authorities for building plan approval . The authorities review the plan to see whether it meets the zoning regulations, local building codes, and law. If the building plan meets all the requirements, it will get approval for construction.

How to Create a Building Plan?

Drawing a building plan can be done both manually and using digital softwares. It depends on the personal preferences of clients and engineers. Both methods have their pros and cons. The manual method involves creating a rough drawing using rulers and measuring using tapes. Though it is easy to change a manual plan, it takes time. On the other hand, softwares provide template libraries in a built system of units and grid lines, making the progress efficient and less time-consuming. Some popular softwares for making building plans are Autocad, Sketchup, Revit, Floorplanner and SmartDraw. However, it is recommendable to consult architects to design functional and aesthetic building plans, as this process requires expertise. 

Advantages of Building Plans:

  1. Clear vision: A building plan acts as a backbone for construction work by giving a clear understanding of the project’s scope, objects, and goals.
  2. Increased efficiency: Having a proper plan in hand ensures well-defined construction work without delays and cost overruns.
  3. Cost savings: A detailed plan for allocating financial resources to different sections of the project in the beginning itself reduces the risk of excess costs and other waste.
  4. Enhanced safety: Analysing the topographical conditions of a site and specific project requirements prevents potential hazards and ensures safety for further construction.
  5. Compliance with regulations: Meeting the requirements of law, local codes, and standards ensures the safety of occupants. It avoids legal issues and fines.
  6. Increased property value: A well-planned and well-executed building project can increase property value because it has enhanced appeal, incorporated amenities, energy efficiency, quality measures, and safety features attained through approval status.

Conclusion:

It is clearly evident from preceding explanations that a well-planned building plan acts as a framework for completing the construction project within the allotted time and budget and for ensuring that the structure meets the required standards. It acts as a starting point of a construction project and brings together all the construction elements to ensure successful completion by satisfying the needs of the occupants.

FAQs

1. What is a building plan?

It is a crucial document or drawing that provides an outline or blueprint for the construction of the building.

2. What information is included in a building plan?

It includes designs and layout of floors, details of openings, structural elements and also service connections like water lines, gas lines, electricity lines, and drainage systems.

3. Can I make changes to a building plan after getting approval?

Yes, you can, but only with minor changes. For major changes, you have to get re-approval by resubmitting the plan. It leads to some additional fees, and the changed plan should meet the regulations and codes for getting approval.

Everything You Need to Know About Ready Mix Plaster

0
Ready Mix Plaster

In the field of construction, groundbreaking progress has been made over the years through innovative building materials to refine the structure and the quality of construction. Starting from planning and designing to foundation work and finishing of construction work, we use major advancements to make the construction strong and flawless both internally and externally as we expected.

One such innovation is ready mix plaster. Let’s take a look into the details of plastering which occurs during the final stage of construction work, with more focus on Ready Mix  Plaster, a  type of plaster that is increasingly being used in the industry.

What is Plastering?

Plastering

Plastering is the Method of applying a coat of plaster over rough under surfaces, using a material composed of sand, cement, gypsum, lime, silica or other such materials . It is applied to protect the walls or ceiling surfaces and also for interior decorative purposes. Plaster plays a crucial role in protecting buildings and preventing cracking, by filling gaps, making them resistant to water and weather and also giving a smooth or matte finish.

Ready Mix  Plaster

Ready mix plaster is a ready-to-use pre-mixed mixture of cement, sand, gypsum, lime, and, water-absorbing additives in well-blended proportions. It requires only water for application. This pre-mixed plaster is considered effective because it is easy to use, saves time, and also quickly dries after application.

Features and benefits of ready-mixed plastering

1.  Convenience: As it is pre-blended, it is easy to use for masons by just adding water and making it into a proper mixture.

2.  Faster application: It saves time and also reduces material waste while applying.

3.  Excellent covering: It gives excellent coverage by smoothing the surface as it contains a uniform mixture of key ingredients.

4.  High strength: The composition provides a strong, long-lasting, durable finish. It has the capacity to protect the exterior walls from harsh weather conditions in hot, rainy  and humid conditions.

5.  Durable and crack resistant: Ready mix  plasters consist of , polymers and other  additives which creates a strong bond, thereby minimising cement shrinkage, preventing and controlling fissures and cracks, and producing  durable finishes.

6.   Water resistant: Water absorbing additives in ready mix plaster like synthetic polymers, natural fibres and other starch-based additives helps to absorb water in walls and make them less prone to seepage.

7.  Labour saving: It is easy to mix, reduces physical work and even unskilled laborers can use it effectively. It creates less of a mess and reduces the time of cleaning because of low rebounding losses.

8.  Cost effective and easy maintenance: It only requires minimum labour power, and also it reduces need for frequent maintenance due to its long-lasting durable finish. Small damages, if any occur in the future, can be easily repaired.

9.  Easy cleaning: If anything is spilled on the surface of walls, it is effortless to wipe up due to its smooth surface and also its ability to protect the underlying structure, thereby preventing any penetration.

10. Quality control: Ready mix  plaster is manufactured through careful selection of raw materials and binding of materials using effective techniques. Before marketing, samples are tested for strength, consistency and enduring properties to meet up the industrial standards, thus ensuring uniform and good quality.

Applications of Ready Mix  Plaster

Applications of Ready Mix  Plaster

Ready mix  plaster is suitable for various surfaces and foundation layers like concrete, brick, drywall, plywood, wood, metal, gypsum board and, wood. It can be  used in:

1.  Walls and ceilings: Provides coating for exterior and interior walls, ceilings and other structural elements  

2.  Flooring: It can be  applied as an underlay for flooring materials like tiles, marbles and wood.

3.  Pillars and beams: Gives a matte finish, which provides enhanced look and also paves way for smooth painting or any other wallpapering works.

4.  Soundproofing: It has the ability to reduce noise and echoes between rooms.

5.  Fireproofing: Cement in ready-mixed plaster has a natural property of heat-resistance. It also has other fire-resistant additives like gypsum and, vermiculite.

Conventional Plastering vs Ready Mix Plaster

Cement plastering, commonly known as conventional plastering, is a traditional way of applying plasters to ceilings and walls which needs a manual mixture of cement, sand, water and other additives. As it is mixed manually, it is not easy to get a uniform blend It also leads to material waste and consumes a lot of time, thus leading to increased costs . Difficulty in making plaster in correct proportions with, different grain sizes, scarcity of major components like sand and time to clean are all added drawbacks of conventional plastering.

To overcome these issues, ready mix plaster is being used. As aforementioned, this pre-blended mix is cost-effective, reduces labour costs, gives the best coverage, requires  less maintenance and provides long-lasting durability.

Product Features and Cost Factors of Ready Mix Plaster:

  • Available packs: 5 kg, 10kg, 25 kg and 40 kg [commonly available]
  • Available colours: Grey
  • The average cost for ready mix  plaster  for 3000 sq ft is given in the following table approximately:
DescriptionValue
Total area (sq ft)3000
Thickness (mm)12 (approx.)
Coverage 20 sq ft/ 40 kg bag
Number of bags required (40 kg bag)150
Cost per bag (₹)300-400
Total cost (₹)45,000- 60,000

Conclusion

From the above factors, it is evident that ready mix plaster is a good choice as it provides numerous advantages like being budget friendly, high in quality, low maintenance, labour-saving and long-lasting with an enhanced appearance. It stands out as a superior  plastering solution compared to other conventional plastering.

FAQs

1.  What is ready mix- plaster?

It is a pre-blended mortar mixture designed for easy application and high-quality performance.

2.  How long does ready mix- plaster take to set?

It varies depending on the thickness of coverage, quality of the product and weather conditions. The time ranges from 24 hours to 7 days to dry completely.

3.  Can ready mix plaster be used on both interior and exterior walls?

 Yes, it has versatile applications and can be used on various construction surfaces including exterior and interior walls.

Everything You Need to Know About Batching of Concrete

0
Batching of Concrete

Concrete is a strong and durable material that is made by the combination of cement, aggregates and water. The process of combining the required amount of ingredients based on their volume or mass, for the production of perfect concrete for a construction is known as Batching of concrete. Once the concrete is produced with perfect quality, it is then transferred to a transit mixer. In this article let’s discover the importance of batching concrete and its methods. Keep reading!

What is Batching of Concrete?

Batching of Concrete

Batching, in simple terms, means skilfully mixing the required ingredients like cement, fine and coarse aggregates and, water,. in an accurate measure to form the best quality of concrete. Materials used for mixing are measured by  their volume or weight in proportion to prepare good quality concrete. Strong concrete can increase the stability of a construction by eradicating structural issues and  Leakage. Batching of concrete can speed up the construction work and  reduce the wastage of materials used for concrete. Once the required homogeneous mix  is produced through batching, it is then used for construction  purposes in buildings, pavements, bridges, etc.

Types of Batching Concrete

Types of Batching Concrete

It is important to make a uniform concrete mix as it plays a vital role in the durability of any construction. There are three types of batching of concrete usually done before concrete pouring . They are, 

Let’s have a brief glance at  these types. 

Random Volumetric Batching.

A process in which the concrete ingredients do not have fixed proportions or quantites is called Random Volumetric Batching. The ingredients are quantified and mixed based on rough estimations of workers. It can result in failure due to its lack of estimated strength. This method is definitely unscientific and inconvenient for any construction project and is strictly not recommendable. 

Volume Batching.

Volume batching of concrete is executed with the aid of measurement boxes. These measurement boxes are termed ‘farmas’ or ‘gauge boxes’ that are used to measure the concrete materials. Gauge boxes are made out of timber, steel or iron.  It is deeper downwards and has a narrow top. This method is a bit less precise or accurate. Materials used for Volume Batching are measured under the terms of volume. If the volume of one cement bag which is around 50kg (35 liters) is taken, then the volume of Gauge or farmas is equal to the volume of cement, without overfill. Gauge boxes are then used to measure and proportion the aggregate components. For example, to achieve 1:1:2 ratio, one farma of cement, one farma of sand and 2 farmas of aggregates are mixed together. The quantity of water is measured by water cans with fixed volume or by water meter. 

Weight Batching.

In weight batching, the concrete ingredients are taken in fixed proportions  with the help of ‘weight batchers’ or other weighing instruments. This method is more accurate, simple and flexible than volume batching. There are different types of weight batching: 

Manual batching: Here, all solid ingredients are weighed manually. It can be used for minor and small jobs.

  • Semi-automatic weight batching: Here, the machine gates for weighing are opened manually with operated switches, and then the gates are automatically closed immediately when the material poured has reached the required weight. 
  • Fully automatic batching concrete: It has automatic microprocessor-controlled batching systems which. It measures the components automatically in perfect proportions.

According to the varied needs and availability, one of these types of weight batching is used. Sometimes, when it comes to big projects, people use automatic batching plants to achieve the desired quality and consistency.

Materials like cement, fine aggregate, coarse aggregate and water are taken by weighing. Water plays a major role, so the essential amount of water must be available. Lack of water leads to weak and unworkable concrete whereas excess water will destroy the strength of concrete. Poor batching cannot give a homogeneous concrete mix so, the workability will deteriorate. Thus, it is important to have skilled workers while handling the procedure for better outcomes.

Factors Affecting the Choice of Batching system.

There are various factors that can affect the choice of the batching system, such as: .

  • Job size: The method of batching depends on the size of the project. Larger projects can opt for automatic weighing systems, while manual weighing works well for small projects
  • Concrete production rate: When project timelines are small, concrete mixing and production has to be done quickly and may require automatic weighed batching. 
  • Labour availability: When there is a lack of labour, automatically weighed batching can be opted for.
  • Cost: Manual weighing for batching can be opted for when there are budget constraints, as automatic weighing costs more.

Conclusion.

Batching of concrete is the most important method for mixing and estimating the needed concrete materials for construction. Once the mix is ready, it is transferred to the transit mixer to create a homogeneous and quality mixture. Poor batching can result in leakages and loss of strength in the concrete It can lead to porous concrete, which will lead to corrosion and can literally reduce the life of the construction. This  can double your investment since the cost of repair is high. Traditional batching is done by volume batching which is not very precise. Batching accuracy is important as it aids in obtaining the desired outcome. It is  better to do weight batching instead of volume batching. Before making a concrete mixture, it is important to note whether the concrete material is proper and accurate in proportion to achieve good  quality. 

FAQ:

1. What is Volume Batching?

Volume batching of concrete is executed with the aid of measurement boxes. These measurement boxes are termed ‘farmas’ or ‘gauge boxes’ that are used to measure the volume of concrete materials. This method is less precise or accurate. 

2. Define Batching of concrete.?

Batching means skilfully mixing the required ingredients like cement, fine and coarse aggregates, water, etc. in an accurate measure to form the best quality of concrete. Materials used for mixing are measured under their volume or mass.

3. Which batching of concrete is suitable and accurate for any project?

Weight batching through manual, semi-automatic or automatic methods are the most precise way of proportioning concrete for any type of project.

Understanding the Differences Between Prestressed Concrete and Reinforced Cement Concrete

0
Difference between prestressed concrete and reinforced concrete

Finding proper construction materials is crucial as they can have a significant impact on the final outcome of the structure. Concrete is one of the most widely used materials in construction today and therefore, understanding the different types of concrete is vital. Prestressed concrete and reinforced cement concrete are two such types with reinforced longitudinal and transverse steel bars (rebars). Read on to learn about the properties and differences between these two types.

Prestressed Concrete

What is Prestressed Concrete?

Prestressed concrete is made by placing high-tensile steel tendons in a particular form and both ends are stretched while or after the concrete is poured. Prestressed concrete is usually formed under stress and provides a great degree of strength. This type is the most preferred choice for large  projects and commercial buildings with high load bearing requirements. Pre-tensioned concrete, bonded post-tensioned concrete and unbonded post-tensioned concrete are a  few categories of prestressed concrete. 

 Prestressed Concrete

Pre-Tensioned Concrete 

This is a type of concrete where tendons are strengthened before the concrete is cast to create a bond between two materials. This prevents corrosion of tendons and has longer life spans and crack resistance. 

Bonded Post-Tensioned Concrete

In this type, the concrete is poured before the tendons are tensioned or strengthened. When the concrete cast becomes hard, the tendons are tensioned with the hydraulic jacks. The tension remains after the jacks are removed and pressure is transferred to the concrete. 

Unbonded Post-Tensioned Concrete

In this method, plastic and metal ducts are placed in the form and then the concrete is poured. After this, the tendons are inserted allowing them to stretch to applied tension. Later they are anchored at ends to resist the tensile force.

Advantages 

  1. The use of thinner and lighter prestressed concrete results in lower  self-weight and proves to be economical in the overall construction process.This makes it suitable for heavily loaded structures.  
  2. Prestressed concrete provides enhanced durability as it doesn’t crack and rusting is minimised. 
  3. It is suitable for structures that are exposed to vibrations and shocks like bridges and dams. 
  4. It has high resisting capabilities, particularly to strong forces. 
  5. Prestressed concrete involves low maintenance costs. 
Advantages of prestressing concrete

Limitations 

  1. Prestressed concrete often requires more supervision and quality control.
  2. The materials used to create prestressed concrete are specialised and more expensive.
  3. The use of high-tension steel makes the prestressed concrete sections more brittle. 

Reinforced Cement Concrete

What is Reinforced Cement Concrete?

This is the most widely used material  in construction. Steel bars are placed into the formwork  before the concrete mix is poured and evenly distributed. The custom form allows the constructor to choose between conventional and unconventional shapes. This creates opportunities to get creative in the architecture of the structure. Beams, bridges, dams, foundations, highways and sidewalks are the most common areas where reinforced concrete is used. It is often indispensable in modern construction for its ability to absorb compressive forces. 

Reinforced Cement Concrete

Advantages 

  1. Compared to other construction materials, reinforced cement concrete has a higher compressive strength.
  2. As it is in the form of liquid in the initial stage, reinforced concrete can be moulded into desired shapes and forms, making it suitable for creative architectural applications.
  3. It has good fire and weather-resistant capabilities
  4. It is considered the most economical construction material for building dams and piers.
  5. Reinforced cement concrete requires less skilled labour to build a structure as the process is less complicated.
  6. It is more durable when compared to other construction techniques.
  7. The cost of execution and maintenance is low when compared to prestressed concrete. 
Advantage of Reinforced Cement Concrete

Limitations 

  1. Shrinkage in reinforced concrete leads to cracks and weakness in the structure.
  2. The process of reinforced concrete involves mixing, casting and curing. All the steps need to be carried out with precision to achieve a strong and durable structure. 
  3. While reinforced concrete is strong in compression, it is weak in tension. 
  4. Usually, the reinforced concrete structures are heavy and bulky making it less suitable for lightweight applications.
  5. It may be susceptible to corrosion and also prolonged exposure to heat can weaken the concrete. 

Differences between Reinforced Cement Concrete and Prestressed Concrete


Aspect

Reinforced cement concrete 
Prestressed Concrete
Fatigue limitThe fatigue or maximum stress limit is low  The fatigue limit is high.
Deformation The deformation when subjected to tension in the future is more The deformation is comparatively less.
Material costThe cost of material involved in the process is low The cost of material involved in the process is high
Materials usedMild steel reinforcement  bars are used in the processTendons made from high tensile steels in the form of single or multi-wired strands are used in the process
Internal stress No internal stress is induced in the process Internal stress is induced in the process before loading.
Dead load The dead  load is comparatively highThe dead low is comparatively low
Quality controlRequires basic quality control and supervision Very high-quality control and supervision is required during  the process.
Special techniques Does not involve any special techniques Special techniques and equipment are involved, especially to anchor  tendons and apply tensile stress. Extremely skilled labour is vital. 
Testing of steelThere is no way to test the steel in this method.Steel can be tested before the placement.
Steel corrosion Steel corrosion is a possibility in this method Steel corrosion is negligible comparatively.
ApplicationMost commonly used in the construction of commercial buildings Most commonly used in bridges, railway sleepers and dams.
Brittleness It is less brittle It is more brittle
Tensile strengthHas good tensile strengthHas very high tensile strength

Selecting the right type of material for construction depends upon the specific needs of the process like cost, structural requirements and performance. When it comes to choosing between reinforced cement concrete and prestressed concrete, one needs to understand the properties and applications of both. To build a durable, efficient and cost-effective project, it is imperative to carefully study and leverage the materials appropriately. It is advisable to consult structural or civil engineers to recommend the most suitable type for your project.

A Comprehensive Guide to Understand Creep in Concrete

0
Concrete creep

Considered one of the most durable materials for construction, Concrete is the most widely used material globally. However, concrete isn’t always reliable and is prone to damage if not constructed properly. The material must be handled carefully during construction to ensure that the structure can withstand stress and load.  

creep concrete

What is Concrete Creep?

Concrete creep is the deformation of a structure due to stress or sustained load. The shape of the concrete in a structure can change because of prolonged pressure and heavy load. Usually, this deformation of concrete occurs towards the direction of the force applied. For example, bending in a beam is caused by the continuous force on the beam surface. 

Levels of Creep

There are various levels to a concrete creep based on the intensity of the force and the time the structure is exposed to stress. They are:

  • Primary Creep – This is the initial creep when a load or stress is applied to the concrete. At this level, there is an immediate elastic strain on the concrete.  
  • Secondary Creep – When the load is sustained for a prolonged period, it leads to the level of Secondary creep. 
  • Tertiary Creep – this is the final level of creep where the structure eventually breaks because of excessive force and pressure. 
Levels of Creep

Factors influencing concrete creep

Aggregate

Aggregates are coarse particles and materials like rocks, gravel, recycled concrete and sand. This reduces the creep rate as it has a high restraining effect. High elastic modulus in aggregates lowers the level of creeping in a structure. Also, the size of the aggregate contributes to the creep. Large-sized aggregates often lower the creep. 

Concrete Mix Ratio 

The quantity and quality of the concrete mix play a crucial role in preventing or lowering creep. The water-to-cement ratio must be right to achieve a quality mix of the concrete. When the water content increases, it leads to a higher creep rate. Also, other factors, such as the use of low quality component materials, have an impact on concrete creep. 

Cement Properties 

Different types of cement have different effects on the strength of the concrete. For example, if the cement is finer, it requires more gypsum to make it denser. Stronger and denser cement is less susceptible to concrete creep. Therefore, choosing the right cement is imperative to prevent creep. 

Environmental Cconditions 

Various environmental factors like temperatures and humidity can have significant effects on concrete. High temperature can lead to an increase in creep as the concrete expands when it is exposed to heat. This leads to deformation and damage of the structure. Also, concrete absorbs water. Due to  this nature, high humidity can increase the rate of creep, eventually leading to deformity of the structure. 

Stress Intensity

When the concrete is exposed to excess  tension, it can lead to an increased levels of creep. Duration of the stress too is key in creep. Constant level of stress over a prolonged period of time can cause creep swiftly. 

Age of Concrete & Loading 

Concrete takes time to strengthen and become hard. When the concrete surface is exposed to heavy loads during early stages, it can lead to concrete creep. Therefore, the application of heavy load should be avoided at the early stages of the setting period. 

Age of loadingCreep coefficient
7 days2.2
28 days1.6
1 year1.1

Source: Civil Engineering Portal 

Factors influencing concrete creep

 Effects of Concrete creep

  1. Creep increases the deflection of reinforced concrete beams and structures, leading to alterations in design strength. 
  2. Concrete creep creates buckling in eccentrically loaded columns in a structure. 
  3. The deformation of concrete can lead to cracks, especially in high-stress regions. In structures like dams, it is important to monitor the structure for cracks periodically to prevent excessive damage. 
  4. Creep can relieve stress concentration on surfaces which is caused by shrinkage and temperature variation. This helps in reducing internal stress. 
  5. Creep affects the overall structural performance as it causes loss of prestress in prestressed concrete

Preventing Concrete Creep

Various steps and preventive measures can be taken to mitigate the amount of concrete creep. It is imperative to follow protocols to maintain the strength and longevity of a structure. 

Creep Testing

A Creep Test is nothing but a method involving calculations which determine the creep potential. Engineers take in several determinants like temperature and duration of stress applied to the structure while creep testing. Typically, they come up with a graph which depicts the creep behaviour in various stages. This helps to forecast the concrete creep and take necessary steps during construction to prevent adverse effects. 

Adding Aggregates 

Adding more coarse aggregates to the cement helps in preventing concrete creep. The high modulus of elasticity in aggregates lowers the creep rate. Limestone, granite, sandstone and quartz work best when it comes to lowering concrete creep.  

Choosing the Right Type of Concrete 

There are various types of concrete with different properties. Choosing the right type based on the structure is important to lower creep. Few types of concrete, such as fibre-reinforced concrete and high-strength concrete, are better at preventing creep.

Adding Reinforcements 

Reinforcements can mitigate the possibility of cracks and damage to concrete surfaces. Steel mesh, fibre and rebars can help increase the strength of the structure and ensure longevity. 

Prestressing

Proper prestressing helps in preventing the effects of creep. Post-tensioned and pre-tensioned concrete assist in balancing initial stresses and reducing the chances of deformation. 

Paying Attention to the Curing Process 

Not following the curing process protocol can result in adverse effects of creep and eventually lead to damage to the structure. Proper measures must be taken to ensure that the concrete dries slowly in the initial phase of curing. Fogging the concrete and using evaporation retarders help slow down the drying process. Also, maintaining the level of moisture in the final curing is imperative. Ponding the concrete and covering helps retain the moisture on the surface. 

Curing Process 

Engineers can implement appropriate measures to mitigate the effects of creep by understanding the causes and behaviour of concrete structures. Appropriate design, construction techniques and creep analysis are crucial in ensuring the durability of concrete structures. 

Methods of Plastering: Types, Applications, and Step-by-Step Guide for Smooth Walls

0
Plastering

None of us like to feel rough and bumpy surfaces on walls . The even and smooth finish of the walls and ceilings of a newly constructed building gives a decorative appeal and improves the overall aesthetics. Plastering is a crucial process adopted in ancient and modern construction to achieve such finishes There are various types of plastering based on the purpose and desired outcome. This blog sheds light on the process, different types of plastering and their methods.

Methods of plastering

What is Plastering?

Plastering is the method of applying plaster a mixture of construction materials like cement, sand and water, which acts as a coating on walls, partitions and ceilings. The aim of plastering is to give the surface a smooth and seamless finish and strengthen it. Plastering on the exterior walls of a building is called rendering. The number of coats applied on the surface depends on the surface and its use. Today, modern construction involves several types of plastering to serve various needs, aesthetical preferences and environmental conditions. 

Plastering

Purpose of plastering

Plastering in construction is an important step as it serves several purposes:

  1. Increased durability – Plastering acts as a protective shield to any surface and increases the longevity of the building.
  2. Smoothing walls – Walls are usually built of bricks or other uneven surfaces. Plastering gives it a smooth and appealing look. 
  3. Aesthetic enhancement – Plastering helps to enhance the visual appearance of the surface with patterns, paints and decorative textures. 
  4. Fire resistance – Plastering acts as a barrier against the spread of flames in case of a fire accident. 
  5. Insulation – Plaster absorbs sound and acts as a soundproof layer. Thick ready mix plaster can be used as insulation.

Types of plastering

Cement Plastering

This type of plastering involves a mixture of cement, sand and water to provide a strong and durable surface. Commonly used in the exteriors of the building, it protects the wall from severe weather and environmental conditions. This method is versatile and allows for different finishes like the sand-faced, smooth cast, roughcast and textured. 

Gypsum Plastering

Gypsum plaster, also called Plaster of Paris (PoP) is a sulphate mineral composed of calcium sulphate dihydrate. This material is usually used for interior surfaces as it dries quickly and provides a polished surface. It is generally not used outdoors due to its low heat resistance. For its fire-resistant properties, gypsum is often one of the most sought-after materials for plastering  and is used in buildings where hygiene and cleanliness are priorities. The gypsum mixture can be hardened with retarders or hardeners. 

Gypsum Plastering

Mud Plastering

One of the less prevalent materials  today, mud plaster consists of a mixture of soil with dung or hay and water. This eco-friendly method is often used in traditional and sustainable construction practices and gives an earthy look and finish to the surface. Even though it provides excellent thermal insulation and breathability, mud plastering is not preferred much in modern-day construction due to its traditional aesthetics. 

Lime Plastering

Lime, sand and water are mixed in a ratio of 1:1 along with a small amount of cement to make lime plaster. This mixture is set when it comes in contact with air in the atmosphere. Lime plaster is used to give a unique and rustic finish to homes. This is another eco-friendly alternative to reduce carbon emissions caused by cement in cement plaster. 

Lime Plastering

Waterproof Plaster

As the name suggests, this method is used to repel water and moisture. Waterproof plaster is often chosen for areas that are prone to moisture and dampness like bathrooms. This plaster prevents water from leaking through the walls, causing mould growth and damage. Its composition is generally similar to cement plaster, but has additional ingredients like pulverised alum and soft soap which chemically seal pores on walls.

Step-by-step guide to Plastering a surface

These are the steps to achieve a smooth and professional finish of plastering. 

Preparing 

The first step involves dusting and cleaning off any imperfections on the surface. In case of replastering, removal of old plaster must be done carefully to ensure smooth adhering of the new plaster to the surface. 

Priming the surface

A PVA (Polyvinyl acetate) adhesive sometimes needs to be applied on the surface before plastering. This step is to ensure that the plaster can adhere to the surface firmly. The surface should not be completely dry before the plastering process.

Mixing 

This is one of the crucial steps involved in the process of plastering as a mixture which is not in the right proportion can lead to uneven and lumpy consistency. The plaster must be mixed in a clean bucket of water to avoid contamination. Using a power mixer instead of a traditional method will ensure a smooth mix. 

Applying 

Using Hawk board and plastering trowel, the first coat of the plastering must be evenly applied from bottom to top of the surface. A firm and even pressure throughout the process will make the mixture adhere properly to the surface. At the end of each stroke, the area must be flattened with the trowel to smooth it down. 

Finishing off the Plaster

Once the plaster has been dried, the surface needs to be smoothed out of bumps or gaps with the trowel. A spray bottle is used to wet the plaster slightly which will help the trowel to glide on the surface. Then the second coat of thinner plaster is applied to the surface. When the plaster is completely dried off, sandpaper can be used to smooth out any rough edges on the surface. 

Plastering is generally not an option but an essential process when it comes to constructing a building. While it is important that the structure is strong and resilient, it is also important that it looks attractive and homely. 

FAQs

1. How much time does it take for plaster to dry?

It usually takes 13-5 days for the plastering to dry, depending on the type of material used. The time also varies on the number of coating and the thickness of the plaster 

2. What is the next step after plastering?

Smoothing the surface is the next step of plastering. Sandpaper is used to level and polish the dried plaster. After this, generally, primer and paint are applied to the surface.

3. What is the right proportion of the cement plaster mix?

The cement: sand proportion is 1:3 or 1:4 for normal cement plaster. 

4. What tools do I need for plastering?

Mortar pans, Hawk board, plastering trowels, wooden floats, spades, chisels, and brushes are usually involved in Plastering.