Home Blog Page 30

Concrete Bricks – Types, Benefits, and Construction Uses

0
concrete-brick

Concrete bricks are one of the widely popular and highly used building materials. Their physical properties and versatile uses make people choose concrete bricks over other brick types. Although they are widely used, there is still limited awareness among the people. Here, we break the stereotype, as this blog clearly explains what concrete bricks are, why they are widely preferred, their applications, advantages, disadvantages, and more.

What is a Concrete Brick?

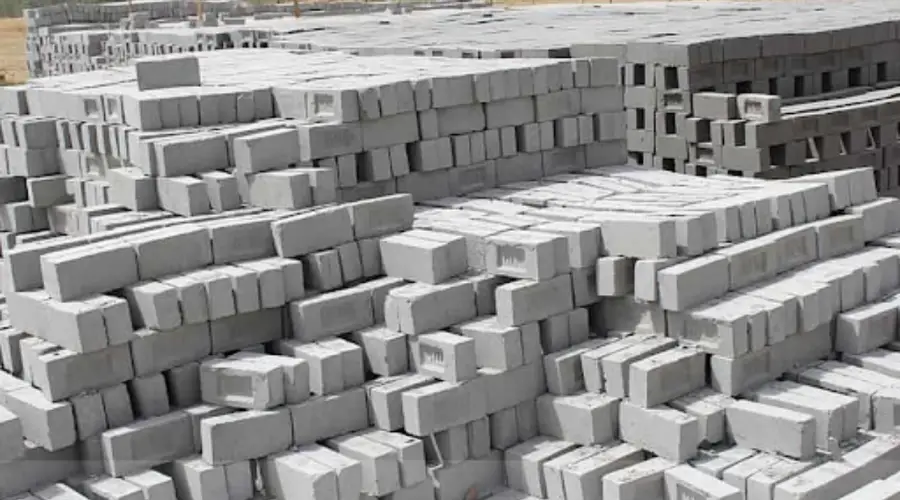
A concrete brick is a pre-casted cement brick made with a mixture of cement, sand, and fine aggregates. These laboratory-made bricks are produced under constant supervision to enhance their unique properties to stand out from other brick properties in the market.

What is a Concrete Brick?

Types of Concrete Brick

Concrete bricks are generally classified into four types based on their weight, shape, and the aggregates used. The following are the types of concrete bricks:

  • Solid Cement bricks
  • Hollow Cement bricks
  • Fly Ash Bricks
  • Interlocking Bricks

Solid Cement Bricks

These bricks are dense, heavy, and uniform in structure, and they have high durability and strength. Solid Cement Bricks are used for the construction of foundation walls, columns, and other load-bearing structures.

Hollow Cement Bricks

Hollow cement bricks are lightweight and are designed with voids in the middle to reduce the overall weight. These bricks improve thermal insulation and have numerous advantages in terms of cost and production. They are generally used for the construction of non-load-bearing structures, such as partition walls and infilling panels, considering their lightweight nature.

Fly Ash Bricks

These are made from a mixture of cement and fly ash(extracts of coal). They are sustainable and eco-friendly bricks, using fly ash as the main aggregate. Fly ash bricks are lightweight, can withstand high temperatures and are even resistant to fire.

These bricks are commonly used in both residential and commercial projects. For example, these bricks are used as partition walls and in other non-load-bearing structures.

Interlocking Bricks

Interlocking bricks are a special type of brick that comes in different shapes and sizes. These bricks are designed to interlock bricks together, reducing the need of mortar and other adhesive pastes. These bricks are custom-made bricks that are manufactured based on the needs and requirements of the building.

Properties of Concrete Brick

  • Density & colour: The thickness of concrete bricks ranges from 300-1800 kg/m³ based on the source material, and they come in different colours.
  • Heat Resistance: They have lower density, which helps to protect the building from fire and hot weather conditions.
  • Strength: They have a high load-bearing capacity and can be used in engineered and mechanical structures.
  • Durability: They are resistant to high wear and tear and have longevity.

Raw Materials Required for Manufacturing

The raw materials required for the manufacturing of concrete bricks include Portland Cement, Water, Sand, and Gravel. In certain cases, fly ash and other additives are included as fine aggregates. Since concrete bricks are produced in various shapes and sizes, their colour pigments and additives may vary.

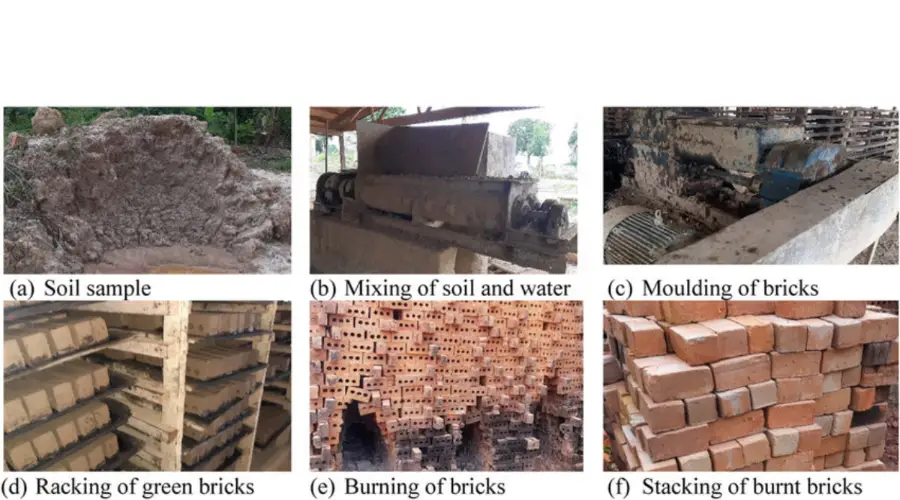
Manufacturing Process of Concrete Bricks

Preparation of Raw Materials

The raw materials such as cement, sand, aggregates, and additional fillers are chosen based on quality. The selected materials are tested in the laboratory for required standards and adequate proportions of the ingredients are determined.

Mixing and Blending

The cement, sand, and aggregates are mixed using mechanical mixers, adding water until they achieve a uniform and homogeneous mixture. An adequate proportion of additives (fly ash or other pigments) is blended to achieve the desired properties.

Molding

The cement mortar is poured into the molds of required shapes and sizes. Vibrators are used to eliminate pore gaps, and ahydraulic press compresses the mixture into a molded brick. The mortar is maintained in the mold throughout the drying and curing process for days until the bricks are completely solidified.

Curing & Drying

After molding, the concrete bricks are cured using water, air, or stream in a controlled environment to improve hydration and strength. The cured bricks are then removed from the molds and dried to remove excessive moisture content.

Quality Checks

Inspections are conducted throughout the manufacturing process from start to finish. Many quality checks are performed in the laboratory at different stages to check the quality of the bricks.

Pros & Cons of Using Concrete Bricks

Pros

  • Highly durable and can withstand harsh weather conditions.
  • Used in nearly every construction process.
  • Available in various sizes, shapes, and designs.
  • High thermal resistance and fireproof.
  • Easily available and cost-effective.

Cons

  • Solid blocks are heavy and require careful handling.
  • Higher water absorption rate, causing efflorescence and moisture damage.
  • Adds more loads to structures and could get cracked under excessive loads.
  • Consumption of natural resources and high energy usage in manufacturing.
  • Requires periodic maintenance for longevity.

Comparison between Concrete Bricks & Clay Bricks

AspectConcrete BricksClay Bricks
Raw materials usedCement, Sand, Aggregate (limestone), and additives.Surface clays, shales, sand, and fire clays.
Initial reactionShrinks due to loss of moistureExpands due to the addition of moisture
WeightSolid cement blocks weigh more than clay bricks.Clay bricks are less weight compared to cement bricks.
StrengthGains strength over time.Loses strength over time.
Compressive strengthHigh compressive strengthComparatively low compressive strength

Conclusion

Concrete bricks are one of the necessary building materials in the modern construction field. They are better known for their strength, durability, and versatile uses in both residential and commercial projects. These concrete bricks are at the forefront of modern construction and their continuous evolution makes them easy and reliable choice. It would be no surprising if the concrete bricks completely replaced the clay bricks in the future.

Calcium Silicate Bricks – Manufacturing Process & Uses

0
calcium silicate brick

In the ever-growing and advanced construction industry, there are several options for choosing the right bricks. Although there are plenty of options, the calcium silicate bricks, or sand-lime bricks, stand out for their attractive appearances and appealing finishes. These bricks are most commonly used in Australia, Europe, and African countries. The attractive nature of the brick is admired by people in India, and the usage of these bricks for Indian construction is increasing at a rapid phase. As the interest continues to grow, here is everything you need to know about calcium silicate bricks.

What is a Calcium Silicate Brick?

Calcium silicate brick is a special type of brick that uses sand and lime as the main raw materials, which are also called sand-lime bricks. These bricks stand out as one of the indispensable building materials that are used for numerous purposes. They are known for their lightweight, multiple colour options, toughness, longevity, and high resistance to heat.

Physical Properties of Calcium Silicate Bricks

  • These bricks have a very sleek and consistent finish that makes them look more attractive compared to other available bricks in the market.
  • These bricks are tightly packed, strong, and robust enough to maintain the original shape of the brick.
  • These sand lime bricks are compact and can hold loads of high capacity of up to 10 N/mm².
  • These bricks are repellent to water and are free from efflorescence when exposed to humid conditions.
  • These bricks are refractory to fire and can prevent the structure from other solar heat effects.
  • They are adept to sound and can prevent the structure from outside noises, acting as noise-cancelling agents.
  • No plastering is required, and mortar usage is reduced.

Applications of Calcium Silicate Brick in Construction

These bricks are known for their resourceful applications in the construction field. They are used in multiple construction works for numerous purposes.

  • Residential Construction- These bricks are suitable for residential buildings due to their insulation properties. Using these bricks in residential buildings will keep the structure cool in dry and hot weather conditions.
  • Commercial Structures- Using sand-lime bricks in commercial structures has numerous advantages. They can protect the building from heat and can withstand for long periods. These bricks can be used for the construction of walls, partitions, and other ornamental purposes.
  • Industries- Sand-lime bricks are mainly used for industries, factories, and warehouses, where fire resistance and high durability are crucial.
  • Fire Protection- These bricks have excellent fire-withstanding capacity and can be used as firewalls for places that have a high risk of fire, especially in steel and glass manufacturing units.
  • Noise Reduction– As sand-limes possess insulating properties, these bricks can be used in structures like schools, colleges, hospitals, and offices that require a noise-free environment.
  • Agricultural buildings- These bricks can be used to build agricultural buildings such as sheds, barns, and storage units to protect cattle, fertilisers, and agricultural utensils from moisture and pests.
  • Advanced technologies- Some manufacturers have tested smart technology integration to include sensors for monitoring temperature, humidity, and integrity for better maintenance.

Manufacturing of Calcium Silicate Bricks

Mixing 

The right proportion of chosen standard sand, lime, and colouring pigments is mixed with 3-5% water to form a homogenous mixture at the right consistency suitable for molding.

Moulding

The blended mixture is transferred to the mould of the required shape and size. The mixture is then molded using a rotary table by applying a mechanical (hydraulic) press at a variable pressure ranging from 30 to 63 N/mm². This pressurised molding process help the brick to attain the desired shape and required compressive strength.

Curing

The molded bricks are transferred to an autoclave (rounded steel cylinder) with a diameter of 2 meters and length of 20 meters. The molded bricks are steamed inside the autoclave with varying pressures from 0.85 to 1.6 N/mm² at high temperatures for 6 to 12 hours to process the chemical reaction in the bricks. During this process, the silica in sand and calcium in lime react together to form a crystal-like compound named calcium hyposilicate.

After autoclave curing, the sand lime bricks are carefully arranged and tested in the laboratory for shape, colour, and durability before being transported to the construction site.

Materials Used for Manufacturing Calcium Silicate Bricks

  • Sand- Calcium silicate bricks consist of 88% to 92% of fine sand.
  • Lime- A range of 8 to 12% of calcium silicate bricks consists of lime.
  • Water- Clean water of 0.25% is used to bind sand and lime together.
  • Colour Pigments- A range of 0.2 to 3% of pigments are added as colouring agents. Some commonly used pigments are:
    • Carbon Black (black, grey)
    • Iron Oxide (Red, Brown)
    • Chromium Oxide (Green)
    • Ochre (Yellow)

Pros & Cons of Calcium Silicate Brick

Pros

  • Attractive appearance with straight edges, uniform shape, size, colour, and texture.
  • No need for plastering.
  • Ideal for the construction in clay soils.
  • Reduces external noises within the structure.
  • Acts as a natural coolant and protects the building from fire and solar effects.
  • Reduces the overall cost of construction by 30% – 40% compared to other bricks.
  • Highly durable and can be used for permanent structures.
  • Wall thickness can be reduced.

Cons

  • Requires high-quality and expensive equipment for manufacturing.
  • Poor abrasion resistance.
  • Easily gets damaged by water.
  • Not suitable for building furnaces.
  • It cannot withstand high temperatures for a long period.
  • It cannot be used for foundations.

Conclusion

In conclusion, calcium silicate bricks or sand lime bricks are excellent brick materials in the advanced construction field. These bricks are highly durable and can withstand extensive use for a very long time. They are resistant to heat and dry climatic conditions, making them one of the most reliable options if maintaining indoor temperature is a key. These bricks are suitable for buildings with a focus on sustainability, as they are energy-efficient, recyclable, generate less waste, and reduce carbon footprint. If you are looking for more environmentally friendly and modernised buildings with aesthetic versatility as key, then you can consider sand lime bricks as an option.

What is Jamabandi – Essential Land Document Explained

0
what is jamabandi

If you own a property or actively looking to buy one, understanding the documents and records is essential. Jamabandi is one of those important land documents that carry information regarding the property, its ownership, types of land, and other revenue histories. Whether you are a first-time buyer or a real estate agent, understanding the Jamabandi, helps ensure smooth and transparent dealings.

What is a RoR or Jamabandi?

Jamabandi or Record of Rights (RoR) is the official record of the concerned property. The record has information about the land ownership, tenancy history, leases, cultivation, and other revenue-related information of a particular property. This is one of the crucial documents that are registered with the government to help people find information on the land transparently and reduce illegal land transactions.

Importance of Jamabandi

  • Jamabandi or Record of Right (RoR) is used to prove the ownership of land.
  • The record is easy to understand and readily accessible and can be used for land records if issues arise.
  • It has all kinds of information related to the property and the ownership.
  • It is one of the essential documents required to apply for loans or other government subsidies.
  • Jamabandi provides information about tax receipts of the concerned revenue department.
  • It is essential to buy or sell a property without any legal issues or fraudulent transactions.
  • Any discrepancy in the Encumbrance Certificate (EC) can be challenged using the Record of Rights (RoR).

Documents Require to Get Jamabandi

  • Identity proof- A valid identity document like Aadhaar Card, Ration Card, Passport, Voter ID, Driving License, or any government-issued identity proof.
  • Land ownership proof- Certified copy of original sale deed, Mutation Certificate, land registration copy, etc.
  • Khata number/plot number- Details of the property, including Khata Number.
  • Revenue Receipts- Tax receipts, previous renewal of Jamabandi, etc.,

Offline Process to Obtain Jamabandi

  • Visit the concerned Tehsil (Taluk) office of your district sub-division.
  • Apply for the Jamabandi to the Village Patwari (Tehsil) with appropriate identification documents.
  • Once the application is accepted, the authorised land details will be issued, and the copy can be printed for reference.

Online Methods to Access Jamabandi

  • Register or Log In- If the applicant is a first-time user, he/she needs to register in the corresponding e-service portal (which differs from state to state) and log in to the portal.
  • Fill in the required details- After logging in, the concerned person should fill in the required information including the location (District, village, survey number, sub-division, reference number & document number).
  • Check Jamabandi- Select the Jamabandi option and check the details of the ownership, activities, and land transactions.

How to verify the authenticity of Jamabandi records

It is important to check the authenticity of Jamabandi records to prevent a buyer or a seller from fraudulent transactions and disputes. The Record of Rights is usually checked before making the final transactions for transparency and to identify any legal issues with the land. Here is how to verify the authenticity of the property using Jamabandi.

  • Jamabandi can be cross-verified in the local revenue office, comparing the online and physical records.
  • Ensure that all the changes in ownership, tenancy, and mutations are up to date and recorded properly, to avoid legal issues.
  • Check for legal stamps and seals in the physical documents and QR codes and digital watermarks in the online records.
  • As a buyer, verify the documents with previous transactions, sale deeds, and receipts are up to date and legal.

How to Correct Inaccurate Data in Jamabandi?

If the details in the records are found to be incorrect or inconsistent, it can be addressed through the following steps.

  • The Jamabandi records can be reviewed online or offline to check if the details are up to date.
  • If the information is found to be incorrect, the necessary documentation providing the right information should be submitted to the local revenue office or through an online platform.
  • The concerned authorities will verify the documents and discrepancies.
  • If the errors are confirmed, the details will be corrected and updated in the system, and a copy of the corrected Record of Rights can be printed.

What are the Benefits of Jamabandi?

  • Holding a Jamabandi can safeguard the property against any illegal ownership claim from a third party.
  • Maintaining up-to-date records can help resolve property disputes.
  • Ensures transparency in buying and selling land transactions.
  • Provides confidence to buyers and developers about security and legality.
  • Helps the land owners to rent, lease, or mortgage their property to earn money.
  • Jamabandi is one of the essential documents required to apply for financial loans and government subsidies related to land ownership.

Legal Implications and Procedures in Jamabandi

It is important to know the legal implications and procedures related to Jamabandi, to effectively manage the land records.

Mutation

Mutation refers to the transfer of ownership of a property. The mutation occurs when the property is sold, inherited, or gifted from the old owner to a new owner. This ensures that the records legally recognise a new owner.

Patta

Patta is a legal document issued by the property owner, which serves as proof of ownership. Patta contains all the necessary details about the property in question.

Adangal

Adangal is a detailed record of the land, that provides information about the ownership, cultivation, land use, and other comprehensive information about the property and is kept up to date.

Revenue Court

The Revenue Court is a judicial body that deals with land revenue and tenancy-related issues. The court handles disputes related to land ownership, boundary issues, and property-related conflicts. They provide legal solutions for property ownership matters.

Conclusion

The Jamabandi or Record of Rights (RoR) is one of the essential documents to hold as a property owner. It is a legal document that provides details of the ownership, tenancy, property, and other rights for the ownership. It can prevent the owner from any legal issues that may arise on the land and asserts the legal proprietor. Holding a Jamabandi can secure the land and build trust for future buy and sell transactions.

Calcium Silicate vs. Clay Bricks: Key Differences Explained

0
calcium silicate bricks vs clay bricks

Bricks are one of the primary building materials that give strength, durability, and versatility to construction. They are one of the oldest building materials that has been in use since 7500 BC. There are numerous bricks in the market, and each one has its unique characteristics, such as structure, strength, composition, looks, and budget.

In this blog, we will compare two of those bricks- Calcium Silicate Brick & Clay Brick discussing the key differences and where they can be used.

What are Calcium Silicate Bricks?

Calcium Silicate Bricks or Sand Lime Bricks are made by mixing sand, lime, and pigments in precise proportions under high pressure and temperature inside autoclave curing chambers. 

They are factory-made bricks that need expensive equipment and constant supervision for manufacturing. These bricks have a sleek and uniform finish, with varying colour options. They are used for numerous applications in the construction field. They have high compressive and tensile strength and acoustic and durability properties. 

What are Clay Bricks?

These are traditional bricks made of clay. The clay is processed and blended with aggregates in a homogenous mix before molding and then burnt in a kiln to add more strength and durability. 

These are made completely eco-friendly Bricks or use large natural resources that pollute the environment. They have a long history and have been used widely over the years. The Class 1 burnt bricks have the highest quality and offer high strength and durability, which are suitable for multiple construction projects.

Key Differences Between Calcium Silicate Bricks and Clay Bricks

Both Calcium Silicate Bricks and Clay Bricks differ in terms of raw materials used, manufacturing process, strength, physical properties, usage, cost, and more. Here is a detailed comparison between the Calcium Silicate bricks and Clay Bricks.

Composition

Calcium Silicate BricksClay Bricks
Sand (Silica) is the primary raw material used that occupies 88-92% of brick’s weight.Sand (Silica) is the primary raw material that occupies 50-60% of brick’s weight.
Lime is the secondary raw material that occupies 8-12% of the brick’s weight.Clay (Alumina) is the secondary raw material that occupies 20% to 30% of brick’s weight.
Fly Ash (0.3-8%), Water (2-8%), and Pigments are added at the required quantity to help the calcium silica bricks attain their physical properties.Lime (2-5%), Iron Oxide (5-7%), and Magnesia (<1%) are added to attain the cohesiveness, strength, and color of clay bricks. 

Manufacturing Process

Manufacturing of Sand-Clay Bricks

Sand, lime, fly ash, and coloring pigments are carefully chosen at appropriate proportions mixed with an adequate amount of water and moulded in a rotary table using a hydraulic press at a pressure ranging from 30 to 65 N/mm². The mold is transferred to the autoclave steel cylinders for curing under varying pressure and high temperature for 6 to 12 hours. This process induces a chemical reaction between sand and lime to form a crystal-like compound named Calcium hyposilicate. The autoclave steamed brick is unmoulded and tested before being transported to the construction site.

Manufacturing of Clay Bricks

The clay is processed through unsoiling, digging, cleaning, blending, weathering, and tampering by manually or mechanically mixing with water, sand, and other aggregates of appropriate proportion until the mixture attains the required moldable consistency. The clay is molded either using hands or powered compressing machines to avoid pore gaps.

The molded clay bricks are dried under the sun for days to weeks to months, depending on the climatic conditions and the type of bricks. The sun-dried bricks are placed under the sun for weeks to months, as it does not undergo the artificial burning process.

In burnt clay bricks, the bricks are dried for 3-10 days and are transferred to fire chambers or kilns under high temperatures of up to 1100℃ for 10 to 40 hours to attain maximum strength. The bricks are then tested and classified from First Class to Fourth Class bricks.

Strength and Durability

Resistance to Impact

Both Clay and Sand lime bricks have similar resistance to impact loads. However, it depends on the right composition and manufacturing methods. Both bricks can be engineered to withstand high-impact resistance by mixing aggregates and other additives before being molded.

Compressive Strength

Burnt Clay bricks have high compressive strength compared to sand-lime bricks, due to their compact, hard, and robust properties, which are induced by molding and kiln burning. Calcium Silicate bricks are loosely packed and are less resistant to compressive loads compared to clay bricks. The higher the density the stronger the bricks.

Thermal and Acoustic Insulation

Thermal Insulation

Clay bricks have higher thermal insulation properties compared to calcium silicate bricks. The burning process during the manufacturing of clay bricks induces the ability to withstand high temperatures. The clay bricks are ideally made for fireplaces and are used in the manufacturing of steel and fire kilns.

On the other hand, Calcium Silicate bricks comparatively have less resistance to heat, as they are loosely packed, which makes them less resistant to heat in the long run.  

Acoustic Insulation

Calcium Silicate bricks have the highest acoustic insulations compared to clay bricks. The porosity of the sand-lime bricks prevents the external noise enter the building’s internal structure and is highly used for soundproofing. On the other hand, Clay bricks are packed more tightly, which makes the noises easily pass through the structure.

Cost Comparison

The clay bricks are more expensive compared to the calcium silicate bricks. The clay bricks are manufactured using more natural resources, manpower, and firing kilns, which makes them more expensive in comparison.

On the other hand, calcium silicate bricks are larger and could substitute more clay bricks in the construction, making it one of the ideal choices, if cost is a consideration.

Applications

Applications of Sand-Clay

These bricks are known for their resourceful applications in the construction field. They are used in multiple construction works for numerous purposes.

  • These bricks are suitable for residential buildings for their insulation properties, which will keep the structure cool in dry and hot weather conditions.
  • Using sand lime bricks in commercial structures has numerous advantages. These bricks can be used for the construction of walls, partitions, and other ornamental purposes.
  • As Sand limes possess insulating properties, these bricks can be used in structures like schools, colleges, hospitals, and offices that require a noise-free environment.

Clay Bricks

  • Clay bricks are commonly used to construct walls, foundations, structural elements, and decorative elements in residential, commercial, and industrial buildings.
  • These are mainly made for fireplaces such as chimneys, steel factories, and other high-temperature places.
  • They are also used to build cinema halls, theatres, schools, and hospitals, as their density helps in soundproofing and prevents noisy environments.
  • The burnt bricks can also be used in retaining walls such as drainage, dams, raised beds, and borders.

Conclusion

Both clay bricks and calcium silicate bricks have unique characteristics that are suitable for different construction projects. Sand lime bricks are more modernized bricks that are ideal if aesthetics is the main consideration. On the other hand, clay bricks can withstand high loads and can be employed in load-bearing and engineered structures, making it one of the functional elements.

Burnt Clay Brick – Properties, Manufacturing, & Applications

0
burnt clay brick

Have you ever wondered why giant chimneys emit smoke from brick manufacturing sites? Yes, they are fire kilns and they emit smoke when the bricks are burnt in high temperatures. The burning of bricks is one of the important processes in the manufacturing of bricks to instate durable properties.

Burnt clay bricks are commonly used in almost every construction project due to their versatile properties. Here, we take a look at what burnt clay brick is, its manufacturing process, types, properties, applications, and more.

What is Burnt Clay Brick?

Burnt clay brick is a clay brick that is burnt at very high temperatures to add more strength and hardness. These bricks can withstand high temperatures and possess high durability and strength compared to other clay-made bricks.

How Burnt Clay Bricks are Manufactured?

How Burnt Clay Bricks are Manufactured?

Image Source: Research gate

Preparation of Clay

The process of preparing clay involves six steps such as unsoiling, digging, cleaning, blending, weathering, and tampering.

  • Unsoiling: The upper soil surface from which the clay needs to be excavated is removed up to a depth of 200 mm to eliminate impurities and other earthy particles.
  • Digging: The clay is then mined manually or using mechanical equipment and heaped above the ground surface.
  • Cleaning: The collected clay is cleaned to remove stones, pebbles, and other vegetable matter using a filtering screen.
  • Blending: The filtered clay is mixed with sand and straw to improve the quality of the brick.
  • Weathering: The blended clay mix is spread out on an open surface for direct exposure to the natural weather conditions for several weeks or even a month to allow plasticity and durable properties.
  • Tampering: Adequate water is added to the weathered/seasoned clay, which is then kneaded with the help of labour or cattle two to three times and battered with shovels to make it a homogenous mix, ready for moulding.

Moulding

The prepared clay is transferred to a mould and compressed to eliminate gaps to acquire a good texture and finish, either manually or mechanically using high-powered compressing machines.

Drying

The moulded clay bricks are racked and kept under the sun for drying. Usually, the drying process takes around 3 to 10 days, depending on the climatic conditions.

Burning

After being exposed to the sun, the bricks are burnt in fire chambers (or kilns) at very high temperature (1100°C) for 10 to 40 hours to gain maximum strength and hardness.

Types of Burnt Clay Bricks

First-Class Bricks

The First Class Brick or Class-I brick is burnt at the right temperature and the shapes are perfect. It has a load-bearing capacity of more than 10.5 N/mm² and emits a clear ringing sound when struck. These bricks do not absorb water more than 20% and the efflorescence should be minimal. These bricks are used for load-bearing structures and walls that are exposed to extremely hot temperatures.

Second Class Bricks

The second-class bricks are slightly over-burnt. It has an uneven surface and possesses a slightly distorted rectangular shape. It has a load-bearing capacity of over 7 N/mm² and emits a ringing sound when struck.

They will not absorb water more than 22% of the actual weight. These bricks can be used for load-bearing walls, but cannot be used for exposed walls.

Third Class Bricks

The third-class bricks are either overburnt or underburnt. They have an irregular surface and shape with a load-bearing capacity of over 3.5 N/mm². These bricks produce a dull sound when struck. It is used in non-structural parts of construction, such as gardening walls and landscaping.

Fourth Class Bricks

Fourth-class bricks are kiln-rejected bricks, which are either overburnt or underburnt. The overburnt bricks are dark coloured, hard, and highly irregular in shape. These bricks are used as an aggregate for concrete and as a road metal. The underburnt bricks are yellow with low strength and can be powdered easily.

Properties of Burnt Clay Bricks

Shape & Size

An ideal brick should have a uniform shape and size with sharp edges and perfect parallel sides. They should be of Indian Standard size of 19 x 9 x 9 cm.

Colour

A perfect burnt clay brick should be bright red and uniform in colour.

Texture & Compactness

The burnt fire brick should be of fine, dense, and uniform in texture. The bricks should not possess any cavities, loose grit, unburnt lime, or high efflorescence.

Hardness

An ideal brick should be hard enough to withstand wear and tear. When scratched with hard substances, it should not cause any impressions on the brick’s surface.

Load-bearing test

This test is conducted to determine the load-bearing capacity of the brick. An ideal brick should have high strength (not less than 10 N/mm²). The blocks with higher strength have the capacity to withstand heavy loads.

Water Absorption

The brick is soaked in water for 24 hours and weighed, if the total weight gained is less than 20%, it is suitable for use.

Efflorescence

The brick should not form white patches on the surface when immersed in water or exposed to rain and humid conditions. The bricks with low efflorescence have high durability to withstand wet conditions.

Applications of Burnt Clay Bricks in Construction

  • Burnt clay bricks are commonly used for constructing walls, foundations, structural and decorative elements in residential, commercial, and industrial buildings.
  • These are mainly made for fireplaces such as chimneys, steel factories, and other high-temperature places.
  • They are also used to build cinema halls, theatres, schools, and hospitals, as their density helps in soundproofing and prevents noisy environments.
  • The burnt bricks can also be used in retaining walls such as drainage, dams, raised beds, and borders.

Advantages & Disadvantages of Burnt Clay Brick

Advantages of Burnt Clay Bricks

  • High strength & Durability
  • Weather resistance
  • Easily available and affordable
  • Absorbs sound
  • Natural thermal insulator
  • Suitable for almost all types of construction

Disadvantages

  • The manufacturing process pollutes the air
  • Heavy Weight
  • Loss of soil & water
  • Waste generation

Conclusion

Burnt clay bricks are known for their strength, durability, and versatility of use in the construction field. These types of bricks are widely used in almost every construction purpose due to their heavy load-bearing, low water absorption, and thermal conductive nature. It is easily available in the market for an affordable price, making it one of the ideal bricks for every type of building.

Rigid Frame Structure: Design, Advantages, & Practical Uses

0
rigid frame structure

Decided to construct a new building? Have you pre-planned its complete purpose? Whether your aim is a bulk storage facility or something entirely different, a rigid frame structure can be an ideal option for your project.

The rigid structure provides enhanced strength and durability and also has the ability to resist deformation. It plays a significant role in steel buildings and reinforced concrete. 

In this article, you will learn what a rigid frame structure is, its advantages, disadvantages, and applications. Understanding its complete concept can help you while you are involved in a new construction project.

What is a Rigid Frame Structure

A rigid frame structure is one type of structural system made of straight or curved members that are connected by rigid joints. The structure uses continuous members, such as columns and beams, to form an interconnected framework.

The rigidly connected joints ensure a strong and stable structure that can resist both vertical and horizontal loads. This frame structure is widely used in civil engineering to manage shear, bending, and axial loads.

Application of Rigid Frame Structure

Rigid frame structures are a common construction practice used in various construction projects ranging from residential to high-rise buildings. Let’s see them in detail:

Industrial and Agricultural Buildings: Rigid frame structures are often used in industrial buildings like warehouses and manufacturing plants, and agricultural buildings include barns and storage facilities. The enhanced strength and durability of rigid frames make them an ideal choice for efficient storage and handling of goods. It safeguards the priceless machinery and merchandise even at weather fluctuations.

Residential Buildings: Beyond industrial and commercial applications, rigid frame structure also plays a vital role in residential construction. It creates a unique and modern structure with custom ideas like large windows and open floor plans.

Office Spaces: A rigid frame structure is a perfect choice for companies of all sizes, from startups to corporate headquarters. It creates an adaptable, contemporary, and effective atmosphere that is both visually interesting and meets the customary office requirements.

Retail Spaces: Rigid frame metal structures provide complete freedom to create superior layouts that potentially improve operational efficiency and customer experience. Because it is versatile, companies not only achieve their practical requirements but also their corporate identity.

Properties of Rigid Frame Structure

Rigid frame structures carry several distinct properties, such as:

Continuous Members: As mentioned earlier, the rigid frame structure is composed of continuous members such as columns and beams. They eliminate the weak points caused by separate members in structures.

Rigid Connections: The joints between members are fixed, which efficiently transfers the loads and forces throughout the structure. It resists bending moments, shear, and axial loads.

Stability: Rigid frames are well-known for their inherent stability, allowing structures to withstand lateral loads like earthquakes and wind. They keep the structure strong and durable even in heavy weather conditions.

Large Spans: If you are planning to construct a home with large open spaces without any intermediate support, then rigid frames are a perfect choice. They provide complete flexibility in both design and layout.

Advantages of Rigid Frame Structure

This structural method offers numerous advantages to the construction, including:

Enhanced Structural Stability: The rigid connections used in these frames provide excellent stability to the structure, supporting it to withstand significant loads and lateral forces. It is highly suitable in areas susceptible to earthquakes and high winds.

Improved Durability: Rigid frame buildings are resistant to weather extremes and daily wear and tear. It causes no significant damage, like cracks in the construction. You can trust that rigid structures can offer long-term reliability that is built to last.

Efficient Space Utilization: Rigid frame structures are engineered to maximise the square foot, resulting in optimal space utilisation. It improves operational efficiency and boosts productivity. Flexibility is at the core of rigid frames. You are open to planning for specific layouts or open floor spaces to make your available area wider.

Cost Efficiency: Compared to other frame types, rigid frames are less expensive to construct. They require minimal internal supports or bracing and no costlier supporting materials are required.

Disadvantages of Rigid Frame Structure

Despite their advantages, rigid frames also have some drawbacks, such as:

Complexity: In comparison to other framing structures, rigid frame design and construction can be more complex to handle. They need more precise planning and calculations. It is because of intricate connections between members such as columns and beams.

Sensitivity to Settlement: The sensitivity of rigid frames can be varied for every settlement of the foundation. It may cause unbound stress to the construction, leading to potential damages.

Limited Flexibility: The rigidity of the connections between members can make the modification difficult. It can be quite complicated to expand or modify the structure in the future.

Design Considerations for Rigid Frame Structure

When designing the rigid frame structure, there are several key aspects to consider. It ensures the strength, durability, and functionality of the structure.

Load Analysis: Load analysis is a crucial step that involves analysing the different types of loads that the structure will be subjected to throughout its lifespan. By accurately estimating the loads, engineers can plan for durable structures without causing any damages or failures.

Material Selection: Choosing the quality materials ensures the structure’s ductility, strength, and durability. Based on the building usage, you can choose concrete or timber according to your requirements. To ensure enhanced fire resistance and durability, concrete can be a perfect choice. Use timber in terms of strength and can be used for smaller-scale projects.

Foundation Design: Each soil has different properties that can influence the foundation design. To avoid excessive stress concentration, it is essential that your design should accommodate differential settlement.

Aesthetics: Rigid frame structures are not only visually appealing but also can be customised with various aesthetic effects, such as unique shapes, clean lines, and open spaces.

Final Lines

Rigid frames are significant for constructions as technological advancements in the future are typically unpredictable. They can be quite helpful for many projects when following the right strategies. Presently, they can be used in various applications according to their requirements. Since the industry is focusing on improvement to achieve a better version.

Encumbrance Certificate: A Guide and Online Applications

0
encumbrance certificate

An encumbrance certificate (EC) is an official document required when handling land and property transactions in Tamil Nadu. The EC is evidence that a particular property is clear and free from any legal or financial liabilities. It safeguards the buyers from the violation of determined laws and regulations.

In Tamil Nadu, EC is referred to as the villangam certificate, a vital part of the property transaction process. This article explains what an encumbrance certificate is, its significance and its validity. Understanding this concept helps you when dealing with property transactions.

Overview of Encumbrance Certificate

An encumbrance certificate for a land or property confirms the property ownership status, including sales and transfers. It helps identify whether the land is encumbered with any potential financial obligations, such as claims, loans, or double registration.

It is issued by the sub-registrar of the property jurisdiction. This is a crucial document to certify that the property has clear titles and the absence of encumbrances, thereby safeguarding the buyer’s interests.

Importance of Encumbrance Certificate

EC plays a vital role in every property transaction in Tamil Nadu. Here are the major significances involved in it:

Free From Legal Claims: It is essential to ensure that there are no legal complications or controversies surrounding the land you are buying. In order to identify that, you need an encumbrance certificate for that property.

Loan Approval: When you are taking out a loan from banks or financial institutions, they expect all crucial documents to be verified. Among them, EC is the most required document for successful loan sanction.

During Buying & Selling: Whether you are buying or selling a property, the prospective buyers require an EC to confirm the legal ownership. It is the simple and easy method to enable a smooth and trouble-free property transaction process.

Prevent Fraudulent Activity: When it comes to property transactions, there are many loopholes for fraudulent activity. By verifying an encumbrance certificate, purchasers can do registration with peace of mind.

Legal Approvals: In some cases, EC is often required by government agencies when you apply for legal approvals like land conversion, property development, or building.

Encumbrance Certificate: How to Get in Chennai

Offline Process:

Obtaining an encumbrance certificate offline in Chennai involves these simple steps. Take these actions:

Visit the Sub-Registrar Office: Visit the sub-registrar office in which region of Chennai your property is located.

Submit the Application: Fill out the application form for an encumbrance certificate with appropriate details. Ensure you attach the mentioned paperwork relevant to the property, such as address proof, the specifics of the property, and title documents.

Pay Fees: Pay a processing fee for the application. You can pay either directly or using the payment gateways they support.

Verification Process: After submission, a verification process of the documents will begin. An appropriate authority verifies the submitted papers to ensure the details are correct.

Issuance: Once a thorough examination is complete, the encumbrance certificate for your property will be granted within 15 to 30 days. It will clear a detailed list of transactions involving the land or property.

Online Process:

If you want to apply for the EC online in Chennai, make use of the TNREGINET platform. Here are the lists you need to follow:

  • Create your user account in TNREGINET. Fill in the required information, such as address, username, password, identity number (driving licence, PAN, or Aadhaar), and others.
  • Once you have logged in successfully, search and apply the EC under the section of E-Services.
  • Enter your property details, such as address (including sub-registrar office, zone, and district), survey specifics, home specifics, start and finish date of the EC, and other relevant facts.
  • Once the details are entered, you will be navigated to the payment section. Use the mentioned payment gateways to process your application fee.
  • Once the payment has been done successfully, make a note of the transaction ID, bank reference, and CIN.

What Are the Documents Required for an Encumbrance Certificate?

Some of the important documents required while applying for an encumbrance certificate in Chennai, are:

Title Deed or Sale Deed: This is a crucial document that indicates who owns the property and also includes location, borders, size, and approximate value.

Address Proof: Submit the government-approved proof as evidence, such as a voter ID, Aadhar card, passport, and any other valid proof.

Tax Receipts: Property tax receipts act as proof for paying regular taxes. They must be verified by authority.

Power of Attorney: If a property or land is registered on behalf of someone, this document is necessary. When there are no third parties involved, this paperwork is not required.

Encumbrance Certificate Vs. Non-Encumbrance Certificate

Encumbrance Certificate: The encumbrance certificate contains significant information about inheritance patterns, land leases, mortgage-related details, sales, and purchases. As a buyer or purchaser, it is essential to verify this information to confirm that a property is free from any legal liabilities. This certification is issued on Form 15, and it may take 15 to 30 days to arrive.

Non-Encumbrance Certificate: The non-encumbrance certificate, on the other hand, acts as proof that no one is able to claim the ownership of a property and that no property is mortgaged. This certificate takes nearly 20 to 30 days to receive.

Final Thoughts

An encumbrance certificate is an official document that is primarily useful for non-agricultural properties. It is the first paperwork to be verified when checking for any property or land to buy. The steps to apply for an EC may vary for both online and offline processes. People can follow their convenient steps to acquire an EC. The legal formalities for applying for an EC may vary for every region, so you can check with your region’s sub-registrar office.

Retaining Wall Design – Types, principles and Guidelines

0
Retaining wall design

Retaining walls help keep structures in place to prevent the soil from shifting from one place to another. They protect heavy structures or buildings from soil erosion. They are widely used to build landscapes. In high terrain elevations, structures that protect the roads and landscaping are constructed through retaining walls. This article will discuss the principles, types, design, and other applications in detail.

What is a Retaining Wall?

The ultimate goal of retaining walls is to withstand the earth’s pressure, rock, and other materials to stabilise slopes and prevent soil erosion. The soil on the back is at a high elevation, and the pressure exerted by this holds it back, called backfill. Retaining walls balance different ground levels, especially when the soil at the back is higher than in front. Their extensive uses are to build deep structures to the ground level, such as basements, and wing walls of bridges, and to hold slopes in hilly areas.

Types of Retaining Walls

The four main types of retaining walls that can be chosen based on several factors of each construction project are as follows:

  1. Gravity Retaining Walls: Gravity retaining walls use their overall weight and mass to counteract the pressure exerted by the soil from backfill. The heavily constructed structure creates a downward force that prevents the wall from falling or moving along the surface. These massive structures are constructed using materials such as concrete, masonry, bricks, blocks, and poured-in-place concrete. 

Some features of gravity retaining walls:

  • They are wider at the base to counteract horizontal pressure at depth.
  • The sloped faces can retain heights of up to 3 meters only.
  1. Cantilever Retaining Walls: Reinforced concrete is the major component in building cantilever retaining walls. They have specially designed foundations that are L-shaped or inverted T-shaped. The vertical stem and base slab are positioned under the backfill. This design transfers the vertical stress to the foundation and prevents the soil from falling. The inverted T-shape provides stability to the structure. The key structure found in the base helps anchor the heavy structure to the ground to prevent sliding. It is suitable for retained heights up to 5 m.
  2. Embedded Retaining Walls: Embedded walls can extend up to 40 m deep to the ground to create near-surface, sturdy underground structures like metro stations, car parking, basements, etc. They work by counteracting the active earth pressure being exerted above the wall.
  3. Reinforced Soil Retaining Walls: Reinforced soil retaining walls are specifically constructed to resist the lateral pressure of the soil and support the soil laterally for balancing different levels of two sides. They are economical and used for constructing highway roads, railroads, and other mass transit systems. 

Principles of the Design of Retaining Wall

The design criteria of the retaining wall must satisfy the following:

  • Prevent Overturning

The design of the retaining wall must resist rotational movement at ground level. Seismic forces can cause a significant overturning moment, potentially leading to structural failure.

Factor of safety = ΣMR/ΣMO 

where,

MR = sum of resisting moments about the toe, and

MO = sum of the overturning moment about the toe

The factor of safety for overturning should be between 1.5 and 2.

  • Prevent Sliding

The design must prevent the sliding of the wall at its base. 

Factor of safety against sliding = μRV/RH

where,

μ refers to the coefficient friction between the base of the wall and the soil (μ = tanδ),

RV and RH refer to the vertical and horizontal components of R, i.e. μRV ˃ RH

The minimum value of the factor of sliding is 1.5.

  • Prevent Tension

Tension should be avoided at the base of the wall while designing a retaining wall. If the eccentricity is greater than B/6, then the tension develops at the heel of the retaining wall.

The maximum pressure should be given as:

pmin=∑Fyb[1−6eb]

\(P_{max} = \frac{\sum F_y}{b} [1+ \frac{6e}{b}]\)

  • Prevent Bearing Failure

The pressure caused by the RV at the toe of the wall should not exceed the allowable bearing capacity of the wall. Assume the pressure distribution at the base is linear and calculate the maximum allowable pressure as follows:

Pmax = RV/B (1 + 6e/B)

where,

e = eccentricity

B = breadth of the retaining wall

The factor of safety against the bearing capacity is mentioned as Q/P.

Here Q is the bearing capacity, and the factor of safety for allowable pressure is 3.

How do Retaining Walls Work?

Retaining walls are constructed to withstand the horizontal or lateral earth pressure exerted by the material at a steeper angle than the material’s natural angle. The lateral pressure of the earth depends on the weight of the material situated behind the wall; it depends on the height and density of the backfill.

Design Guidance and Considerations for Retaining Wall Construction

Here we will explain the calculated design guidance and considerations for retaining wall construction as follows:

  1. Gravity Retaining Walls

Step 1: Choose a trial section

  • For easy construction, maintain the top width ≥ 0.3 m.
  • Make sure to have a foundation depth (D) ≥ 0.6 m.
  • The ideal base width of the wall is between 0.5H to 0.7H (H is the wall height), with an average of 2H/3.

Step 2: Calculate the earth’s pressure using Rankine or Coulomb’s theory

  • η = (45° + β/2) – (ϕ/2) – sin⁻¹(sin β / sinϕ)
  • Where β = backfill angle, ϕ = wall friction angle.

Step 3: Check stability using the weight of the soil, earth pressure, and wall weight.

  1. Semi-Gravity Retaining Walls

The same procedure applies to gravity walls, but the only difference is the smaller base width.

  1. Cantilever Retaining Walls
  • Consider the top width ≥ 0.3H.
  • Maintain the base slab width at 2H/3.
  • Stem, bottom slab thickness, and projection length ≈ 0.1H.
  • Follow similar steps as described in the gravity retaining wall.
  • If the sliding factor of safety (FOS) is less than 1.5, add a base key under the stem for increased stability.
  1. Counterfort Retaining Walls
  • Counterforts are 0.3m thick and spaced 0.3H to 0.7H apart.
  • Designed as a cantilever wall, with slight differences due to the counterforts.

Materials Used in Retaining Wall Design

The most common materials used to construct retaining walls are as follows:

  • Wood or Timbers: These are popular choices due to their flexibility and affordability. Wood retaining walls are flexible in design and suitable for curves and angles that complement the landscape.
  • Masonry: These are versatile in style and became popular for enhancing the appearance of the landscape.
  • Poured Concrete: They are known for their strength and durability. They require minimal maintenance and are ideal for modern landscape work.
  • Interlocking Concrete Blocks: They can be used for both curved and straight wall designs. Their lightweight properties and easy installation process make them an ideal choice for many projects.

Steps in Designing a Retaining Wall

Assigning the preliminary dimensions for different components of retaining walls is important before starting any construction work. Let us see the details in below table:

FeaturesMeasurements
Overall heightDepends on the project
Base widthBetween 0.4 – 0.7 of the overall height
Toe widthBetween ¼ and ⅓ of the base width
Base thicknessBetween 0.07 and 0.1 of the overall height and must be greater than 0.3 (12 in)
Stem bottom thicknessBetween 0.07 and 0.12 of the overall height
Stem top thicknessMinimum 0.2 and 0.25 is preferred

Cost Considerations for Retaining Wall Design

Many factors contribute to the retaining wall costs, including location, land preparation, permits, demolition, soil type, waterproofing, drainage, and labour costs. So, careful planning and consideration of these factors will help you to plan a budget accordingly. 

Here is an example of a cost estimation for retaining walls based on above assumptions.  

1. RCC Work Cost Estimation

Grade of Concrete: M25

Rate for RCC M25 using RMC (excluding steel): ₹6,500 per cubic meter (cum)

Total RCC Quantity: 117 cum 

Calculation:

Cost of RCC Work = Rate × Quantity

Cost of RCC Work = ₹6,500/cum × 117 cum = ₹760,500

2. Steel Work Cost Estimation

Rate of Steel Work (labour only, excluding material): ₹10,200 per metric ton (MT)

Quantity of Steel: 7.65 MT (as per provided data)

Calculation:

Cost of Steel Work = Rate × Quantity

Cost of Steel Work = ₹10,200/metric tons × 7.65 metric tons = ₹78,030

3. Total Cost Estimation Calculation:

Total Cost = Cost of RCC Work + Cost of Steel Work

Total Cost = ₹760,500 + ₹78,030 = ₹838,530 

4. Contingency Addition Contingency Percentage: 5% 

Calculation:

Contingency Amount = Total Cost × 0.05

Contingency Amount = ₹838,530 × 0.05 = ₹41,926.50

5. Final Total Cost Estimation Calculation:

Final Total Cost = Total Cost + Contingency Amount

Final Total Cost=₹838,530 + ₹41,926.50 = ₹880,456.50

Conclusion

In conclusion, a well-engineered retaining wall provides structural stability and enhances the aesthetic appearance of the mass structure. Ultimately, retaining wall design is crucial for soil erosion, landscape stability, and slope stability. By understanding the key factors, engineers can build retaining walls that stand the test of time.

FAQ’s

1. What are retaining walls used for?

The primary purpose of retaining walls is to hold back the soil and other materials in place. It also prevents soil erosion and creates uniform-level surfaces in the terrain or sloped regions.

2. How to choose the right type of retaining walls for your project?

It completely depends on the quality of the soil, the location of the structure, the intended use, and design preferences.

3. Are retaining walls difficult to maintain?

No, it is not difficult to maintain retaining walls but it requires frequent inspections.

How to Get Sale Deed Copy Online? and Processing Details

0
how to get sale deed copy online

Accessing a property’s sale deed copy online has become more convenient today. A sale deed is a legal record; it outlines the transfer of ownership from the seller to the buyer. Imagine sitting at home in comfort as you effortlessly complete the process. With just a few clicks, you can request your sale deed and download a digital copy. This streamlined process enhances transparency in property transactions. It also eliminates visiting government offices and endless paperwork.

In this guide, let us explore the step-by-step process of acquiring a sale deed copy online for your property.

Steps to Obtain Sale Deed Copy Online:

  • To apply for the sale deed online, go to the official state government online portal (each state has its own online portal for property records).
  • Register to create an account or simply sign in using your credentials.
  • Navigate to the Sale Deed section to process it among the others listed.
  • Provide necessary property details. Enter the property registration number, owner’s name, and property location. Keep the information ready before applying. Ensure to enter the correct details to avoid disputes.
  • Next, upload the necessary documents required for the application of the sale deed. Identification proof, property tax receipts, previous sale deeds, etc., might be required.
  • Pay the online sale deed application fees using any available payment gateway.
  • Finally, submit the sale deed application form after filling out the details correctly. Make sure that all the required documents are uploaded correctly. Download the received acknowledgement receipt that has the reference number. 
  • Use the reference number to track the application status online.
  • The relevant authorities will review the submitted details and documents to process the sale deed application. 
  • You will receive a notification regarding your application status via the provided email address or SMS. Once the verification process is completed, you will get a notification accordingly.
  • Once approved, you can download the sale deed copy directly from the online portal. Print the downloaded document for your records if needed.
  • If your application is rejected, resolve the issues or consult a legal expert and reapply. Refer to FAQs and help sections on the portal for any needed guidance.

Document Required for Applying for Sale Deed

  • Original Sale Deed:

This is the primary document with details of the property transaction between the buyer and the seller.

  • Identification Proof:

Valid identification document proofs are required from both the buyer and seller. Acceptable forms include:

  • Aadhar Card
  • PAN Card
  • Passport
  • Property Registration Documents:

For verification of the ownership:

  • Copies of the property registration.
  • Khata Certificate and Extract
  • Completion certificate
  • Power of Attorney
  • Property layout
  • Occupancy certificate
  • No Objection Certificate (NOC):

If applicable, obtain an 

  • NOC from the Housing Society  
  • NOC from the local municipal authority.
  • Encumbrance Certificate:

The encumbrance certificate is crucial and shows that the property is free from financial or legal dues. It certifies the property and assures the buyer that the property is not mortgaged or under any legal dispute. 

  • Tax Receipts:

Provide the latest property tax receipts. This confirms that there are no pending dues on the property and serves as proof of property ownership.

  • Payment Proof:

Proof of payment for the transaction amount is required. This can include:

  • Bank statements
  • Receipts
  • Any other relevant financial documents
  • Photographs:

Passport-sized photographs are required for documentation purposes. Photos of both the buyer and the seller need to be included in the revenue records for identification.

Time Duration for the Sale Deed Processing

Several factors determine the duration of processing a sale deed. It varies based on various factors and government procedures. Here are some key points:

Recording the Sale Deed: 

Once the property transaction is done, the deed must be officially recorded at the local government office. According to the Registration Act, 1908, the entire process of registering the sale deed online must be completed in 4 months. This process includes everything from submitting the documents to registration and ensuring proper documentation of the ownership transfer. Depending on the location, approximately, the legal recording of the sale deed can take anywhere from 14 to 90 days.

Receiving Official Deed:

Once the deed is signed and notarized, it can be filed immediately. However, the new owner will receive their official deed in the mail within two weeks to three months.

Conveyancing Process: 

The overall conveyancing process can take as little as four weeks. It includes the preparation and recording of the sale deed. However, the average time is around 12 weeks.

How Much Does It Cost to Get a Sale Deed Copy Online?

The cost of obtaining a sale deed copy online in India can vary depending on the platform and the specific requirements of the property. Here are some general estimates:

  • Government Services: 

If you use official government websites, the fees are usually nominal. 

Range: INR 100 to INR 500 per document. 

  • Private Services: 

Private platforms might charge higher fees.

Range: INR 1,000 to INR 10,000.

What happens if an Original Sale Deed is Lost?

  • File a police complaint regarding the loss of the sale deed. You can file the record at the local police station. This helps to prevent any misuse of the deed.
  • Visit the Sub-Registrar’s Office, where the property was originally registered. Then apply for a certified duplicate copy of the sale deed. This process typically involves:
    • Submitting an application form.
    • Providing an affidavit detailing the loss.
    • Presenting proof of identity and property details.
    • Paying the required fees.
  • Once the application is processed, you can obtain a certified copy of the sale deed, which can be used for legal and property transactions.
  • It’s advisable to consult with a legal expert to ensure all steps are correctly followed and to handle any issues.

Can you Sell the Property Without the Original Sale Deed?

Selling a property without the original sale deed is possible. But it involves some additional steps and precautions. Here are the key points to consider:

  • Apply and obtain a duplicate sale deed at the local registry’s office. This process usually requires documents such as
    • proof of identity
    • Address proof
    • Property ownership proof.
  • Conduct a title search to confirm the property ownership. This can be done through the local land registry office. 
  • Prove the ownership of the property.
  • If the property purchase happened at any time in the last 30 years, then you can obtain the record of the property deed at the county register office. 
  • Consult with a professional legal expert to ensure all necessary steps are taken. 
  • In some cases, certified copies of the original deed or other supporting documents can be used to prove the ownership. It includes:
    • mortgage payment statements
    • utility bills
    • property tax records 
  • If any of the above doesn’t work, you may need to register it with the local land registry office. This process can be complex and may require additional documentation such as:
    • Identity Proof
    • Address Proof
    • Property Tax Receipts
    • Encumbrance Certificate
    • Previous Sale Deeds
    • No Objection Certificate (NOC)
    • Affidavit
    • Possession Letter
    • Building Plan Approval

Conclusion

In conclusion, the ability to obtain the sale deed copy online marks a significant step towards the modernisation of property management. As you navigate through the steps outlined in this guide, it becomes a simplified process. The convenience of securing the property sale deed online helps keep records organised and saves time. This approach is more transparent and efficient. Informed decisions and empowered ownership pave the way to a future where property transactions are seamless and accessible to all.

Pouring Concrete – Techniques, Tips, and Best Practices

0
pouring concrete

Pouring concrete is a fundamental process and acts as the backbone of a structure’s durability and resilience. Concrete pouring is also known as concrete placement. The process begins with the proper preparation of materials, ensuring the formwork is robust, levelled, and reinforced. Several factors directly influence its outcome. A technical challenge that arises in concrete pouring is timing. 

Concrete is highly sensitive to various environmental factors, and therefore, the process is carried forward under controlled conditions to ensure quality. In today’s construction industry, various advancements have been made to improve the workability of concrete, shaping the future of this process. Facts reveal that the global concrete industry produces around 30 billion tons annually, with advances in technology like self-compacting concrete and high-performance concrete improving construction efficiency. Let’s get a detailed glimpse of concrete pouring in the following blog.

What is Concrete Pouring? 

Concrete pouring is significant for creating a foundation that is strong and durable. Its attributes and versatility allow concrete to be molded into any required shape. It is a suitable and ideal choice for any construction project due to its wide range of beneficial features. Over time, concrete, with the incorporation of advances in technology, has greatly evolved. Such innovative solutions include the introduction of reinforced concrete and prestressed concrete. These contribute to improving strength and durability. 

How to Pour Concrete: step-by-step process

Concrete pouring is considered a meticulous process, requiring proper planning and execution. As a fundamental task in any construction project, it involves several steps. These steps are followed to ensure the quality and structural integrity of the project to attain longevity. The process involved in the concrete pouring:

Site Work:

Site work or site preparation is an important phase in a construction project. Before pouring concrete, ensure proper cleaning of the area. It is essential to remove any debris, old concrete, or rocks. An unobstructed workspace is required before the excavation is performed on the site. 

Secondly, maintain a proper level base. Excavate the area to the desired depth and prepare the subgrade by compacting the soil for stability.

Once a stable subgrade is established, the sub base is installed—a base composed of a layer of 4–8 inches of granular fill or road-based material. 

The next step involves compacting the subbase using a hand tamper or plate compactor to ensure stability. 

Finally, measures are implemented for moisture control. The damping of the sub-base prevents it from excessive water absorption.

Forming

Formwork plays a crucial role in achieving the precise shape of concrete structures. The process begins with meticulous planning and design of the form. Foam boards are cut to the required dimensions and carefully assembled using screws or nails before being secured in place with stakes. To ensure stability and prevent bowing under the weight of the concrete, it is essential to brace the formwork properly.

Mixing

Proper mixing of concrete provides uniform consistency, essential for strength, durability, and workability. The materials required for mixing include cement, sand, gravel, and water. Water and all ingredients are accurately measured. A concrete mixer is used where the water is added in measured portions, followed by cement and aggregates. Allow the mixer to run for 3 to 5 minutes to ensure proper mixing. Adjust the water content to obtain the desired consistency and texture. 

Different Equipment Used for Mixing:

Concrete Mixer: A machine used to mix the ingredients uniformly.

Mixing Containers: If mixing by hand, use containers like wheelbarrows or mixing trays.

Shovels: For manually mixing and transferring materials.

Measurement Tools: Proper measuring tools are used to measure the ingredients.

Placement

Pour concrete into the form before it hardens and settles. Cover the edges using a shovel or rack to evenly spread the concrete. Enhance the concrete consistency by eliminating any void or air gaps. Often a vibrator is deployed to carry out this process. A screed board is then used to level the surface for a smoother finish.

Early Finishing

Early finishing is a technique that smooths and shapes the surface.

  • Edging

Tool used: Edger

Edgers create round edges along the sides of the concrete slab, giving a finished look and preventing chipping.

  • Jointing 

Tool used: Groover tool or Saw

Joints are created in the slab to prevent cracking. A groover or saw is essential in creating them. The concrete further expands and contracts without cracking.

  • Floating 

Tool used: Bull float or hand float

Aggregate particles rising to the top are removed to smooth the surface. Move any type of float over the surface back and forth for levelling.

Troweling

Troweling of concrete is a step for refining the surface before it is fully set. This process is adopted before the concrete attains stiffness. When the concrete has hardened, begin the troweling process. Either a hand trowel or power trowel is used to continue with levelling. Finally, a steel trowel is used in the second troweling to achieve a smooth, strong finish. For larger areas, a power trowel is generally used.

Final Finishing

Several tools are used for the final finishing. A broom is commonly used to drag across the surface to facilitate a smooth finish. It creates slip resistance, providing a rough texture. Other equipment, such as a steel trowel, is employed to give a smooth finish. However, stamps and moulds are used for patterns and textures.

Curing

Curing is intended to improve the integrity, durability, and workability of the concrete. It aims to prevent early cracking, improving performance and lifespan. Concrete needs 24 to 48 hours to set initially.

Methods of Curing Process:

  • The concrete is spread or covered with sponges to keep it moist. This process is called water curing. 
  • Use plastic sheets or a wet blanket to retain the moisture in the concrete. 
  • A liquid membrane compound is applied to the concrete surface to reduce evaporation. 

Tips for Laying Concrete

  • Plan with all necessary permits. Determine the area to be concreted and clear the place for a clean and stable base. This ensures proper ground levelling and soil compaction for laying the concrete.
  • A wise selection of form boards, particularly straight ones, is required. Before nailing, the forms must be properly aligned and levelled. Secure the form by driving stakes into the ground.
  • Prior calculation of concrete helps ensure the base is accurately levelled. 
  • For additional strength and to prevent cracking, reinforce the concrete using rebars or wire mesh.
  • Be sure to wear gloves, safety glasses, and masks. Also, avoid excessive workability of concrete to prevent cracking.
  • Use vibrators to spread the concrete evenly. Never add too much water to the mix, as this weakens the concrete over time and can lead to cracking or poor durability.
  • Screed boards can remove excess concrete. During the curing process, protect the concrete from extreme weather conditions. 
  • Thoroughly mix the concrete to achieve a consistent texture and ensure an even distribution of materials throughout the slab.

Mistakes to Avoid While Pouring Concrete

  • Concrete that is too wet or too dry compromises its strength, reduces workability, and creates a brittle structure.
  • Improper reinforcement of concrete can affect structural integrity. When the reinforcing fibres and steel rods are misplaced, changes in the grid patterns occur.
  • Poorly built forms will result in uneven slabs and affect the strength and appearance of the structure.
  • Overwatering or underwatering of the concrete causes poor durability. This can affect the integrity of the structure.
  • Concrete vibrators are essential for larger concrete pours. This helps avoid the existence of voids in the concrete.
  • Failing to plan ahead is a common mistake. Before beginning, it is crucial to determine the thickness, size, and placement of the concrete pour.
  • The compaction of the subgrade is often left unnoticed. However, it is crucial to prevent shifting and concrete slab settlement.
  • When control joints are ignored in the concrete, it often creates random spaces and leads to cracking patterns. 
  • The curing process in concrete pouring must be done properly. Rushing can cause surface defects and reduced strength in the concrete.

Conclusion

Concrete pouring stands as the foundation of any construction project. It is a crucial factor that affects the durability, strength, and stability of the structure. There are no shortcuts to concrete pouring; all that matters is precision, patience, and attention. Every detail needs to be done properly with the right tools. Concrete pouring demands proper execution with attention to achieve the desired results.