Home Blog Page 22

Terracotta Jali Bricks – Designs, Benefits, and Modern Uses

0
Terracotta Jali Bricks - Designs, Benefits, and Modern Uses

In art and architecture, the use of terracotta jali bricks is prevalent around the globe. It has been a significant aspect of building materials in many ancient civilisations. With their distinctive, creative designs and outstanding performance, terracotta jali bricks stand out in the quest for modern architecture’s ideal fusion of aesthetics and functionality, giving your constructions an unmatched level of elegance and durability. More information regarding the functions, styles, uses, and characteristics of terracotta jali bricks will be provided to you here.

What is Terracotta Jali Brick?

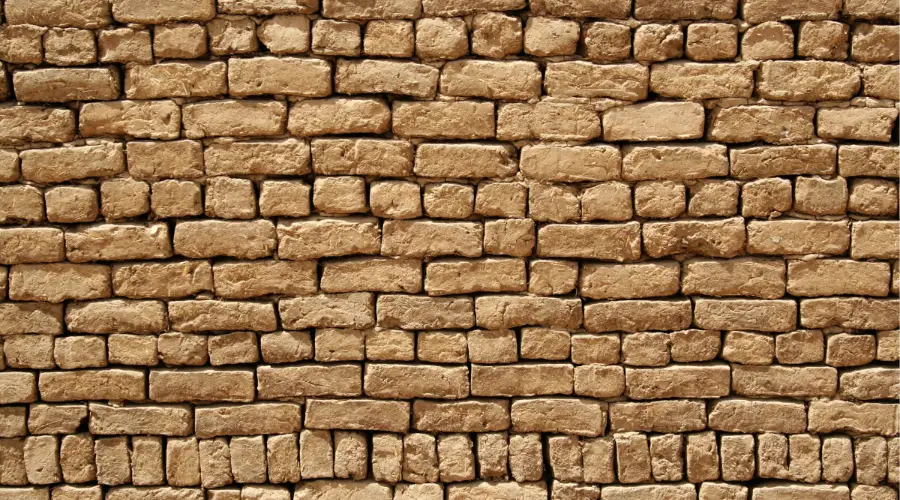
Terracotta jali is also known as clay jali, which is purely made from red clay. They are available in floral patterns, geometric lines, and squares. The clay jalis will provide you with an earthy feeling. The clay jali looks cosy and invites the warm and comfortable sunlight into your home. 

Types of Terracotta Jali Brick

Terracotta jali bricks are available in two major varieties. 

  • Solid Terracotta Jali Brick

Solid clay can be used to create thick, dense, and solid jali bricks. It is employed in the construction of massive structures and load-bearing walls. 

  • Hollow Terracotta Jali Brick

Because of their hollow core, these bricks weigh less. Additionally, the hollow form improves their insulation capabilities, aiding with soundproofing and temperature regulation. They are typically utilised for decorative components, non-load-bearing walls, and partitions.

Designs of Terracotta Jali Brick

Designs of Terracotta Jali Brick

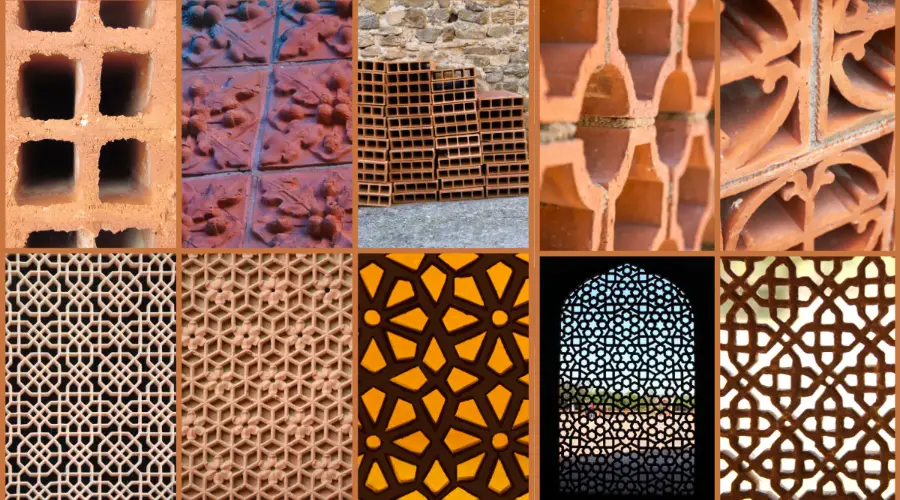
The different designs of terracotta jali brick include four-petal, T.V. jali, sapphire jali, opel jali, amber jali, jade jali, camp jali, pearl jali, topaz jali, and diamond jali. Every company provides unique designs and offers specified features. They are also available in floral patterns, geometric lines, and squares. Robust foldable gates or movable dividers are made from terracotta jalis on metal frames. They give versatility and aesthetic appeal while blending style and functionality, making them easily incorporated into various architectural projects.

Applications of Terracotta Jali Bricks in Modern Architecture

living rooms terracotta screen

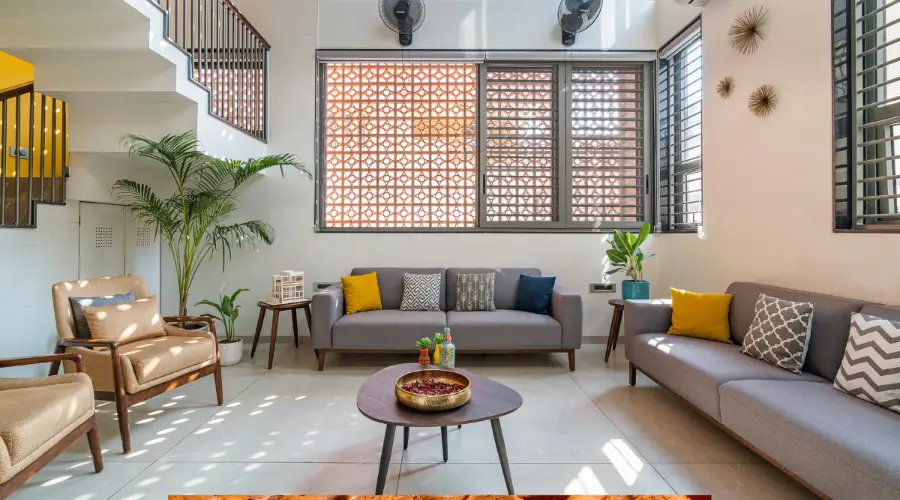
For expansive areas that have subtle divides and transparent lighting, terracotta hollow window blocks are perfect. By acting as partitions, they produce a play of light and shadow and improve the perception of space. Terracotta bricks offer a blend of rich, rough, and delicate aesthetics for a flexible home style, adding texture and variation to interior design.

Example 1: To link and organise the area, use a terracotta screen block wall between the dining and living rooms.

Example 2: Terracotta bricks act as a wall between the living room and balcony, absorbing and dispersing light to create a cosy, gloomy atmosphere.

Properties of Terracotta Jali Bricks

Terracotta clay, which is used to make terracotta screen blocks, adds a natural, earthy feel and helps cool a space. These blocks are becoming more and more common in offices and households for several reasons:

Durability: Terracotta is long-lasting and doesn’t crack or scratch under strain. It is impervious to water, fire, erosion, and the growth of mould or bacteria. Low maintenance and repair expenses result from this.

Economical: Like other building materials, terracotta jali bricks are reasonably priced for their high availability. It is a good investment opportunity and provide a warm appearance.

Gorgeous Look: Terracotta’s rust, yellow, and orange shades lend a cosy, warm vibe to interior areas. It offers a wide range of design possibilities for different spaces because it can be moulded into different forms and patterns. For more variation, the surface can be painted.

Easy Maintenance: Because terracotta doesn’t absorb water, cleaning it with a moderate washing solution is simple. It is non-slip, low maintenance, and perfect for places like bathrooms.

Visual Effect: Beautiful shadow patterns can be produced by dividing huge areas with terracotta blocks that let light in. They are ideal for dividing spaces such as the dining and living rooms, balcony and family room.

Simple to Install: Installing terracotta jali walls is quick and easy, requiring only structural glue.

Durable Colour: Even when exposed to rain or sunlight, terracotta jali bricks will not deteriorate over time. After installation, they retain their colour for many years.

How to Install Terracotta Jaali Bricks?

Installation Advice:

  • Use tile adhesive or cement mortar to install them like ordinary bricks.
  • Use a stainless steel grid to hold the jaali blocks firmly in place for wider spans.
  • Any colour can be used to paint jaalis, but first, use a primer to get a smooth finish.

These bricks offer privacy, ventilation, and sun protection while dividing spaces.

Where to Install Terracotta Jali’s for Better Use?

By letting in fresh air and filtered sunlight, they can change outdoor areas like balconies. They enhance the design’s elegance and work well for stair railings as well.

Jaalis are great as accent pieces in porches, kitchens, or at bar faces, or as ornamental partitions to divide spaces like dining and living areas.

Using jaalis in interior design creates an organic, earthy atmosphere.

Advantages of Terracotta Jaali bricks

  • It is an environmentally sustainable cooling option because the natural clay material lowers indoor temperatures.
  • Terracotta jalis, with their perforated designs, combine style and utility to create visually appealing screen systems.
  • These jalis can improve the overall design in a variety of locations, including feature walls, railings, visual barriers, entrances, and facades.
  • They give exterior designs a refined and aesthetically pleasing touch that makes buildings stand out.
  • Terracotta jalis are durable and require little structural support because of their thickness, which guarantees both aesthetic appeal and usefulness.

Disadvantages of Terracotta Jaali Bricks 

  • Even though terracotta jaali bricks have more advantages, jali works come with some additional drawbacks. Customised jali works may require more craftsmanship, which can be more expensive. 
  • The complex patterns in jali may collect more dust than ordinary bricks. So, regular cleaning is required to maintain the appearance of the jali. 
  • The perforations in the jali may weaken the structural integrity of the wall if they are not supported properly. 
  • While it promotes ventilation and sunlight into your house, it cannot give much protection against heavy weather, like rain, which makes it unsuitable without waterproofing. 
  • Sealants must be used to protect the top layer of the jali bricks.

Conclusion

In conclusion, terracotta jaali bricks have their pros and cons, and the choice depends on the project’s needs. Terracotta jaalis are ideal for a traditional look and eco-friendly design. Terracotta jali bricks enhance decor while simultaneously facilitating light transmission, ventilation, and space separation. Light flowing through them creates patterns that give the surroundings unique effects.

FAQ’s

1. What ingredients are required for making terracotta jali?

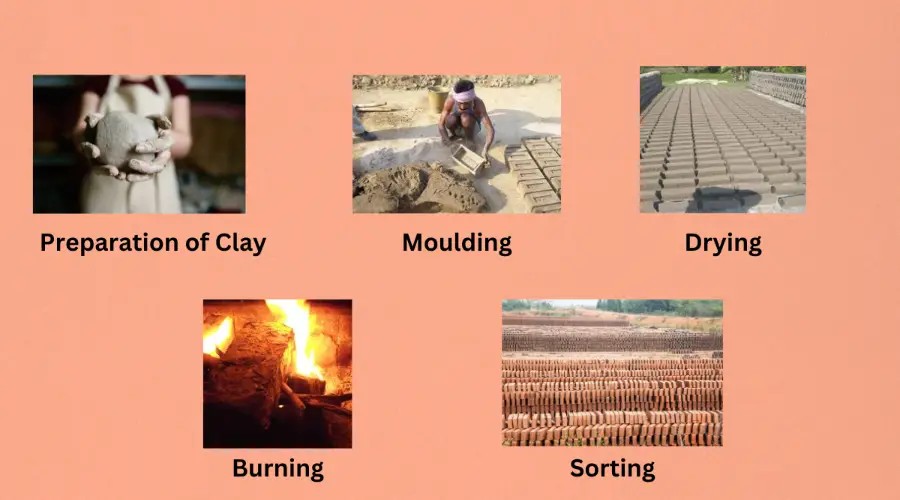
The characteristic earthy colour and texture of terracotta jalis are derived from clay that is burnt at high temperatures.

2. What disadvantages do terracotta jali have?

Terracotta jali has several drawbacks, such as being brittle and prone to breaking when struck, as well as possibly deteriorating over time if improperly cared for.

3. What are the benefits of terracotta jali?

While letting light through, terracotta jali offers advantages like better air circulation, natural cooling, superior aesthetics, and more privacy.

4. How long do we have terracotta bricks?

Because of their resilience to weathering and moisture, terracotta bricks are a dependable long-term material that stands for many years.

Guide to PVC Roofing Sheets: Types, Installation, and Benefits

0
PVC roofing sheets

Recently, PVC roofing sheets are gaining popularity in the Indian construction industry. Made from polyvinyl chloride, these sheets are known for their durability, low maintenance and versatility. Manufacturers engineer them in such a way that it can withstand harsh weather, UV exposure and other environmental conditions. With all these qualities, these sheets are some of the most preferred choices for industrial and residential applications. Despite being lightweight, their sturdy nature simplifies the installation process, providing optimum roofing solutions for various types of buildings. 

Covering everything from manufacturing, the various types available to the advantages and disadvantages, this blog explores everything you must know about PVC roofing sheets. Whether you are a homeowner looking to install the sheets for your new home, or a construction professional looking to install them in your commercial, industrial and home renovation projects, read this guide to get a comprehensive understanding and make an informed decision.

PVC Roofing Sheet- What Is It?

Polyvinyl Chloride, abbreviated as PVC, is a synthetic plastic polymer used in numerous applications, including roofing. Manufacturers design PVC roofing membranes by bending PVC with other additives and reinforcing materials. These together form a strong flexible and highly resistant material, making an excellent roofing choice for residential and commercial buildings. The sheets include a single-ply membrane with two layers of vinyl bonded to a polyester scrim layer. 

Since these roofing sheets deflect intense UV rays, manufacturers paint them in white or other lighter shades. Compared to other traditional options like metal panels and concrete roofs, these innovative roofing systems are easy to install. 

Composition of PVC Roofing Sheets

During the manufacturing of PVC sheets, vinyl resin is compounded with plasticisers, ultraviolet light inhibitors, heat stabilizers, biocides and colour pigments. The membranes generally consist of a polyester reinforcement scrim that the manufacturers place between two layers of PVC material. The single-ply top membrane contains additives that make it resistant to UV rays and prevent curing. Manufacturers make the bottom ply (the ply facing the roof) with black PVC. The ply mostly consists of plasticizers as they boost flexibility. However, it does not contain any other fillers or additives.

PVC Roofing Sheets: Types

People use roofing sheets and membranes for numerous reasons. While some use them to enhance the aesthetic value, others install them to protect their homes from external weather conditions, including torrential downpours, snow and heavy winds. The level of protection offered by a plastic roofing solution depends on the combination of material used by the manufacturer. These roofing solutions come in the following varieties.

Corrugated Roofing Sheets

Corrugated Roofing Sheets

It is one of the strongest roofing sheets available in the market. The sheets are suitable for agricultural buildings, garages and industrial sheds and have one of the best life spans. Unlike flat roofing sheets, the corrugated roofing sheets do not get damaged easily. They can be further classified into the following:

  • Bitumen:  Besides being lightweight, bitumen coatings offer excellent resistance to water. Therefore, they find the best use in garages, sheds and agricultural buildings.
  • PVC Plastisol: The sheets are highly resistant to scratching and damage. Though they have a life span of 20 years, they can last over 40 years with proper maintenance.
  • Polyester-painted sheets: These sheets are highly suitable for agricultural buildings, as they have high resistance to scratching and damage.

Flat Roofing Sheets 

These sheets find the most use in industrial complexes and commercial buildings. Flat PVC sheets are popular for their durability and can withstand frequent exposure to extreme temperatures and weather conditions. Besides, they require low maintenance, making them an ideal choice for warehouses, manufacturing facilities and multi-store retail complexes.

Apart from these two major shapes, PVC roofing sheets are also available in various other forms which can also be customised based on individual project needs and desires. 

Manufacturing of PVC Roofing Sheets

Raw Materials Required

These include the following:

  • Vinyl chloride monomer: The solution, also known as VCM, is obtained from the reaction between chlorine and ethylene and is the essential building block of PVC.
  • PVC Resin: It forms by polymerizing vinyl chloride molecules, forming the base structure of your PVC roofing solutions.
  • Plasticizers: Manufacturers add them to the resin to enhance its flexibility and workability.  Although most manufacturers use phthalate-based plasticizers, bio-based plasticizers are becoming popular due to environmental concerns.
  • Stabilizers: They help prevent PVC from degrading during the manufacturing process. They offer thermal stability to the sheets and prevent oxidation.
  • Fillers and Pigments: Manufactures add various fillers and pigments to enhance specific properties or to add colour to the sheets.

The Manufacturing Process

The manufacturing of the PVC profile sheet involves a systematic process, where the manufacturers ensure the product’s quality and characteristics at the end of each stage. The process involves the following stages:

Polymerisation

It’s the first step in creating the PVC roof sheet design. The vinyl chloride monomer at this stage undergoes a process known as polymerisation. Here several VCM molecules link together to form a polymer chain, which the manufacturers achieve through either emulsion polymerisation or suspension polymerisation.

Producing the PVC resin

PVC resin is obtained in the form of small particles after polymerisation, which most manufacturers refer to as PVC resin granules. The granules serve as another base material of the sheet.

Compounding

It forms the next step, wherein the manufacturers mix the resin with various additives to improve its properties. They mix the additives like pigments, stabilizers, fillers and plasticizers in measured quantities. They then blend them together with the resin to create a homogeneous mixture.

Extrusion

Once the PVC compound is ready, manufacturers feed it into an extruder, a machine responsible for melting the mixture to form a uniform molten mass. The manufacturers forces the molten PVC through a die, imparting a desired shapes and thickness to the sheet. The sheets go through either flat-die extrusion or calendaring depending on the type of sheet manufactured.

Cooling and sizing the sheets

After extrusion, the new and fresh roofing sheets undergo cooling and solidification. Proper cooling is essential to prevent warping and deformities in the final product. The manufacturers then trim the sheets and cut them to the required dimensions.

Embossing

Have you ever noticed a specific texture or pattern on the sheets’ surface? These sheets undergo a process called embossing to produce such patterns, which involve embossing rollers that press the desired design onto the sheet during the cooling process.

Surface treatment

It is an optional process. During the process, the PVC sheets undergo a special treatment that enhances their properties. Surface treatments often include corona treatment to improve printability. The manufacturers apply a special coating to boost the sheet’s chemical resistance.

Quality control

During the manufacturing process, the manufacturers employ strict quality control measures, ensuring the sheets meet the required specifications and standards. The sheets undergo various tests, including checking of tensile strength, tear resistance and thickness measurements that ensures the sheets’ qualities.

Packaging

After passing the quality checks, the manufactures engage in packaging the sheets. It prevents the sheets from damage during transportation and storage. With proper packaging, you can prevent any damage or contamination that could affect the sheet’s performance.

Installation Process of PVC Roofing Sheets

Installing your PVC roof on your building involves a systematic process. These include:

Planning and Preparation

Before installing the roof, you must plan and prepare in advance. It starts with analysing the condition of your current roof and determining whether PVC roofing is ideal for your building. After analysing the condition, calculate the quantity of materials required for the installation. These include PVC sheets, adhesives, fasteners and flashing.

Removal of Existing Roofing

If your roof already has a roofing solution, you first need to remove the existing roofing. This includes repairing the damages of the underlying structure. It’s a labour-intensive process and requires careful attention so that the roofing you install does not cause further damage. Look for the presence of debris and leftover materials and clean them thoroughly. Inspect the surface for any unattended imperfections that might affect the installation. With proper preparations, your new roof will provide optimal performance and longevity. 

Install the Insulation

After removing the old and damaged roof, it’s time to install the insulation on the roof deck. Proper insulation helps improve energy efficiency, reducing the heating and cooling costs of the structure. Choose the best quality insulation materials that are compatible with vinyl roofing systems. When installing the insulation, ensure to secure it well to prevent gaps and air leaks that often undermine the effectiveness of the insulation. It helps maintain a consistent interior climate, prolonging the lifespan of your roof.

Installing the PVC Sheets

Once you install the insulation, it’s time to fasten the membrane. You need to start by rolling out a complete roll of the selected PVC roofing sheet. Now, first fasten one end of the sheet by holding the material straight and tight. This minimises the wrinkles on the roll. Next, roll out the second sheet to overlap the fasteners installed along the previous sheet. Repeat the process. Once you fasten the sheet with the seams, you can weld them with a hot air welder to form one monolithic sheet.

Adding Finishing Touches

Your roof installation ends with adding flashing around the edges and penetrations such as chimneys and vents. Flashing prevents the entrance of water at vulnerable points of the roof. Finally, you must inspect the roof carefully for the presence of gaps and imperfections. Add any required final changes, such as gutter installation.

Advantages of PVC Roofing Sheets

With PVC roofing, you get numerous benefits. Here’s what makes the material one of the most preferred options for roofing:

Energy Efficient

The material’s effective properties reduce the amount of heat absorbed by a building, thereby keeping your interiors cooler. It reduces your energy bills, minimising the strain on coolers and air conditioners.

Durability and Longevity

Another significant advantage of PVC roofing is its durability. With proper maintenance, a PVC roof can last between 20 and 30 years. It can withstand a variety of harsh weather conditions, including high winds, heavy rain and even hail.

Low Maintenance 

Another significant property of these roofs is that they require low maintenance. Your PVC roof panels require only routine inspections and occasional cleanings to keep the roof in top conditions.

Chemical Resistance

Most commercial and industrial settings have high exposure to harsh chemicals. In such a setting, PVC roofing is an ideal choice. The material is highly resistant to such elements, making it a durable option for such an environment.

Disadvantages of PVC Roofing Sheets

No roofing material is perfect, and it’s the same with PVC sheets as well. When you are aware of the challenges, you make an informed decision. The following are the drawbacks of choosing PVC profile sheets as your roofing solution.

Environmental Concerns

Since PVC is synthetic plastic, its use raises numerous environmental concerns. During the production of the material, the manufacturers use fossil fuels that generate numerous by-products. However, you can recycle the material, helping mitigate the environmental impact.

Initial Cost

These sheets have a higher cost compared to the traditional roofing system. However, the long-term benefits the sheets offer, including energy efficiency and low maintenance often justify the initial investment.

Temperature Sensitivity

PVC is highly sensitive to extreme temperature fluctuation, preventing it from expanding and contracting. Despite the good thermal stability, proper installation is crucial to prevent issues related to temperature changes.

PVC Roofing Sheet Price

A PVC roofing membrane might cost around INR 100 and 1000 per square feet, depending on the type. However, when installing PVC  sheets on your roof, you must understand the factors that impact the overall material cost. Enlisted are some of these factors

  • Raw materials: The price of the primary component- polyvinyl chloride resin affects the overall cost.
  • Transportation and logistics: The distance between the manufacturing unit and the project site affects the transportation costs. The logistics expenses include mode of shipping, freight fees and fuel prices.
  • Installation requirements: The complexity of your roof’s design and the specialised labour required for the right installation adds to the project cost.

Conclusion

With a durable, cost-effective and versatile solution for various building projects, PVC sheets have revolutionised the industrial roofing landscape. However, when installing your PVC sheets do not forget to assess your requirements and budget.

As a leading construction firm in India, Brick & Bolt aims to provide design-build services on all your projects. Whether you are building your dream home, redesigning your existing home or want to install a new roofing solution, the professionals associated with the organisation make the process smooth, memorable and efficient. With real-time data tracking, transparent communication, quality checks and regular updates on your projects, the organisation promises to bring trust into the informal field. Contact Brick & Bolt today to build your dream home!

Thermal Load in Construction – Importance, Types & Reduction

0
Thermal Load

Thermal loads are considered the amount of heat energy that a building absorbs and releases depending on the surrounding environmental factors. The structure uses a variety of surfaces, including the walls, windows, and roofs, to absorb and distribute energy. If a building has to sustain itself for long periods, then it can improve energy efficiency and manage thermal loads effectively.

The operating costs of the building can be raised due to poor thermal load considerations, which lead to excessive use of energy. The people who live in the building might find this uncomfortable. To get a clear idea, you can go through the significance, types, calculations, factors affecting, and other methods to resolve thermal loads on buildings as discussed in detail.

What is Thermal Load? 

The thermal load determines the energy required to balance the heating or cooling effect of the building. Selecting the appropriate HVAC system is crucial for maintaining this effect.

You can more efficiently use solar and wind energy to illuminate your building, heat and cool it passively, ventilate, and ventilate, and design efficient HVAC systems if you know the thermal loads related to the structure and its intended usage. It is possible to harness on-site resources, which would otherwise contribute to thermal loads, to generate energy instead.

Importance of  Thermal Load in Construction

Importance of  Thermal Load in Construction

Thermal loads play a crucial role in impacting a building’s energy consumption, comfort, and long-term sustainability. The heat that enters and exits the building results from external and internal heat sources like sunlight, climatic variations, and temperature fluctuations. Handling these factors is essential for several reasons, as mentioned below:

  1. Cost savings and energy efficiency

The usage of energy is highly affected by thermal loads. The efficient design properties of the building structure can reduce the demand for appropriate heating and cooling of structures by installing the roofs, windows, and walls in the right places. Due to this, the structure is sustainable and reduces the cost overrun for energy management systems. 

  1. Comfort of Occupants

When a building’s occupants are thermally comfortable, they never experience extremes of heat or cold while they are inside. Poor conditions like overheating in the summer or overcooling in the winter could result from improper temperature control. Through efficient thermal load management, excessive heat and excessive air conditioning issues are eliminated.

  1. Structure Integrity

Thermal loads impact the building’s construction as well. Concrete and steel, for example, expand and contract in response to temperature changes, which over time may produce cracks or other damage. Designs must account for the reality that high temperatures can weaken materials to maintain structural strength.​

  1. Thermal Load Optimization for Green Building Certifications

Efficient thermal load management is necessary to lower energy consumption and greenhouse gas emissions. Buildings that efficiently manage thermal loads can earn certifications like LEED or BREEAM, which promote sustainability by reducing the need for heating and cooling and the environmental harm they cause.

  1. Adjusting to the Changing Climate

Managing thermal loads becomes ever more crucial as climate change causes temperatures to become increasingly extreme. To prevent using more energy, buildings must adjust to these temperature changes. Buildings can remain efficient and comfortable with properly optimised thermal loads, particularly in areas with harsh weather.

  1. Complying with regulations

Strict construction codes that establish requirements for thermal performance are now in place in many areas. Proper thermal load management ensures that buildings adhere to insulation and energy efficiency criteria, preventing fines and guarantees that the building satisfies energy standards.

What are the Types of Thermal Load in Construction?

The following categories of thermal loads are illustrated with basic examples:

  • The heat from sunshine entering a structure is known as solar heat gain. The size, direction, shade, and glazing of the window all affect it. Large windows facing south, for instance, might increase a building’s summertime temperature and necessitate more cooling.
  • Internal heat gain refers to heat generated within a structure by equipment, humans, and illumination. A workplace with numerous computers and occupants, for example, produces more heat than an empty storage space.
  • The amount of heat gained or lost as a result of air entering or exiting the structure is referred to as air infiltration or exfiltration. A poorly sealed building loses more heat in the winter than one with controlled ventilation, for instance.
  • Heat transmission via windows, walls, or air movement is known as conduction and convection load. A well-insulated structure, for example, requires less heating since less heat escapes through the walls.
  • The heat absorbed by materials such as stone or concrete is the thermal storage effect. For example, with concrete floors, heat can be absorbed during the daytime and released during the night, thus stabilizing the internal temperatures of the structures.

How to Calculate Thermal Load?

The heat gained or lost in a building that needs to be controlled to maintain pleasant temperatures is referred to as the thermal load. It is computed by evaluating heat transmission via ventilation, internal heat sources, and the building’s construction. Here’s a basic technique:

  • Heat Transfer via Windows, Roofs, and Walls

Apply the following formula:

Q = U×A×ΔT

U: Thermal transmittance in W/m²K.

A: Area of surface (in m²).

Δ T: The difference in temperature (in °C) between the interior and exterior.

  • Heat Gain from the Sun (Windows)

When sunlight passes through glass, the heat is:

Q solar = SHGC × A window × S.( 𝑆 𝐻 𝐺 𝐶)

Where:

Q solar: Total heat gain from solar radiation (in Watts).

SHGC: Solar Heat Gain Coefficient (dimensionless), typically ranging from 0 to 1.

A window: Area of the window (in square meters, m²).

S: Intensity of the sun (in Watts per square meter, W/m²).  

  • Sources of Internal Heat

Include the following contributions:

Approximately 100 W per person.

Appliances: Enter the wattages of the devices.

Lighting: Use the wattage of the bulb.

  • Heat from Ventilation

Determine the heat generated by air exchange using the formula:

𝑄 ventilation=1.2×𝑉×Δ𝑇

Where:

Q ventilation: Heat transfer due to ventilation (in Watts).

V: Airflow volume (in cubic meters, m³).

ΔT: Temperature difference between the inside and outside air (in °C).

​The heat from ventilation is equal to 1.2 times the airflow volume multiplied by the temperature difference.​ 

The size of the HVAC system is determined by adding up all figures for the total thermal load. 

Factors Affecting Thermal Load in Buildings

Thermal load can be affected by many factors that involve internal or external circumstances. The essential things that affect the thermal loads are as follows:

  • A building’s energy requirements for heating or cooling are influenced by the direction it faces, which affects how much heat it receives from sunshine.
  • The overall heating and cooling needs of the structure are influenced by the local climate, whether it is hot or cold.
  • How much heat is lost or kept depends on the insulation and building elements like glass and concrete.
  • The kinds and locations of windows, as well as shading mechanisms, can either contribute to excessive heat gain or reduce energy use.
  • The total thermal load of the building is influenced by internal heat sources such as humans, machinery, and lights.
  • The amount of heat that enters or leaves the building depends on the rate of air exchange through ventilation or air leaks.
  • The thermal load is increased by the building’s use, such as residential or commercial, and the number of occupants.

Methods to Reduce Thermal Load in Construction

Thermal Load in Construction before vs after

Utilising Passive Air Conditioning to Lower Heat Loads

Throughout a building’s life, passive air conditioning uses techniques to lower thermal load without the need for mechanical equipment, saving money and energy. Important techniques consist of:

  • Orientation to the Building

A building’s thermal load is affected by the direction it faces. In hotter regions, south-facing facades—especially those composed of glass—can intensify the summer heat. Proper orientation reduces the amount of heat and sunlight a building absorbs.

  • Selection of Materials

High thermal mass materials, such as stone or concrete, absorb and hold heat to avoid sharp temperature swings. Conversely, glass can increase thermal load by causing excessive temperature variations since it is a poor insulator.

  • Elements of Shading

Block direct sunlight with architectural elements like umbrellas, brise-soleils, or awnings. These can reduce the effects of sunshine while letting in more natural light. 

  • The Vegetation

Shade-producing and heat-reducing plants, including leafy trees and green roofs, can help cool the building in the summer while allowing sunshine in during winter. Maximising these tactics can significantly enhance a building’s energy efficiency and comfort.

Conclusion

An important consideration in building design is thermal load, this type of load has a direct impact on long-term durability, occupant comfort, and energy efficiency. By understanding the many sources of thermal load, including ventilation, interior heat, and solar radiation, designers can optimise building envelopes for energy savings. Efficient thermal load management decreases reliance on heating and cooling systems, minimising environmental impact and energy costs.

FAQ’s

1. What is passive air conditioning to reduce thermal loads?

It refers to techniques for controlling home temperatures naturally without the use of mechanical devices like air conditioners. To improve comfort and energy efficiency, these solutions concentrate on lowering the quantity of heat that enters a building or increasing its capacity to remain coolness.

2. What is thermal load in construction?

Thermal loads are considered the amount of heat energy that a building absorbs and releases depending on the surrounding environmental factors.

Second Class Bricks – Characteristics, Uses & Properties

0
second class bricks

Bricks are the most commonly used construction materials that give the necessary strength and durability to the structure. There are various types of bricks in construction; however, the quality of the bricks is a concern, no matter what brick is being chosen. The first-class bricks earn a wide range of attention and preference, but the second-class bricks often go underrated. Here in this blog, we are going to take a look at the second-class bricks and everything you need to know about them.

What are Second Class Bricks?

Second-class bricks are slightly over-burnt clay bricks. These bricks are ground-moulded and have irregular edges. They are inferior to first-class bricks and are used in both important and unimportant masonry structures.

Characteristics of Second-Class Bricks

  • These bricks are slightly overburnt in the burning kiln.
  • They are rectangular and have irregular edges, and the surfaces may be slightly uneven.
  • They might have slight flaws and chips on the surface, but are free from lime and kankar nodes.
  • They don’t have any efflorescence on the surface of the brick, even in wet weather conditions.
  • These bricks are slightly red and have uniform colour throughout the structure.
  • The surface texture of the second-class bricks is rough and uneven.

Properties of Second-Class Bricks

Water Absorption

These bricks, when immersed in water for 24 hours, will absorb water up to 22%. Since these bricks have a higher water absorption ratio, they are not suitable for construction in water-prone and wet areas. 

Crushing Strength

These bricks are strong and brittle, but they have a minimum crushing strength of 70 kg/cm². The lower crushing strength makes them unsuitable for high-load-bearing structures.

Compression Strength

The minimum compressive strength of the second-class brick is between 7 N/mm² to 7.5 N/mm². These bricks can be used for medium-load-bearing structures.

Impact

These bricks, when struck together or when struck with a hammer, produce a metallic sound.

Abrasion

These bricks, when scratched with fingernails, do not form any marks on the surface, proving the high-abrasion resistance, similar to the first-class bricks.

Efflorescence

These bricks, when immersed in water, do not form any white layer on the surface, marking the low efflorescence rate in both wet and dry states. 

Advantages & Disadvantages of Second-Class Bricks

Advantages

  • These bricks are cost-effective and economical when compared to first-class clay bricks.
  • They are suitable for one-storeyed load-bearing buildings.
  • These bricks, after plastering, can be used for permanent structures.

Disadvantages

  • These bricks have a rough and uneven finish that requires plastering of the building for a smooth finish.
  • The manufacturing process of these bricks consumes a lot of natural resources and pollutes the air.
  • These bricks are heavyweight.
  • They have a high water absorption ratio, thus making them unsuitable for water-prone areas and exposed structures.
  • They produce waste during manufacturing and masonry work.

Quality Standards for Second-Class Bricks

The second-class bricks should possess the following quality standards:

  • The compressive strength of the bricks should not be less than 7 N/mm².
  • The colour of the second-class brick should be either yellow or light red and should be uniform throughout the brick.
  • These bricks containing marks of slight overburning are acceptable.
  • The bricks should be rectangular in shape, but they have uneven edges and surfaces.
  • These bricks, when struck with a hammer, should produce a metallic sound.
  • They should be free from efflorescence in all weather conditions.
  • They should not absorb more than 22% of water when immersed in water for 24 hours.

Manufacturing Process of Second-Class Bricks

Manufacturing Process of Second-Class Bricks

The manufacturing process of second-class bricks is similar to that of burnt-clay bricks.

Preparation of Clay

The upper surface of the soil is removed up to a depth of 200 mm to eliminate impurities and other earthy particles. The clay is then excavated and heaped above the ground surface. The stones, pebbles, and other vegetable matter from the collected clay are removed using a filtering screen. The filtered clay is mixed with aggregates (sand and straw) to improve the quality of the brick. 

The blended clay mix is then spread out under direct sunlight for several weeks to months to get seasoned under natural weather conditions. This allows the brick to develop plasticity and durable properties. After weathering, an adequate amount of water is added and the mix is kneaded with the help of labour or cattle two to three times and battered with shovels to make it a homogenous mix that is ready for moulding.

Moulding

The prepared clay is then transferred into a ground or table mould and compressed to remove pore gaps and make it dense. The table or ground moulding is the reason behind the uneven finish of the bricks.

Drying

The moulded clay bricks are arranged and kept under direct sunlight for 3 to 10 days for natural drying, depending on the climatic conditions.

Burning

After natural drying, the bricks are burnt in fire kilns at a temperature of 1100℃ for 10 to 40 hours to attain maximum strength and durability.

Sorting

The burnt bricks are then sorted based on the classes, where the bricks that are slightly overburnt and have uneven edges are separated as Class B or second-class bricks.

How to Identify Second-Class Bricks?

How to Identify Second-Class Bricks?

The second-class bricks can be identified using the following characteristics:

  • Irregular shape
  • Rough surface
  • Small distortions or cracks
  • Marks of slight overburning
  • Lack of sharp edges
  • Do not break when dropped from a height of 1m.
  • Do not leave any marks when scratched with fingernails.
  • Produce a metallic sound when struck.  

Conclusion

The second-class bricks are slightly less superior compared to first-class clay bricks. They are made similar to all kinds of fire-burnt clay bricks, however, the moulding and burning process affects the quality of these bricks. They possess good compressive strength, which means they can be used for constructing both load-bearing and non-load-bearing structures; however, they are not suitable for exposed structures. Nevertheless, when properly plastered, they can be used for exposed walls and permanent structures.

No Fines Concrete – Applications, Advantages & Properties

0
No Fines Concrete

There are numerous concrete mixtures used in the masonry and construction field, by adding different additives and aggregates into it. Among them, No Fines Concrete is unique, as itis made just using cement and coarse aggregates, without the use of fine aggregates (sand). Here we will take a look at what is No Fines Concrete and everything about it in detail.

What is No Fines Concrete?

No Fines Concrete Made

No Fines Concrete is a concrete that is made without fine aggregates. It consists of normal Portland cement, water and coarse aggregate. These are lightweight concretes due to their large pore gaps. They have high permeability and drainage capacity and can help absorb rainwater and facilitate the drainage system.

Application of No Fines Concrete

No Fines Concrete is used in a wide range of applications including:

  • Drainages
  • Driveways
  • Civil Infrastructure
  • Landscaping
  • Parks Gardens
  • Load-bearing cast external walls of single & multi-storey buildings
  • Small retaining walls
  • Damp-proofing subbase material
  • Gravity structures

Advantages & Disadvantages of No Fines Concrete

Advantages

  • They can be used to provide one of the most effective drainage systems.
  • They are lightweight materials and are easy to handle.
  • They are cost-effective due to low cement use and no fine aggregates.
  • The cavities within the concrete conduct low heat, acting as a good thermal insulator.
  • The pore holes within the structure prevent the structure from external acoustic sounds.
  • Segregation of concrete is low.
  • The drying shrinkage is low when compared to normal concrete.
  • The rodding method is adequate, and no expensive mechanical vibrators are needed for compaction.

Disadvantages

  • The compressive strength and load-bearing capacity of the concrete are low, due to the high voids.
  • They can be subjected to low strength and corrosion when used in exposed structures, although when combined with reinforced concrete.
  • The consistency of concrete is not measurable.
  • Casting the concrete wall adjacent to No Fines concrete walls is difficult and can be subject to leakage.
  • The cohesion value of this concrete is very low, making it difficult to remove the formwork.

Properties of No Fines Concrete

Structure

The structure of the no-fines concreted is different from the conventional concrete. They have very high permeability, but their strength is low. The aggregates used in the concrete form a thin layer. They have a high void ratio due to their open structure. The compression could help the aggregate come into contact and improve the strength of the structure. 

Shape

The aggregates are spherical and are of uniform sizes. This shape develops a large number of bonds and provides strength to the concrete. Flaky or elongated aggregates are not used, as they could reduce the strength of the concrete.

Permeability

The permeability of concrete depends on the materials and the placement of aggregates. Typically, the water flow through the concrete is between 120l/m²/min to 320l/m²/min.

Compressive Strength

The compressive strength of this concrete ranges from 3.5 Mpa to 28 Mpa, depending on its application.

Density

The density of the No Fines Concrete ranges between 1600 kg/m³ to 1900 kg/m³. The density varies based on the shape, size, aggregate-cement-water ratio and compaction of concrete.

Air-voids

The air voids in the concrete range from 13% to 28% depending on the aggregate-cement ratios.

Shrinkage

The drying shrinkage of the concrete takes place slowly when compared to conventional concrete. Typically, 50% to 80% of the shrinkage occurs in the first ten days. The lower shrinkage and surface texture cause random cracks and uncontrolled joints.

Composition of No Fines Concrete

  • The coarse aggregate used in the No Fines Concrete should pass through a 20mm sieve and be retained on the 10 mm sieve.
  • The aggregate-cement ratio of the concrete varies from 6:1 to 10:1, based on the application of the concrete.
  • The water-cement ratio is kept within the 1600 to 1900 kg/m³ range. If lightweight aggregates are used, the density of the concrete can be further reduced by up to 300 kg/m³.
  • The compressive strength of this concrete varies from 3.5 MPa to 28 Mpa.

Installation Steps

Prepare the Base

Clear the obstacles and level the site where the concrete needs to be installed. Dig a shallow trench of minimum depth and fill the area with compacted gravel. Place the framework in the base level of the required thickness.

Mixing of Concrete

Prepare the No Fines Concrete by adding cement, aggregate, and water in the appropriate ratio (6:1 or 10:1), until it attains the plasticity to get moulded into the required shape.

Pouring & Compacting

Pour the concrete into the moulds with a depth not exceeding 16 inches and compact the layer using a rod. The compaction of No Fines Concrete does not require any compactor or vibrator, as the simple rodding process is enough to fill the voids.

Place Reinforcement (if required)

Place the reinforcement steel bars into the concrete at equal intervals (if needed) to improve the strength. Using the reinforcements could help hold the concrete layers and improve stability.

Repeat

It is advisable to take at least 2 to 3 hours to pour the next layer of concrete, to achieve higher aggregate stability. After a pause, repeat the pouring and compacting process, not exceeding the 16-inch depth

Curing

Curing the No Fines Concrete is not necessary, as it could cure too soon after pouring into the moulds. However, it is necessary to keep the structure idle after compaction for 2-3 hours after each layering.

Remove Spills & Back Fill

If the concrete is spilled out in the face of the wall, remove the spillings using water and brush and backfill the concrete into the mould to fill the gaps.

Finishing

Use a low permeable fill on the last lift (8 to 12 inches), by placing a horizontal fabric layer above the previous layer before filling, to finish off the installation.

Layers of No Fines Concrete

Subgrade/Soil Layer

It is the ground surface that consists of the earth or soil, which is excavated up to a shallow depth. Any drainage or pipelines can be used in this layer.

Base Course

Above the soil is filled with base course, usually gravel or other coarse aggregates. They act as the base bed that separates the soil from the no fines concrete layer. The formworks in the base are introduced in this layer to initiate moulding.

No Fines Concrete Layer

No Fines Concrete is poured over the base course with the help of formwork. The concrete layer is filled layer by layer up to a certain height and compacted and cured at regular intervals.

Permeable Layer

Above the No Fines Concrete layer is the Permeable layer, which occupies the topmost layer and allows water to pass through the structure, reducing the runoff and recharging the groundwater.

Conclusion

No Fines Concrete is a unique concrete material that uses very little cement and no fine aggregates. It is packed with more void gaps, which makes it an effective drainage system. These are low-density concrete; however, it is used for numerous applications effectively. It is ideal for water-draining areas, and when combined with reinforced steel bars, can be used for constructing retaining walls. The usage of this concrete is visible in drainages, driveways, and many civil infrastructures.

Builder Buyer Agreement – Importance, Format & RERA Impact

0
Builder Buyer Agreement

Selecting the proper home can take time, and purchasing one is a significant choice. Read the sale agreement carefully before signing it because once you do, it becomes legally binding. Later, you won’t be able to dispute its conditions. A sale agreement may have provisions that could cause problems because it is not a typical contract. As a result, it is crucial to properly review it. It contains information on delivery, the property, and other crucial terms. State laws control this legally enforceable document. We’ve outlined the main features of the BBA, such as its significance, purpose, and meaning.

What is a Builder-Buyer Agreement? 

A builder-buyer agreement is a legal document that attests to the buyer’s ownership of the property and guarantees their rights under predetermined conditions. Approvals, annexures, terms, conditions, and mutually agreed-upon flat layouts are all included. It is essentially a legal document that outlines the essential conditions of the sale of the property. 

The need for this document is growing continuously and adheres to the Real Estate (Regulation and Development) Act of 2016 (RERA). The registration of projects is mandatory for private real estate developers within three months of notification received from their respective state governments. After successful completion of registration, the developers are allowed to provide any advertisements for the projects related to selling off or offering any possession to the consumers.

The most common issue that most buyers face is that after signing the agreement, they may not be given the appropriate property that they have signed for. A buyer has the right to raise a complaint against the developer regarding this BBA.

Importance of a Builder Buyer Agreement (BBA)

Clear contractual conditions are crucial for the buyer when purchasing a property. Possession delays can be extremely stressful, and some real estate agents may take advantage of legal gaps to deceive purchasers. By holding the builder responsible for their responsibilities, preventing violations, price adjustments, or structural flaws, and covering delays, a builder-buyer agreement safeguards the buyer.

A builder-buyer agreement is crucial for the following main reasons:

  • It guarantees that the buyer’s expectations are met during construction.
  • It explains each party’s rights, responsibilities, and duties in detail.
  • It avoids miscommunications or conflicts during building.
  • It outlines the terms and conditions for the process of developing real estate.
  • BBA ensures high-quality construction that satisfies the expectations of the buyer.
  • Buyers should carefully read the contract before signing it.

Purpose of BBA

Prior to signing a contract, you should understand its goal and the reasons behind it. Let us know the aspects of your building project that cover the BBA as follows:

  • Payment transactions
  • Scope of work
  • The exact completion date or period
  • The specifications and quality standards, including warranty period
  • Compliance certificate that includes building codes.

What are the Parts of a Builder-Buyer Agreement?

Three important parts comprise a BBA:

  1. General Conditions – Standard terms that apply to all buyers, such as the builder’s responsibility for construction defects and stamp duty payment.
  2. Special Conditions – Terms specific to the buyer, like the payment schedule and possession date.
  3. Product Specifications – Details about the property’s materials, design, and quality.

The BBA is a legal document that must be signed before possession, even if you’re paying through a home loan.

Things to Check Before Signing the Builder-Buyer Agreement

Things to Check Before Signing the Builder-Buyer Agreement

One important legal agreement that specifies the conditions for the sale and possession of real estate is the builder-buyer agreement (BBA). Before signing, buyers should carefully evaluate the following crucial issues:

  1. Check the Credibility of the Builder

Examine the builder’s prior work and online reviews to make sure they are trustworthy. Their dependability and professionalism are revealed by client reviews and project excellence.

  1. Examine Warranty and Inspection Terms

Examine warranty and inspection provisions to verify the builders’ handling of construction flaws. Within a certain time frame after completion, they must offer a warranty for any problems.

  1. Review the Terms of the Contract

Read the agreement carefully, paying particular attention to the sections about permits, deadlines, and zoning. Recognise how each clause affects your obligations and rights.

  1. Examine the Terms of Payment

Review payment schedules, total expenses, late fees, and registration fees in detail. Make sure any information about payments is understandable and stated clearly.

  1. Look for Legal Support 

Hire a legal professional to examine the contract for any unfavourable clauses or hidden gaps. They can answer any questions and protect your interests.

Builder-Buyer Agreement Format

To address default conditions, a builder agreement specifies all project specifics, amenities, and deliverables. Although there is no set format, an example builder agreement might contain:

  • Name of buyer
  • Name of developer
  • Address of property
  • Terms of purchase
  • Super built-up area 
  • A built-up region with facilities
  • Parking information
  • Schedule of payments and cancellation fees

Builder-Buyer Agreement Before the Rera Act

RERA

Before RERA, BBA agreements were disproportionately in favour of builders. Delivery schedules frequently stated 36–42 months but were vague about when this period began. While buyers faced severe penalties of up to 24% per quarter for late payments, builders could raise property prices citing shortages of raw materials. 

In certain instances, builders could demand an additional 20–30% if property areas were changed, or they could cancel allotments due to late payments without penalties for changes in development plans. Additionally, builders may levy transfer charges if buyers switched ownership before possession, but they were not penalised for modifications to development plans. Customers suffered enormously from these methods.

Builder-Buyer Agreement After the Rera Act

The builder-buyer agreement model has been changed by real estate regulations to rectify the previous agreement’s bias in favour of builders. The Real Estate (Regulation and Development) Act, 2016 (RERA) established regulations mandating that builders submit important documents to purchasers with their applications, including a signed transfer deed, sale contract, and proforma letter. In addition to outlining the party’s respective responsibilities, these contracts contain an Earnest Money Clause that restricts the builder’s ability to claim earnest money up to 10% of the property’s cost.

The agreement must unambiguously describe every facet of the project, including internal and external development, following Section 13(2) of the RERA 2016. The builder is legally required to address any issues within a reasonable amount of time if they fail to deliver as promised.

Conclusion

For homebuyers, a builder-buyer agreement is a crucial document. It guarantees a seamless transaction by providing clarity, openness, and legal protection. To safeguard your interests and guarantee a fair transaction, it is crucial to thoroughly understand the BBA before making a home purchase. When applying for a home or mortgage loan, the agreement is also helpful.

FAQ’s

1. What is a buyer-builder contract?

A formal legal document that specifies the obligations, terms, and conditions that the buyer and the builder must follow is called a builder-buyer agreement.

2. Is a builder-buyer contract required?

Yes, it is crucial to get the builder-buyer agreement completed and registered following the initial booking deposit in order to safeguard one’s rights. When applying for a home loan or mortgage loan, this builder-buyer contract will be required.

Concrete Trowel – Types, Importance, Advantages & Mechanism

0
Concrete Trowel

A process of repeatedly rolling the concrete surface with a hand trowel or power trowel before the final set of the concrete. This process can take place after the initial set of the concrete. To ensure a smooth levelling surface on concrete slabs, troweling is important. Troweling helps to set the top layer of the concrete surface and it gives the concrete time to set concrete and harden to attain a smoother surface. 

The weak spots or cracks can be easily identified by doing troweling. The air pockets that form during the pouring of concrete may be removed. Troweling can be done after the initial set of concrete and repeated after 24 hours. Lastly, 28 days are given for the concrete surface to cure. The significance, varieties, benefits, drawbacks, and workings of concrete trowels will all be covered in this article.

Importance of Concrete Trowel

A concrete trowel produces a finish that is even, dense, and smooth when completed after the initial setting. By levelling the surface, filling in gaps, and removing ridges, troweling enhances the surface’s longevity and look. This procedure lowers maintenance expenses for polished concrete floors and helps avoid further damage. The top layer is troweled, dried, and then sealed. It is a crucial step in the construction process, which is extremely beneficial. 

Types of Trowel Machines Used

Types of Trowel Machines Used

Concrete trowels are used to create a smooth finishing surface when the concrete surface attains the setting phase. Various demands on the concrete surface can be made by these troweling machines, and they are used to increase the appearance of the surface. Different types of troweling machines can be used across the construction industry, but the main two broad types of troweling machines are discussed below:

Power Trowel

An effective tool for levelling and smoothing concrete surfaces is a power trowel. It is perfect for precisely and swiftly finishing big concrete areas since it has revolving blades or a disc that spins at high speeds. Power trowels come in a range of sizes and can be powered by electricity or gasoline, providing versatility for a variety of job sites and environmental circumstances.

Because they produce a level, smooth surface on both horizontal and vertical surfaces, this equipment is crucial for concrete construction. Power trowels also eliminate flaws and inconsistencies, guaranteeing a superior surface that is long-lasting and aesthetically pleasing.

Ride-On Trowel

Large concrete surfaces can be levelled and smoothed with a ride-on trowel, a construction tool frequently employed in large-scale projects like commercial buildings or industrial complexes. The machine is effective at covering large areas since its operators sit atop it and move it around the surface. With interchangeable blades for a smooth, level finish, ride-on trowels can be operated manually or by self-propulsion.

Take your project’s size, the kind of concrete surface, and your budget into account when selecting a ride-on trowel. By examining the different models, you may select the machine that is most suited for the task. With the correct equipment, you can produce a high-quality, long-lasting concrete surface that appears professional and lasts for many years.

Advantages of Concrete Trowel

Concrete troweling may offer numerous benefits for a concrete surface, which are as follows: 

  • Troweling improves the surface’s strength and ability to endure over time.
  • It can also lower the possibility of cracking.
  • Concrete troweling increases moisture resistance by setting the air pockets formed during concrete pouring.
  • Troweling can eliminate surface imperfections such as holes and air spaces.
  • A clean, simple, and smooth surface can be developed using troweling.

Disadvantages of Concrete Trowel

Although concrete trowels offer many advantages, they also have some limitations. It’s essential to be aware of these before using one. They are discussed below:

  • Timing and weather must be balanced to get the perfect concrete trowel finish.
  • The best results need careful attention to detail and the use of appropriate techniques.
  • A power trowel may be expensive to purchase or hire. 
  • Using a hand trowel requires a lot of physical labour.
  • Professional assistance may be necessary for large-scale concrete troweling jobs.

Mechanism of Concrete Trowel 

To create a smooth surface, concrete must be shaped while it is still wet. Hand trowels are useful for small spaces, but power trowels or ride-on trowels are better for bigger ones. Trowels are more effective and quicker. With a little instruction and practice, power trowels are easy to use. Here are some points to consider before using trowels for your construction project:

  • Use the concrete trowel at the right time: 

When the concrete is sufficiently solid to bear your weight, begin troweling, leaving only shallow imprints that are 1/8″ to 1/4″ deep. Start at the proper moment to avoid issues.

  • The Basic Movement of Concrete Trowel:

To steer, push the handle down to steer right or lift it a little to go left. The machine reacts slowly, so be careful.

  • First to float, second to finish: 

Always use the proper blades to float the concrete before finishing. The different blades are available to have a perfect surface as follows:

  • Mixing Blades: Fits both floating and completing by changing the angle of the blade. These are more expensive but more handy.
  • Clip-On Float Blades: To make them float, attach them to complete blades; then take them off to complete.
  • Panning: For quicker coverage, use a float pan. More effort and control are needed with this approach.

When to Use a Trowel

Concrete Surface Before and After Troweling

A smooth concrete finish depends on the time of troweling. Only begin while the concrete is still soft and workable but solid enough to hold the troweling tools. The concrete mix, temperature, and humidity all affect how long it takes for the concrete to cure. After pouring, it usually takes a few hours to a day to achieve the proper troweling stage.

To prevent surface damage, make sure the concrete is in a “plastic state,” which is solid but malleable. To verify preparedness, do a thumbprint test or measure surface moisture. For optimal results, balance scheduling with environmental elements, like temperature, wind, and humidity, which can affect the troweling window.

Conclusion

After floating, troweling is done to provide a polished, smooth surface and to add further compaction for strength. In addition to being aesthetically pleasing, a well-done trowel finish increases longevity and lowers ongoing care expenses. This calls for careful attention to detail and appropriate technique. The secret to good concrete troweling is using the right equipment, timing, and procedures. You may create a long-lasting, visually appealing surface that will endure with careful application.

FAQ’s

1. What are the crucial steps for having a perfect smooth surface?

Crucial steps for getting a perfect smooth surface are as follows:
Use even, overlapping passes to avoid overworking the concrete.
Keep the trowel moving while floating at slower rates.
Avoid making abrupt direction changes or stopping in one place.
These methods guarantee a polished and long-lasting finish.

2. Can troweling be done manually, or is a power trowel always necessary?

Troweling is typically done using a steel or wooden hand trowel to smooth freshly poured concrete manually; it requires patience and skill. Large projects may require power trowels or ride-on-trows to achieve smoother surfaces.

Plinth Filling – Importance, Process, Materials & Benefits

0
plinth filling

The plinth is a foundation’s visible face that plays a major role in the construction and architectural design. It is the place where the underlying foundation connects with the overlying superstructure. It distributes the structural loads evenly on the foundation and also helps to provide an aesthetic appearance to the building. As the plinth plays a major role in the integrity of the building, the plinth filling provides the necessary stability.

What is Plinth Filling?

Plinth filling is the process of filling the plinth area of the foundation with materials either excavated from the ground or from outside. The filling process is done to provide stability and support to the building’s foundation, minimise structural issues, and improve soil compaction. Soil, rock, aggregates, murrum, shingle, sand, and other materials can be used for plinth filling.

Benefits of Plinth Filling

  • Strengthens the Foundation: Plinth filling enhances the strength of the foundation. It provides a strong base that will help in the load-bearing capacity of the building and helps the structure to stand for a long period of time.
  • Provides Essential Support: Refilling the plinth area with compacted soil and properly damping it ensures the foundation can withstand external forces, keeping the structure rigid and secure.
  • Increases Stability: Studies have proven that buildings that are properly filled are more stable and capable of holding heavier loads compared to foundations that are not properly compacted.

Step-by-step guide to the Plinth Filling Process

Cleaning & removing water

Once the plinth foundation of the building is laid and completely cured, the plinth area is cleaned and water within the plinth is removed.

Spreading the soil

After cleaning the plinth area, the construction soil is spread within the plinth at 15 to 30 cm thickness based on the type of compactors used. Whether using manual rammers or mechanical compactors, the thickness of the soil layer should not be more than 30 cm, to achieve proper compaction.

Watering

After the first layer of soil is spread, water is sprinkled all over the plinth until it attains adequate moisture content suitable for compaction.

Compacting

After sprinkling the water, the soil is rammed either using a manual rammer or using a mechanical compactor. Mechanical compactors are more efficient compared to manual compactors. For commercial constructions, it is advisable to take a density test to achieve maximum dry density.

Layering, Watering & Compacting (Repeat)

After compacting the first layer of the soil into the plinth, the soil needs to be spread layer-by-layer, not crossing 30 cm thickness from the previous layer. The soil filled is again sprinkled with water and compacted using a compactor. This process continues for three to four layers until the plinth is refilled with soil.

Types of materials used in Plinth Filling

Earth or Soil

The soil that is excavated while laying the plinth foundations is generally refilled into the plinth. In other cases, other soil types from quarries and other external soils can be used as a filler, except the black soil, which has high expansion properties and is not suitable for filling. The soil used for the filling should be free from organic materials and clods more than 50mm.

Sand

Sands can be used as a plinth filler; however, the sand should be clean and free from dust, organic, and other alien particles. The sand should not contain more than 5% clay or silt.

Murrum

Murrum is a red soil that is available in humid tropical and equatorial zones. They are widely used as fillers in plinths and backfilling. They can be compacted easily and can be made into hard surfaces.

Shingle

Shingles or pebbles of size ranging from 4.75 mm to 40 mm can be used for plinth filling along with a fine material, to fill the interstitial spaces. The shingle used should be clean and free from foreign matters, that are obtained from river or canal beds.

Factors to consider during Plinth Filling

Numerous factors need to be considered, before filling the plinth area, some of the key factors include:

Concrete Works

All the concrete structures such as footings, columns, and plinth beams should be removed from the formwork and the honeycombs or cavities in the structure should be repaired, before the filling process.

Plinth Masonry

The plinth area should be completed with internal plasters, or by filling the joints, such that the plinth is free from any cracks or unconnected joints.

Curing Period

It is mandatory to ensure that all the concrete structures and masonry works are completely cured before the filling. Filling before the curing process could affect the strength and stability of the structure.

Cleaning & Dewatering

The plinth area and the footing should be clean and free from water content or any other moisture. Any organic matter, logs, and roots should be removed, as they could decay over the years and create voids, which weaken the compactness.

Soil Test

The soil that is used for filling should be tested to remove the organic matter, plant roots, pebbles, clogs, and chemical matter, which could affect the structure. The soil that is more than 50 mm should either be broken or removed to achieve complete compaction.

Excavated Soil

If the soil excavated from the plinth area and footing is black soil, it should be completely removed. The black soil is not suitable for construction, as they have expansion properties. It is recommended to conduct an in-situ test before construction in those places. 

Conclusion

Plinth filling is a crucial process that helps the foundation and the overall structure enhancing strength and stability. By choosing the right filling materials and performing compacting techniques effectively, the building can achieve maximum stability to withstand for a long period of time. It is essential to keep the factors in mind and execute the process under expert supervision to build a strong and long-lasting structure.

How to Remove Cement From Tiles​?

0
How to Remove Cement From Tiles​?

Going into a newly constructed or remodelled room feels wonderful until you notice ugly cement stains on your lovely tiles. These stains can destroy the appearance of your room and are frequently left behind after remodelling. Don’t worry, though! Common queries like how to get rid of dried cement from flooring and cement stains from tiles are discussed in this article. We’ll show you how to restore the original beauty of your tiles easily.

Top Methods to Remove Cement From Tiles 

When removing stains from tile designs, you must first consider the method you plan to use, whether it will be gentle or abrasive. A gentle method involves using a vinegar-water solution, lemon juice with baking soda paste, or extra-fine sandpaper.

However, the stubborn stains in tiles may not be removed by using natural techniques; you may have to opt for hard stain-removing methods like phosphoric acid or hydrochloric acid. Note that on natural stones like marble, hydrochloric acid can be corrosive. If using chemical solutions to remove stains, always wear gloves and goggles to protect yourself from injuries.

Important Points:

  • The techniques for removing cement stains differ according to whether they are hard or soft.
  • When utilising chemicals, always undertake a patch test and take safety precautions.
  • By using a sealant, avoiding strong chemicals, and cleaning frequently, you can keep tiles in good shape.

Process of Removing the Cement from the Tiles

The best processes that can be used to remove your unpleasant stains permanently from your favourite tile design are as follows:

Vinegar Solution

Everyone generally knows that vinegar is a commonly used kitchen product that has multipurpose properties. It is considered the most low-cost kitchen ingredient that can be used to remove stains easily from your stained tiles. First, you have to dilute the vinegar at an equal ratio with water. 

Then pour the vinegar-water mixture into the stain spot and allow some time to absorb. After some time, scrub the stains with a scrub brush or smooth brush without scrubbing hard. Once it is completed, rinse the tiles with fresh water. As it is a mild acidic solution, it may take away the lighter stains.

DIY Stain Remover: Lemon Juice and Baking Soda Paste

Baking soda and lemon juice combine to create a powerful solution that effectively removes stubborn stains. Mix lemon juice and baking soda until you form a thick paste. Wait a while after applying this paste to the stained regions. After this, use a gentle scrubber to scrub the stained tile. The toughness of baking soda combines with the citric acid of lemon to loosen and remove the stain effectively as much as possible.

Commercial Cleaners:

Industrial cleaners are readily available to ease the stain removal process. These specialised products are used to remove stains from many surfaces, including tiles. You must read the instructions before using any industrial cleaners. Because each product has its unique usage recommendation. After applying the cement removers, let it absorb for some time. Rinse it off with fresh water after gently cleaning it with a soft scrubbing brush. 

Hydrochloric Acid: (Warning: Handle with Care)

Hydrochloric acid is a powerful solution; you must be very careful before using this. Because vinegar emits harmful fumes, it is vital to avoid using it in a closed space. The place should be ventilated, or open the doors of the room where you can use this. Before using this, don’t forget to dilute this solution with water as mentioned in the procedure to use. If you have any respiratory-related problems, avoid using this solution. Don’t let your skin come into contact with this solution: it may irritate you.

Acetone

Acetone has the strong ability to dissolve any hard stains in tiles. Be careful while using this chemical. Acetone can be used only on unglazed surfaces. Before using this on any surface, give it a trial to check if it suits that surface. You must wear gloves while using the acetone solution.

Sugar Paste

This may be unusual to hear, but an equal mixture of sugar and water may be spread over the stain. Leave it for fifteen minutes, and it will automatically break down and be removed. This is a safe and kinder solution for all who need to clean their tile without risk.

Steps to Prevent Cement Stains During Tile Installation

When installing tiles, take the following actions to avoid cement stains:

  • Use a Grout Release: Before applying coloured grout, apply a grout release agent to the tile’s surface. It forms a barrier that facilitates cleaning.
  • Protect Surrounding Surfaces: To prevent cement spills, cover flooring, fixtures, and counters with drop cloths or plastic. Secure the covers to stop movement.
  • Plan the tile layout to minimise excess cement and stains by reducing the need to trim tiles during installation.
  • Work in Small Sections: To prevent the cement from drying out before cleaning, apply it in smaller sections. Better control and simpler cleanup are made possible by this.
  • Use Sandpaper: To get rid of tough stains without causing surface scratches, wet sand the tiles using extra-fine sandpaper (400 grit or finer).
  • Clean as You Go: To avoid more stains, wipe away any cement spills right away with a damp sponge or towel before they dry.
  • Select the Correct Tools: To manage adhesive placement and lower the possibility of excess glue causing stains, use the proper tools, such as a notched margin trowel.
  • Vacuum Frequently: To prevent dust and debris from combining with cement and leaving a permanent coating on the tiles, keep the work area tidy by vacuuming frequently.

Tips for Maintaining Tile Surfaces

The secret to preserving the beauty of your tiles and preventing cement stains is to keep them clean and protected. Take these three simple actions: seal the tiles, avoid strong chemicals, and clean them frequently.

1. Frequent Cleaning

To avoid dirt buildup, sweep regularly and mop tiles once a week. To keep them fresh, clean and stain-free, give them a monthly deep cleaning with a brush.

2. Avoid using harsh chemicals

Vinegar, bleach, ammonia, and lemon may damage your tiles. Dish soap or baking soda are considered better cleaners.  Scrub a stained region with a gentle cloth after applying this.

3. Cover Your Tiles

To establish a barrier that will keep spills and stains out, apply a sealant. This increases the lifetime of the tiles and makes cleaning easier. A manufacturer may provide guidelines on every product. To keep your tiles safe, reapply every few years according to the manufacturer’s application directions.

You can easily maintain the appearance and durability of your tiles by adhering to these easy instructions.

Conclusion

Take the proper precautions to keep your tiles pristine and free of cement stains. Recognise the distinction between hard and soft stains, apply efficient fixes or cleaning supplies, and exercise caution when installing. To keep your tiles’ beauty over time, always abide by safety precautions and perform routine maintenance.

FAQ’s

1. What are the best methods to remove dried cement from tiles?

The best cleaning technique depends on how severe the stain is. Use vinegar on mild stains. Use a paste made of baking soda and lemon juice for more stubborn stains. Use a grout saw or store-bought cleansers for tough spots.

2. How long should vinegar be left on cement stains to dissolve them?

Although vinegar works well to remove stains, if it is applied for an extended period, it might harm the concrete. To clean safely, leave it on for no more than fifteen minutes.

3. What is the best way to clean tiles?

Experts suggest that regular mopping of tile surfaces once a week is enough for cleaning the tiles. The use of heavy acids or cleaners may affect the sealant of your tile surface and lead to the degradation of the tiles. 

4. How do you make homemade cement remover from tiles?

Mix lemon juice with baking soda and form a paste. Apply this paste and leave it on the tile surface. After some time, scrub the tile with a gentle scrubber and rinse it off with fresh water.

SOR in Construction – A Comprehensive Guide

0
SOR in Construction

The success of every project lies in effectively managing the funds. We can’t imagine how a project manager or other individuals can efficiently manage the funds in large or small construction projects. Let’s spill the beans. The magic of managing effective finance lies in the Schedule of Rates (SOR). In this article, we will unlock the secrets of SOR in detail, including its significance, preparation process, components, benefits, drawbacks, and applications.

What is SOR in Construction?

The Schedule of Rates is a comprehensive list of organized items and services that might be needed in construction projects, along with their respective unit rates. These rates mentioned in this SOR are standard and serve as a foundation for estimating the project cost, tender, and contract administration. 

They ensure the rates are consistent and transparent in evaluating the prices. It is like a menu in a restaurant that consists of all the items served there. This includes a detailed description and price of each unit of work that has to be undertaken during the construction process.

The following details are contained in the Schedule of Rates (SOR):

  • Detailed description of items or materials that can be used in construction projects.
  • The standard unit of measurement that quantifies each item. (Eg., kilogram, square meter, cubic meter).
  • The cost related to one unit of the described item or service.
  • The specified properties, like the technical standards or quality requirements of each item, can be mentioned in this SOR.

Importance of the Schedule of Rates in Construction

The SOR is a versatile tool that serves multiple purposes in the construction industry, as follows:

  • Estimation of Cost

SOR is a standardised basis for estimating the cost of construction materials and items involved in the project. The total cost is based on the quantity of each item and the corresponding unit rate.

  • Tendering and Bidding

During the tendering process, SOR is used to prepare the bidding price for each item and material. It ensures that all the bidders may use the same bidding price and supports a fair competition price and transparency.

  • Contract Administration

After a project has been awarded, SOR stands as the reference for contractor administration. It helps in defining the variations and payment process and resolving disputes over prices.

  • Budgeting and Financial Planning

The clear visualisation of expected costs in the construction project aids in calculating the budget and financial plan of the project for successful completion. The project owner and managers can effectively allocate resources for the construction work and are also helpful in crafting the contingency cost of the project schedule.

  • Standardisation

The Schedule of Rates (SOR) renders standardisation of prices of various items and materials that can be used across the project. It can also reduce the divergence of prices of various materials and ensure that the cost of the materials is aligned with current market conditions.

How is the Schedule of Rates Prepared?

The baseline for preparing the list of SOR lies in a thorough analysis of the market conditions, construction processes, and material cost. The six steps involved in preparing the schedule of rates are as follows:

  • Understanding the Market

The initial stage of preparing the schedule of rates involves a comprehensive analysis of the tendency of the current market rate of materials or items, labour charges, and charges of equipment rented or purchased for the construction process. You can get the data from various suppliers, subcontractors, and other market participants.

  • Compilation of Items

The list of construction activities, such as purchasing various items or materials and services required for different construction projects, can be compiled. The list should cover all types of items that are required for construction projects.

  • Defining Specifications

The quality, dimensions, and other specific details of each item involved in the construction process are defined. This reflects what is being priced for each item and ensures all the parties involved in the process can understand the items clearly.

  • Calculation of Unit Rates

The crucial factors involved in defining the unit rates of items include the cost of the material, labour rates, equipment to be used in the process, overheads, and profit margin. The rates mentioned in this should be real, which is followed by many suppliers and it also supports current market changes.

  • Review and Approval

Experts can review the draft Schedule of Rates. The reviewing process should be accurate, complete, and compliant with industry standards. 

  • Regular Updates

The calculated SOR is a dynamic process that should be periodically updated based on factors such as market changes, inflation, the arrival of new technologies, new tools, and evolving construction practices.

Components of a Schedule of Rates

A Schedule of Rates involves several components that can be mentioned below as follows:

  1. General Conditions

It comprises applicable rates of the materials, validity, an escalation clause in which labour charges can be adjusted according to market conditions, and other contractual materials.

  1. Cost of the Material

The rate of construction materials such as bricks, cement, steel, and other miscellaneous materials can be included in this section. Depending on the market conditions, location, and quality of materials, it may vary and can be adjusted which can reduce the construction cost

  1. Labour Costs

The working costs of different categories of labourers are included in this phase. They may be masons, electricians, plumbers, engineers, supervisors, etc. The rates included can be accounted for wages, benefits, and other labour-related expenses.

  1. Equipment and Machinery Costs

Based on the project requirements, the company has to purchase or rent heavy equipment that can be used for excavation, concrete mixing, etc. If it is rented, the charge of renting, such as hourly, daily, weekly, and monthly, can be included in this section. The purchase cost is also provided in this phase.

  1. Overheads and Profits

It can also cover administrative costs, safety precautions, and site supervision. The profit margin of the project can be factored into rates and also mentions contractor’s profit margin. 

  1. Miscellaneous items

The miscellaneous items that can be helpful to complete the project, such as scaffolding, shuttering, and temporary structures, can be included in this category.

Benefits of SOR in Construction 

A Schedule of Rates helps to determine the standardised structure of price for the materials, items, and other miscellaneous charges involved in the construction process. It offers many benefits, as discussed below:

  • Compared to fixed-price contracts, variations are more affordable and simpler to estimate.
  • Access to a wider pool of contractors for bidding is made possible by the speedy procedure.
  • Contractual conditions and a flexible scope adjust to the needs of the project.
  • Depending on finance or cash flow, clients may cease and continue activity.
  • Without a completely thorough design, projects can begin early and be completed more quickly.

Drawbacks of SOR

Though SOR offers numerous benefits, it also has some disadvantages that every construction project has to face, which are as follows:

  • Verifying payments and estimating efforts take additional resources.
  • Planning for long-term resources can be challenging, which could result in staff changes and a loss of consistency.
  • Without knowing the whole cost, the client begins work.
  • If future work is uncertain, contractors can be motivated to frontload expenses.
  • Project uncertainties make it difficult to estimate total costs. 

Application of SOR 

Simple Budgeting: Budget planning is made simple by the Schedule of Rates (SOR) predefined rates. By only multiplying fixed rates by the expected quantities, estimators may accurately predict project costs, saving time and minimising errors.

Fair Pricing: By establishing a consistent charge for work items, SOR guarantees consistency in pricing. This lessens the possibility of disagreements and negotiations, creating an equitable atmosphere for both clients and contractors and promoting an emphasis on doing high-quality work quickly.

Simplified Billing: Since all fees are pre-agreed upon prior to work commencing, SOR makes billing simple. This ensures a clear and effective payment procedure by removing drawn-out conversations or disputes during billing.

Document Required for SOR

Tender documents, which include alternatives and quantity-based discounts, will look like a bill of quantities. Important portions could consist of:

  • General conditions.
  • Ways of measurement.
  • Safety rules and a code of conduct.
  • List of approved vendors.
  • Proportional rates and rating criteria.
  • Initial site preparation, testing, and commissioning.
  • Built-up areas and curved work. 

Conclusion

In conclusion, SOR is helpful in many aspects of construction projects, especially in budgeting and financing. It is not only a list of prices but also ensures transparency in budgeting, fairness, and efficiency across the construction process. This analysis helps to complete the project within the timeline, simplifies the billing process, and facilitates smooth communication between the stakeholders. 

FAQ’S

1. What is the usage of SOR in the construction industry?

SOR is a document that lists the supplies, labour, and machinery required for a building project. Each item’s unit cost and quantity required to finish the job are listed in the schedule.

2. What does SOR mean in construction?

A Schedule of Rates (SOR) is used to list the items or materials involved in the construction process.