Home Blog Page 21

Concrete Ratio for Slab – Key Mixes and Mixing Procedures

0
concrete ratio for slab

Unquestionably, the mixing ratio of concrete provides good structural integrity and workflow. To achieve the required strength and durability, it has many uses and ratios. Depending on the construction requirements, different quantities of concrete are blended. It offers a fundamental degree of strength appropriate for all types of construction.

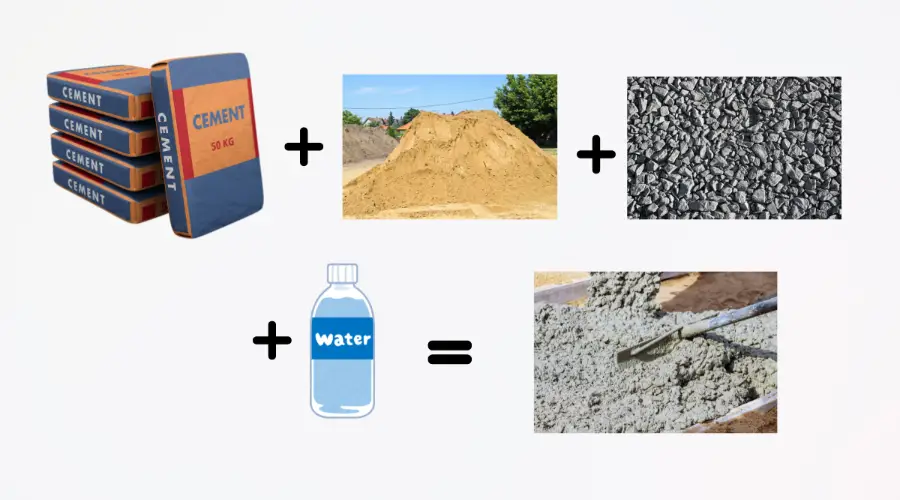
Concrete is made out of a mixture of many ingredients, such as cement, water, and sand, as well as additional ingredients, such as coarse aggregates (gravel or crushed stone), additives, and admixtures that can be added to get the appropriate paste-like consistency for construction. This procedure can be carried out either manually or using machinery to achieve the ideal ratio for its intended purpose. The overview of concrete ratio for slab, significance, common ratios, and factors will all be covered in today’s Brick & Bolt’s blog. 

Overview of Concrete Ratio

The primary constituents of the concrete are sand, cement, and stone or gravel. This procedure entails combining the necessary ingredients in various ratios. For the structures constructed, it offers the intrinsic advantages of strength, durability, safety, and affordability. This mixture often takes longer to harden compared to cement on its own. However, it can be manipulated in many ways to achieve better results.

The concrete mixture’s composition can be altered based on the project’s specifications. The concrete mixture is held together by the cement, which serves as a glue. It works well for creating adaptable and visually appealing structures that meet the demands of the building sector. The varieties of concrete mixtures and their advantages are explained in detail in this article. 

Importance of Choosing the Right Concrete Mix for Slabs

The capacity and strength of the concrete poured into the building structure are increased when the concrete is mixed properly and in a suitable proportion. Some of the key points are:

  • Structural Sturdiness and Strength

The structure’s strength and durability are derived from the precise ratio of the concrete mixture. It can support large weights without breaking or harming the structure. Additionally, it can withstand natural disasters, extending the structure’s lifespan.

  • Economical

Waste is prevented, and the necessary ingredients are simply measured. The size of the project, the kind of concrete you’re using, and the local company’s prices and shipping can all have an impact on costs.

  • Decreased Failure Risk

The correct methods for mixing, curing, and strengthening concrete in a building lower the possibility of structural failure. It is crucial to maintain the concrete mix ratio for different applications such as slabs and floors to achieve successful outcomes. The incorrect ratio of concrete may weaken the concrete and lead to cracks or even structural failure.

Common Concrete Ratios for Slabs

Slabs are essential parts of building construction for floors and roofing. For flooring, a typical concrete mix ratio is 1:2:4 (1 part cement, 2 parts sand, and 4 parts coarse aggregates), which guarantees a strong and long-lasting surface. This mixture offers a smooth finish and the required load-bearing capacity. The mixture for slabs needs to be able to support foot movement as well as the weight of equipment and furniture.

Strong and flexible slabs that can endure slight motions without breaking should be produced by the concrete mixture. Appropriate curing is necessary to attain the desired cement consistency. In order to increase the concrete’s strength and durability, this entails adding water and letting it stay wet-mix for a few days.

Step-by-Step Guide to Mixing Concrete for Slabs

Step-by-Step Guide to Mixing Concrete for Slabs

Follow the steps to prepare a concrete mix for slabs:

  1. Prepare the mixture: 

Start by mixing the components in the correct ratio, which is 1 part cement, 2 parts sand, and 4 parts coarse aggregate. Make sure to maintain the water-cement ratio, usually around 0.40 to 0.60, to achieve optimal consistency of the mixture.

  1. Spread out the cement-sand mixture:

Spread the mixture on a level surface.

  1. Add the coarse aggregate:

Cover the cement-sand mixture with the measured coarse aggregate.

  1. Blend the components:

Now, combine all the ingredients by hand or with a machine that mixes concrete.

The concrete mixture will then be poured into the structure if the aforementioned procedures are followed. It can be prepared in single batches to expedite the process and meet the immediate construction requirements. The performance of the combination is enhanced by the inclusion of admixtures.  

Factors to Consider when Choosing a Concrete Ratio for a Slab

  • Strength of Compression

Concrete’s compressive strength is a crucial characteristic that determines how long it will remain solid and hardened. To make sure the water-to-cement ratio is right for the intended mix, it is usually checked after 28 to 30 days. Compressive strength criteria, which are impacted by curing time, temperature, and conditions, are specified by standards such as ISO 456-200, British Standard, and Eurocode.

  • Concrete’s Scope of Work

The ease of placing, compacting, and shaping concrete during construction is referred to as workability. Compaction methods, reinforcing spacing, and section size and shape all impact workability. High-workability concrete is necessary for intricate or narrow areas to guarantee correct placement and compaction. Architects and contractors frequently use the slump test to gauge workability.

  • Durability

​Durability refers to concrete’s capacity to withstand environmental deterioration.​ Bridges, buildings, and other structures are strengthened and have a longer lifespan when made of durable concrete. A good water-to-cement ratio is essential for durability when high strength is not required. Durability is compromised if the water-to-cement ratio is excessively high.

  • Quality Control on-site

​Concrete meets the necessary standards through effective quality control.​ Variations in strength often result from errors in batching, mixing, placing, and curing processes. These issues can be mitigated through proper testing and diligent attention to quality inspections.

  • Concrete Structure and Aggregate Size

The maximum aggregate size is determined by the distance between reinforcements. While aggregate size has a direct impact on workability, it has an inverse effect on the water-to-cement ratio. Smaller aggregate sizes are typically utilised for better compressive strength.

Conclusion

Every building project benefits from a carefully planned concrete mix. For better results, you need to select a concrete combination that is robust, high-quality, and reasonably priced. The proper ratio of concrete mix may be determined by skilled construction experts. They guarantee conventional mixing procedures for producing high-quality constructions and have a solid understanding of construction.

FAQ’s

1. What is the best mix for concrete slabs?

The best mix ratio is 1:2:4 (1 part cement, 2 parts sand, and 4 parts coarse aggregates) for concrete slabs.
When mixing, the concrete must be placed within half an hour to ensure consistency and easy placement. Use a square-headed shovel for a smooth finish and generous placing. 

2. What type of concrete is used for slabs?

The three types of concrete most frequently utilised in pavement construction are C30, PAV1, and ST 3. Additionally, it is perfect for outdoor paved spaces like patios, driveways, pathways, stables, and garages, as well as for exterior applications that are less demanding, like slabbing. 

3. Which concrete mix is ideal for slab repair?

The specifications of the project often determine the ideal concrete mix for a slab. Nonetheless, 1:2:4 is a frequently utilised ratio. That means one component of cement, two parts of sand, and four parts of aggregate. You have three options: buy Portland cement individually, mix the sand and aggregate yourself, or buy ready-mixed bags

Composite Construction Materials: Meaning, Types, Benefits, and Applications

0

Composite materials have become vital for modern construction, engineering, aerospace, automotive and many other industries. Known for their unique properties, composite materials add two or more different substances to achieve characteristics superior to the individual components alone. This article will explore what composite materials are, their benefits, types, characteristics and applications, specifically in construction. 

What is a Composite Material? 

Composite materials combine two or more components with different physical and chemical properties. Unlike traditional materials like metals or plastics, composite materials aim to capitalise on the strengths of their individual components while minimising their weaknesses. By doing so, they create a final product that is often stronger, lighter and more durable than its parts. 

Composite Material Meaning and Definition

The composite material definition shows its hybrid nature: it is engineered by merging two or more materials which retain their own properties while contributing to a synergistic effect in the composite. The main elements of a composite material are: 

1. Matrix – This is the continuous phase, usually in the form of a resin or polymer, which binds the reinforcing material.

2. Reinforcement – This dispersed phase, which could be fibres or particles, enhances the composite’s mechanical properties. 

Thus, the meaning of composite material centres on the innovative combination of these components, making the resulting material stronger, more lightweight, and often more resistant to environmental factors.

Characteristics of Composites

One of the most unique features of composites is their versatility. They can be engineered to meet specific needs by adjusting the type and ratio of materials involved. Here are some key characteristics of composites that make them beneficial in construction and other applications:

  • High Strength-to-Weight Ratio: Composite materials are generally lightweight yet strong, which is a desirable combination in many applications, especially in the aerospace and automotive industries. 
  • Corrosion Resistance: Unlike pure metals, most composite materials are resistant to rust and corrosion, which reduces maintenance costs and extends the lifespan of structures. 
  • Thermal and Electrical Insulation: Many composite materials can provide insulation against heat and electricity, adding value to construction and infrastructure projects.
  • Design Flexibility: Composites can be moulded into various shapes, creating complex designs that might be challenging to achieve with traditional materials.
  • Durability: Composite materials are generally more durable and can withstand environmental stress, strong chemicals and extreme temperatures, making them ideal for harsh conditions.

Types of Composite Materials 

Composite materials come in various forms, each suitable for different applications. Each type of composite has unique benefits and limitations, allowing engineers to select the best option based on project requirements and performance demands. Here are some major types of composite materials commonly used in construction and other industries:

 1. Polymer Matrix Composites (PMCs)

These composites use a polymer-based resin as the matrix and are reinforced with fibres like glass, carbon, or aramid. PMCs are the most widely used composites in construction due to their light weight, high strength and corrosion-resistant properties. 

2. Metal Matrix Composites (MMCs) 

In these composites, a metal (e.g. aluminium or titanium) acts as the matrix, while reinforcing materials like ceramics or fibres are added for improved strength and temperature resistance. MMCs are primarily used in high-performance applications like the aerospace and automotive industries.

3. Ceramic Matrix Composites (CMCs)

The matrix is a ceramic material, often reinforced with fibres to improve toughness. CMCs are highly resistant to heat and corrosion, making them ideal for high-temperature environments.

4. Fibre-reinforced Composites 

Fibre-reinforced composites consist of fibres in a matrix material, such as carbon fibre or glass fibre. These components are used extensively in construction due to their superior tensile strength, lightweight nature and durability.

5. Natural Fiber Composites 

These composites use natural fibres like bamboo, jute or hemp bonded with a polymer or natural resin. They are chosen for eco-friendly construction applications as they are biodegradable and have a lower environmental footprint.

6. Sandwich Composites 

These structures have two strong outer layers and a lightweight core material. Common in the aerospace industry, sandwich composites provide excellent stiffness and strength while remaining lightweight. 

Benefits of Composite Materials in Construction

The applications of composite materials in construction have risen due to their numerous advantages. Here are some benefits:

  • Light weight and high strength: Composite materials are strong yet lightweight, which reduces the overall loading on structures. This is beneficial for applications like bridges and high-rise buildings. 
  • Design Flexibility: Since composites can be moulded into complex shapes, they allow architects and engineers to create innovative designs that would be difficult or impossible with traditional materials. 
  • Durability and Low Maintenance: Composites are resistant to weathering, corrosion and impact, meaning structures made from composites require less maintenance and have longer service lives. 
  • Thermal Efficiency: Certain composite materials offer excellent thermal insulation, helping buildings maintain stable internal temperatures and reduce energy consumption.  
  • Environmental Resistance: Composites can withstand extreme environmental conditions, including UV radiation, humidity, and chemicals, which is important for structures regularly exposed to such elements.
  • Reduced Costs: Although initial material costs may be higher, the ease of manufacturing and installing and the reduced need for maintenance make composite materials cost-effective in the long run.

Applications of Composite Materials in Construction

Numerous industries have seen a rapid increase in the use of composite construction, with uses ranging from:

1. Bridges and Infrastructure: Composite materials are widely used in bridge construction due to their strength, lightweight nature and durability. Composite decks, girders, and reinforcing bars are common in modern infrastructure. 

2. Building Facades: Composite materials offer architects flexibility in design, allowing the creation of aesthetically appealing facades that are also durable and resistant to environmental damage.

3. Flooring and Roofing Systems: Composite materials are used for flooring and roofing due to their insulation properties, resistance to corrosion, and ease of installation.

4. Pipes and Tanks: Composite pipes and tanks are increasingly popular for water and chemical storage due to their corrosion resistance and low maintenance requirements.

5. Structural Components: Beams, columns and other structural elements are often made of composite materials, which offer great strength and reduce the total load on foundations.

6. Renewable Energy Structures: In the renewable energy sector, composites are used in wind turbine blades, solar panel frames, and other energy structures due to their strength, durability and light weight.

The Future of Composite Construction Materials 

The demand for composite construction materials is expected to grow as advancements in manufacturing and materials science make composites even more versatile and affordable. Innovations in eco-friendly composites, such as biodegradable polymers and natural fibres, are promising for sustainable construction projects. Developing smart composite materials that can change properties in response to environmental stimuli could also revolutionise how buildings adapt to changing climates.

Conclusion 

Composite materials have changed construction possibilities by offering strength, durability and flexibility. The variety of types available allows engineers and architects to select the best material for each application, optimising cost, performance, and sustainability. Composite materials will become a key part of future infrastructure and architectural designs as their use in buildings continues to expand due to continuous developments. 

Building Completion Certificate – Importance & Process Guide

0
Building Completion Certificate (1)

A Building Completion Certificate (CC) is an important legal document issued by the local authority for a newly built project. Obtaining the completion certificate during the purchasing process is essential, as it certifies the building’s construction is complete and that is ready to occupy. Failing to get the CC could result in legal complications and affect future sales or tenancy. Here, we look at a Building Completion Certificate, its importance, and how to acquire it.

Understanding Building Completion Certificate Regulations

A Building Completion Certificate is a legal document that validates that the construction of a building (residential or commercial) is complete and ready for possession. Relevant authorities will inspect whether the building complies with the approved plans and local development regulations and issue the completion certificate to legitimise the building.

The completion certificate is crucial for a builder or the building owner as it ensures that the building is developed following the applicable laws and guarantees the quality of the structure. The CC contains all the necessary information about the building, including the plan, height, and materials used. This certificate will help in obtaining electricity and water from the corporation and will also be beneficial during sales, tenancy, and applying for loans against property.

Process for Verification Before Issuing a Completion Certificate

Process for Verification

Application

After the construction, the builder or property owner must apply for the building completion certificate from the local authorities. In the application form, the owner must fill in all the necessary details of the construction, including the name, permit number, survey number, nature of construction, and date of completion, along with a copy of legal documents such as the building plan approval, NOCs, structural safety certificate, property tax, and other necessary documents related to the building.

Inspection

Structural Safety Check

After submitting the application form, the local authorities will schedule an inspection. A team of officials will be inspecting the building on the scheduled date. The inspection parameters ensure the building is constructed based on the legal codes, regulations, and safety standards. If the inspection is satisfactory, they will move to the next process of providing the certificate. However, if there are any changes in the construction, a demolition letter will be issued. In case of minor changes, a penalty will be charged.

Document Review

After inspecting the building, the local authority will review the submitted documents, such as building plans, structural stability, and occupancy certificates. The final output will be reviewed if any alterations are suggested during the inspection.

Approval

Upon satisfaction with the document verification and inspection, the local authorities will issue the building completion certificate within three to four weeks.

Criteria for Obtaining a Building Completion Certificate

The criteria for obtaining a building completion certificate in India vary from one state to another. However, here are some general criteria a building must meet to obtain the completion certificate.

  • The building must be constructed within the approved building plan that has been issued.
  • The building must follow the codes of construction and local building development guidelines, such as building height, materials used, and more.
  • The builder or the owner must obtain the No Objection Certificate issued by the various government departments.
  • The building must have a structural safety certificate and a building warrant.

Legal Documents Required for obtaining a Building Completion Certificate

Here are some documents that a builder or property owner must have to obtain the building completion certificate.

  • Duly filled application form
  • Building completion certificate
  • Building Plan Approval
  • Structural safety certificate
  • Property tax receipts
  • NOC from the fire department
  • NOC for lift installation
  • Encumbrance certificate
  • NOC for the sewage system
  • NOC for the water supply plan
  • Certificate for electrical supply
  • Affidavit for provisional completion certificate
  • Any other document or declaration (if required)

Benefits of Having a Building Completion Certificate

  • It ensures that the construction is built within the rules and regulations of the country.
  • The certificate helps obtain property registration, water, and electricity connections from the corporation.
  • The certificate contains all the information about the construction and can secure the building from any legal complications.
  • This ensures that the buyer is not living in an illegal building.
  • Property tax benefits can be claimed using the completion certificate.
  • It is a mandatory document when selling or leasing the property.
  • It can help the owner if he/she wishes to apply for a loan and other benefits from the government against the property.

Consequences of Not Having a Building Completion Certificate

Failing to obtain a building completion certificate could lead to numerous consequences. Here are some of the consequences of not having a building completion certificate.

  • Authorities can file hefty penalties for not having a building completion certificate, or in a worst-case scenario, they could even declare that the building is illegal, leading to to the issuance of demolition orders.
  • Without the Completion Certificate, the property owner or developer will find it difficult to sell or lease the property. Since this is a mandatory certificate, leasing or selling the property without this may be considered illegal.
  • It will be difficult for the property owner to obtain a financial loan against the property without the completion certificate.
  • The property owner cannot file or enjoy the income tax benefits without the CC.

Conclusion

It is crucial to hold the Building Completion Certificate for all types of buildings (both residential and commercial) as an owner, buyer, or developer. It provides the property’s legal proof and all the necessary construction details. The certificate provides the details of the building and also ensures the basic amenities, such as water and electricity. This certificate could act as a legal aid for the property owner and help them enjoy the financial benefits of the property.

Types of Arches in Construction – Shapes, Materials & Uses

0

An arch is a curved vertical structure with a raised space that may or may not support the weight above it. Arches have been used in construction for hundreds of years for architectural purposes. They are widely used in bridges, doorways, windows and aqueducts. They can carry heavy compressive loads by uniformly distributing the weights above them. There are various types of arches in construction based on the shape, materials used and the number of centres. This blog discusses the different types of arches in the construction field.

Types of Arches in Construction

Historical & model Arch Structures

According to the shape

Based on the shape, arches are classified into:

Pointed Arch

Pointed Arch is an arch where two arcs are sectors of circles that meet at the apex, forming a triangle (irrespective of what triangle is formed). These bricks are also called Gothic Arches. These arches are widely used in cathedrals and castles as visually pleasing element. These arches allow higher walls and oversized windows and help distribute the weight uniformly and more effectively. These arches are ideal for larger structures.

Horseshoe Arch

As the name suggests, the horseshoe arch is in the shape and structure of a horseshoe. It has a unique extended curve structure that extends beyond the semicircle. It brings more architectural and cultural significance and is widely used for doorways and windows in Islamic architecture.

Flat Arch

A flat arch forms an equilateral triangle within the intrados of the structure, formed by the horizontal angle of 60° by skew backs. Although the intrados are flat, a slight rise in the extrados of 10 to 15 mm per meter width of opening allows for small settlements. These arches are commonly used for buildings with minimum weight.

Segmental Arch

Segmental Arch is one of the most commonly used arches, where the circle is less than 180°. These arches can resist thrust and are among the most durable arches. In this arch, the centre lies below the springing line, where the thrust is transferred in an inclined direction to the abutments.

Semicircular Arch

As the name suggests, the arch curve looks like a semi-circle, and the thrust transferred to the abutment is in the vertical direction, as the skewback is horizontal. In this arch, the centre lies exactly on the springing line.

Venetian Arch

The vegetarian arch is also pointed, but the crown is deeper than the springing line. It contains four centres, all of which lie on the springing line.

Semi-Elliptical Arch

As the name suggests, these arches are semi-elliptical in shape and have three to four centres. These arches are a combination of elegance and harmony. They are used in the construction of bridges due to their uniform weight distribution and better headroom.

Stitled Arch

It is a semi-circular arch that has two vertical portions at the springings. The centre of the arch lies on the horizontal through the tops of vertical portions.

Relieving Arch

It is a type of arch constructed above the flat arch or above the wooden lintel to provide high strength. The decayed wooden lintel can be replaced with a relieving arch without disturbing the stability of the structure. The ends of the arch are carried into the abutments.

Arches classification according to construction material

Based on the construction material, arches are classified into:

  • Stone Arches
  • Brick Arches

Stone Arches

Stone Arch Designs

Stone arches are again classified into

Ashlar Arches

It is a type of arch where the stones are shaped and dressed appropriately to fit the shape of the arch. The chiseled stones are bonded using cement mortar to form an arch. These Ashlar stones are used for the construction of flat arches.

Rubble Arches

It is a type of arch constructed using rubble stones, which are rough and non-uniform. These stones are used to create arches spanning not more than one metre. These arches are unstable and are used for substandard works.

In rare cases, this arch can be used for building relieving arches up to a depth of 37.5 cm and is constructed in a single ring.

Brick Arches

Brick Arches

Brick arches are again classified into

Rugged Brick Archway

The Rugged Brick Archways are usually wedge-shaped and are used for unimportant structures. These arches are created with standard bricks without voussoirs. The arch curve has wedge-shaped joints that are extremely thick at the extrados and less thick at the intrados. These arches are not aesthetically pleasing and are not used for exposed brickwork.

Fine-Axed Brick Arch

Fine-axed brick arches are constructed by placing the bricks in the appropriate shape. The bricks used in the arches are usually chopped in the shape of wedges. The fine shape and proper arrangement of bricks make it more aesthetically pleasing.

Gauged Brick Arches

In Gauged Brick Arches, the bricks used should be finely dressed and require skilled craftsmanship. Based on the requirements of the voussoir, the bricks are cut with a wide saw of appropriate size and shape. Lime binders bind the bricks together to form an arch.

Manufactured Brick Arches

These arches are built using specially manufactured bricks of the required shape and size of the voussoirs to achieve excellent craftsmanship.

Based on the number of Centres

Based on the number of centres, arches are classified into:

One-Centred

These arches have only one centre, including semicircular, flat, horseshoe, segmental, horseshoe, and bulls-eye arches.

Two-Centre Arch

These arches have two centres. Arches like pointed, Gothic, and lancet arches come under a two-centred arch.

Three-Centre Arches

These arches have three centres. Arches like elliptical and equilateral arches come under three-centre arches.

Four-Centered Arches

These arches have four centres. The Venetian arch and Tudor Falls arch come under four-centred arches.

Five-Centered Arches

These arches have five centres, and the semi-elliptical arch falls under this category.

Conclusion

Arches are one of the common architectural features of buildings, and they are built using bricks or stones. They primarily help hold the structure’s weight above the opening. There are numerous arch types to choose from, each with unique characteristics. We hope this blog has helped you understand more about arches and helped you decide which arch to choose for your dream project.

A Comprehensive Guide to IoT (Internet of Things) in Construction

0
Internet of Things in construction

In recent years, the Internet of Things (IoT) has changed various industries, with construction among those seeing significant benefits. By interconnecting devices and utilising real-time data, IoT empowers construction projects to be more efficient, safer and data-driven. This blog will explore the definition, importance, and benefits of IoT in construction alongside a look at different IoT-enabled systems and products in the industry. 

What is IoT in Construction? 

The network of physical items, or “things”, that have sensors, software and other technologies installed, allowing them to send and receive data with other systems and devices over the Internet is known as the Internet of Things (IoT). IoT helps streamline various aspects of construction, from monitoring equipment to resource management and real-time project tracking. IoT allows enhanced decision-making based on data collected from on-site devices, thus transforming how construction projects are managed.

7 Key Components of IoT in Construction 

To understand how IoT can be applicable in construction, it’s important to break down its core components which enable seamless device integration in IoT systems, ensuring that construction companies can use data for effective decision-making. Let’s briefly look at the components of IoT in construction.

1. Sensors/Devices: The “things” in IoT are devices with sensors that collect data like temperature, speed, or location. 

2. Connectivity: Collected data is sent through networks like Wi-Fi, cellular networks, or low-power wide-area networks (LPWAN).

3. Data Processing: Data is processed and examined to find patterns or irregularities as it arrives at a central platform.

4. User Interface: This component provides users with accessible insights into the collected data, often via dashboards or mobile applications. 

5. Data Storage: Data storage solutions are needed to hold and organise large volumes of data for future analysis. 

6. Security: IoT requires strong security protocols to prevent data breaches and ensure safe device operation.

7. Actuators: In some systems, IoT devices can perform actions based on the data they collect, such as turning equipment on/off.

Types of IoT Systems and Products in Construction

Several types of IoT-enabled devices are commonly used in construction to support various functions, from equipment tracking to safety monitoring. Here are some popular systems and products that use IoT in the construction industry:

1. Wearable Technology 

Wearable IoT devices, like smart helmets, vests, and safety glasses, ensure workers’ safety by monitoring vital signs and environmental conditions. These wearables provide alerts in case of hazardous situations, keeping workers safe and allowing managers to track their well-being.

2. Connected Heavy Machinery

Construction equipment with IoT sensors can monitor factors like fuel levels, engine temperature, and operational hours. This IoT implementation ensures that equipment is well maintained before a critical failure occurs, reducing downtime and maximising resource use.

3. Smart Material Sensors 

Smart sensors are embedded in construction materials, monitoring temperature, moisture, and concrete strength. These IoT-enabled devices provide real-time data, ensuring materials meet quality standards and reducing the likelihood of structural issues post-construction. 

4. Drones for Site Surveying

Drones fitted with IoT sensors are used for surveying and mapping construction sites. They provide aerial views and capture data on project progress, assisting managers in better planning and allocation of resources.

5. Site Monitoring Cameras 

IoT-enabled cameras placed on construction sites help monitor activity in real-time. This allows managers to monitor project progress, maintain security, and guarantee safety. They also allow for real-time project tracking, so that all stakeholders in a project can be aware of construction updates.

6. Building Information Modelling (BIM) Integration 

IoT can integrate Building Information Modelling (BIM) systems, allowing for real-time monitoring of construction projects. With IoT-enabled sensors feeding data directly into BIM software, managers gain a careful view of every stage of the construction process.  

7. Environmental Monitoring Sensors 

IoT sensors can monitor factors like air quality, noise levels, and temperature to ensure that the construction environment remains safe and obeys regulations. This is especially important in urban construction projects where environmental impacts must be carefully managed.

Importance of IoT in Construction 

The construction industry faces project delays, budget overruns, safety concerns, and resource mismanagement on a regular basis. IoT addresses these issues by improving connectivity, providing insights from real-time data, and allowing for predictive and preventive actions. Here are a few reasons why IoT is vital in construction:

  • Improved Efficiency: IoT helps automate repetitive tasks, monitor progress, and optimise workflows. 
  • Enhanced Safety: IoT-enabled devices can alert workers and management of potential hazards, helping reduce on-site accidents.
  • Resource Optimisation: IoT applications provide information into resource management, preventing wastage and improving cost-effectiveness.
  • Data-Driven Decisions: Construction managers can verify that project timetables and budgets are met by using IoT to make well-informed decisions supported by real-time data.

Benefits of IoT in Construction

  • Better Operational Efficiency: Real-time tracking allows monitoring and optimising resource allocation effectively. This results in better resource management in IoT-enabled projects, reducing idle times and unnecessary expenses.
  • Predictive Maintenance: Construction companies can use predictive maintenance by implementing device integration in IoT. Sensors on machinery detect abnormal behaviour, allowing early intervention to prevent downtime, reduce repair costs, and extend equipment life.
  • Improved Worker Safety: Smart helmets and vests are examples of wearable IoT-enabled devices that monitor and alert users of any danger. This IoT use case improves overall safety by constantly tracking workers’ health and safety, reducing the risk of injuries and accidents.
  • Reduced Costs: Efficient use of resources and predictive maintenance reduces the project’s overall costs. By using IoT in construction, companies can avoid waste, improve productivity, and minimise equipment downtime, leading to substantial savings.
  • Remote Monitoring and Control: Construction managers can remotely regulate multiple project sites through IoT-enabled devices. This allows tracking project progress, monitoring equipment, and accessing site conditions without being physically present, improving management and efficiency and reducing the need for constant on-site supervision. 

Conclusion

IoT implementation has a few challenges, like data security, as it often handles sensitive information. It also needs significant investment, not only in technology but also in personnel training. However, IoT’s benefits are worthwhile, from resource management in IoT applications to predictive maintenance and safety improvements. The growing importance of IoT highlights the need for construction companies to adapt and invest in IoT-enabled devices and systems, creating more efficient, cost-effective, and safer work environments. 

Construction firms like Brick & Bolt, which leverage IoT, will be better positioned to meet industry demands and handle large projects. IoT applications in construction will grow as the technology develops further, opening the door to a more connected, data-driven future. 

Vastu for Living Rooms: Comprehensive Guidelines for Positive Energy

0
Vastu for Living Rooms

Whether you live in an apartment, villa or mansion, the living room is generally the most used space in homes. It’s where you place your favourite sofa so that you can relax after a tiring day at your workplace. Here you gather with your friends and family on holidays and indulge in a fun night, sit with your favourite cup of coffee or plan a get-together. Therefore, when designing your home, it is essential to give importance to your living room.

Besides function, your living room mirrors your personality and style. The way you design and decorate your living room affects the overall atmosphere of your space. Therefore, you must focus on following the Vastu guidelines when designing and decorating your most favourite spot of the house. Vastu Shastra, also known as the science of planning, combines architecture with the various elements of nature. It harmonises the natural elements to create a positive and balanced environment for you to live.

In this blog post, we will provide you comprehensive tips and insights on drawing room Vastu. From colours and lighting to seating arrangements and placing decorative items, this blog guides you on everything you should know. Whether you are setting a new space or redesigning your existing house, following these guidelines will bring tranquillity and prosperity in your living room.

Importance of Vastu Principles in Interior Designing

The following are the benefits of having a living room as per Vastu.

Enhances Positive Energy

When you design and decorate your rooms following Vastu principles, you create a space that resonates with positive cosmic energy. Following Vastu principles involve strategic placement of furniture, rooms and decorative elements to facilitate the flow of energy. It leads to an overall sense of wellbeing and harmony among family members and guests.

Improves Health and Vitality

Vastu Shastra focuses on natural light and proper ventilation, as they are essential for good health. If your space experiences a free-flow of air and sunlight, you have a well-designed living room, contributing to the physical and psychological well-being of the occupants.

Better Relationships

Your living room is the space where your family members gather and interact. With a Vastu-compliant living room, you will experience better communication and improved relationships with your family members and guests.

Reduces Stress

When you harmoniously design your living room, it serves as a sanctuary relieving you from all stresses of life. The balanced and positive energy created by the Vastu of the space helps in reducing stress, thereby promoting positive relaxation.

Optimal Space Utilisation

Vastu offers guidelines for the best utilisation of your space. It is beneficial if you are dwelling in an urban setting, as space is very limited. If you are an interior designer and following Vastu, you can create layouts that maximise functionality without compromising the aesthetics.

Boosts Prosperity

Certain Vastu guidelines attract wealth and financial stability. When you incorporate these guidelines and elements in your living room, you create an environment that attracts financial growth.

Living Room Direction as Per Vastu

Vastu Shastra recommends positioning your living room in the north, east, northeast or in the northwest direction. Having your living room in any of these directions has a positive impact on the energy flow within your space. However, you must avoid certain directions like the southwest for your living room. Experts believe that this direction brings inauspicious energies to the space.

The main entrance of your house must be either in the north or east direction, as it ensures a harmonious flow of energy. Never place the entrance in the southeast or southwest corners as they aren’t considered auspicious in living rooms. If your dining area and living room have a connection, ensure to position it in the east or southeast area of the living room. Ensure that your dining area is close to your kitchen. If you have an open-plan design home, and want a puja room, position it in the northeast area of the living room or else you can design your house floor plan accordingly.

Vastu Guidelines for Your Living Room

Furniture Layout

When purchasing furniture for your living room, go for rectangular or square-shaped ones. Avoid round and odd-shaped furniture. Opt for wooden furniture, as they emit higher positive energy vibrations compared to synthetic materials.

Sofa direction as per Vastu

If you have a sofa in your living room, place it along the south or west wall of the room, because when you sit on the sofa, you face either north or east, which are the auspicious directions. When placing your sofa, ensure that it is not under a beam. Doing so will create negative pressure and discomfort. Moreover, the back of the sofa must not face any doors as this might create obstacles in the flow of good energy.

Placing side tables and coffee tables

When selecting side tables and coffee tables for your living room, ensure they are shorter than your seating arrangement. Place the coffee table in the centre and the side tables adjacent to your seating area. Ensure that the tables do not block movement or create obstacles in the energy flow.

Vastu-compliant seating arrangement

According to Vastu, you must arrange your seating in a manner that allows free movement and open spaces in the living room. When sitting on any furniture, you must face the east or the north. It helps you in better absorption of positive energy. Never place your sofa or seating arrangement directly in front of any room.

Placing Home Appliances

TV direction as per Vastu 

Since your living room is the hub for numerous activities, it’s incomplete without a television. According to Vastu, when you place your television in the right direction, it brings good luck and prosperity. The TV position in your living room as per Vastu should be on northern or eastern walls. Otherwise, your television set must face north, west or east when you see it sitting on your sofa. It brings positive energy in your living space, ensuring that you receive good vibes from the programs you watch. Never place your television in the southwest corner of your living room as this will result in excessive arguments among family members.

Installing air conditioners

If you plan to install an air conditioner in your living room, ensure that it is in the right direction. For optimum temperature management, Vastu suggests placing your air conditioner on the east, west or northwest side of your living room.

Living Room Colour Scheme According to Vastu 

Choosing and implementing the right colour scheme is crucial for your living room because each colour links to one of the five elements, influencing your space’s overall ambience and energy. When you opt for Vastu-compliant colours, you contribute to creating a positive, harmonious environment. 

Colours for north-facing halls: Use light and cool colours like light greens, blues, pale pink and light yellow. These hues introduce positivity while maintaining an energetic balance within the interiors.

Colours for east-facing halls: If you have an east-facing living room, colour it in bright and warm colours to create a vibrant and welcoming ambience. Light peach, yellow and beige are some of the most auspicious colours for your east-facing hall that foster a cheerful atmosphere.

Colours for northwest-facing halls: Your northwest-facing hall benefits the most from warm and neutral colours like cream, light peach and beige. These colours establish a warm and welcoming ambience that fosters stability and positivity.

Vastu Recommendations for Decorative Items in the Living Room

Every piece in your house has trapped cosmic energy, which can be either positive or negative. However, when your items are Vastu-compliant, the negative energies start diminishing and attract positivity to the place. The same happens with your living room’s decorative items. Therefore, you must know the right direction of your decorative items as per Vastu Shastra.

If you want to keep antique metal pieces, the western and southern parts are the ideal sides as these directions bring abundance and health for you and your family members. If you are looking to place wooden items like almirahs, flower vases and cabinets, the northwest or southeast directions are ideal as these attract positive energy.

If you love including decorative items depicting flowing water, place them in the northeast direction, as it signifies the inflow of wealth. You must place other items containing water elements like fountains or aquariums in the north or northeast direction. Never keep any cracked or broken decorative item. If you have any such pieces, discard them immediately. Never mend such items and keep them for decoration, as it leads to problems in married life, causing irreparable loss.

Placing Plants and Decorative Lights

Indoor plants are one of the most valued decorative elements. They bring calmness and positivity. Avoid including thorny plants like cacti. Ensure to water the indoor plants regularly. Decorative lamps are a good source of positivity. Ensure that they do not make huge shadows as this might lead to domination of negativity over positive vibes. 

Placing Paintings 

You can also include paintings, as they uplift the beauty of any room. The northeast and east directions are generally ideal for placing your paintings. 

East wall: You can place paintings of sunrises, water flowing and green foliage. These paintings enhance growth, new beginnings and progress.

North wall: You can place paintings of Lord Kubera, Goddess Lakshmi or lotuses. These paintings enhance wealth, spirituality and prosperity.

South wall: This wall is ideal for paintings of elephants, horses and couples. The paintings induce fame, good relationships and recognition.

West wall: This wall is ideal for placing paintings of birds, sunsets and landscapes. These paintings showcase creativity, children and travel.

Conclusion

In the modern-day lifestyle, most homeowners consider Vastu as a trend. However, if you have a Vastu-compliant home, you bring in more positivity and prosperity. If you are an ardent follower of Vastu tips, you can alleviate negative energy within the space by planning the typology of your living room. Starting from spatial planning and colour palettes to furniture placement, you must have a keen eye on everything when it comes to Vastu. Therefore, if you want to include some positive vibes into your home, you can follow the Vastu tips we have shared in this blog.

Whether you are redesigning your existing home or planning to construct a new one,  Brick & Bolt, as a leading construction firm in India, will take care of the entire project from start to finish. The professionals here understand the overwhelming effort that goes into constructing your dream home. Therefore, we empower our clients with the assurance of reliability, quality and on-time delivery of every project. If you are an ardent believer of Vastu Shastra, do not forget to communicate with the experts here, who will design your living room and your home following all the guidelines of Vastu.

A Comprehensive Guide to Asphalt Shingles for Roofing

0
Asphalt Shingles for Roofing

For several years, asphalt shingles have been a popular roofing material in Indian homes. Known for their durability, affordability and wide range of aesthetic options, construction professionals love using them in their residential projects. Homeowners find it a reliable and accessible solution for weather protection as they are suitable for various climates and architectural styles.

The value offered by shingles material is another key reason behind their popularity. This blog aims to guide the homeowners and construction professionals on everything about asphalt shingles. It focuses on the manufacturing and installation process, various types of shingles available in the market, the merits and demerits of installing the roof and the cost.

Asphalt Shingles Roof: What Is It?

An asphalt shingle roof is a roofing system comprising asphalt shingles along with other roofing components. Manufacturers make these shingles with different layers of asphalt-coated fiberglass mat at the core. It helps the shingles be flexible even during extreme winters. If these shingles become brittle, it will compromise its ability to resist water penetration. Manufacturers embed the top coating with ceramic granules, which protects the material from damage by UV rays. Some manufacturers also include algae resistance granules to control algae growth that might discolour the roof.

Types of Asphalt Shingles

Today, you will come across numerous shingle choices. However, not all shingles are the same. Therefore, you must weigh the pros and cons before choosing the right type for your home. Some of the types available include the following:

Standard Asphalt Shingles

Often called traditional three-tab shingles or strip shingles, most homeowners choose them due to their affordability. Made from a single layer of asphalt, these shingles have a flat appearance, offering a slate-like look. Since they consist of a single layer of asphalt, these are lighter in weight. Before the introduction of designer shingles in the 1980s, these traditional shingles were a predominant roofing material. Today, most construction professionals use these shingles in inexpensive homes.

Architectural Shingles

Often termed as dimensional or laminate shingles, these are the most popular roof shingles used in construction projects. Manufacturers make the shingles using two layers of asphalt fused together, which gives your home a multi-dimensional appearance. This asphalt roof replicates the look of wood shake and natural slate. Since these are heavier than traditional shingles, they offer better weather protection.

Luxury Shingles

These are the best-in-class laminated shingles available in the market. The excellent appearance and functionality outclasses architectural shingles. Besides being heavyweight and offering premium protection from harsh weather conditions, they have a distinct aesthetic value, providing highest quality, colouration and dimensionality. With this shingle roof, your home receives the most realistic representation of the traditional wood shake and quarried slate roof.

Manufacturing of Asphalt Shingles 

Raw Materials

The following are the raw materials used in the manufacturing of asphalt shingles.

  • Bitumen 
  • Sand grains 
  • Gravel
  • Synthetic polymers, like ethylene propylene diene monomer (EPDM) rubber.

The Manufacturing Process

Step1: The Shingle Membrane

The shingles construction process starts with sheets of fiberglass membrane that arrive at the manufacturing unit in large rolls. However, some manufacturers use membranes made from organic materials, such as wood chips, paper and cardboard. Irrespective of the membrane material, it creates a flexible strong base for the shingle, aids in weather protection and boosts fire resistance, offering a longer lifespan to the roofing shingles.

Step 2: Asphalt Layering

Manufacturers heat the asphalt at high temperatures. When it turns into a liquid, they pour it onto the membrane sheets. Asphalt is a thick, semi-solid and black form of petroleum which is added to the shingles in a precise process. It boosts weather resistance and durability. Often additional ingredients are mixed to the asphalt to boost the fire resistance capacity of the shingles.

Step 3: Shingle Granules 

When the material is still hot, manufacturers press the granules into the asphalt. The granules are often tiny pebbles or crushed stones that come in a variety of colours. Some granules resist algae growth, while others reflect the sun’s heat. Manufacturers add another layer of the granules to the shingles, as they prevent the surfaces from sticking together during the packaging process.

Step 4: Packaging

After manufacturing the shingles, the manufacturers cut the sheets into a shingle in an accurate measurement of 12 by 36 inches (generally). The manufacturers then pack the cut shingles into bundles.

Installing Asphalt Shingle Roof Systems

Installing the shingles requires precision and expertise. Enlisted are the steps that one must follow for the best installation.

Removal of the Old Roof

Before installing a new roof, ensure to remove the existing roofing. You must remove the old shingles and other materials, such as underlaying layers, flashing and nails from the roof.

Inspecting and Replacing the Roof Decking

After the removal of the old roof, check if the roof decking is in a good condition. Roof decking refers to the layer attached to the roofing materials and the frame of the structure. In case of any damage, ensure to replace the damaged portion immediately with a new plywood or oriented strand board (OSB). Composed of compressing layers of wood strands and resin, OSB is a prominent form of decking. Its strength, affordability and durability makes it a popular choice for roof decking.

Installing Drip Edge

The next process involves installing a drip edge along the eaves and rakes of the roofs. This is a metal flashing that requires installation along the edges to prevent water from running under the shingles and seeping into the roof deck.

Cover the Decking System with Underlayers

After covering the decking with a drip edge, you must cover the roof with underlayment, which is a water-resistant barrier installed over the roof decking. It offers an extra layer of protection against any damage. Felt paper and an underlayment made from polyester or fiberglass are the most common forms of underlayment.

Use a Leak Barrier

If you have your home in a valley, you must use a special leak barrier. It prevents water from seeping down the shingles into the roof decking. From self-adhesive membranes to metal flashing, you can avail different types of leak barriers to suit your home’s requirements.

Place the Starter Shingles

After installing the underlayer and leak barrier, it’s time to install the starter shingles. These form the secure base on which you can install the rest of the shingles. These are thinner than normal shingles, so that the front layer sits on the roof, allowing the water to run off. They also form a better, stickier base, preventing winds from blowing off the first line of shingles.

Flashing Walls and Penetration

Installing flashing is vital around the walls and other penetrations, including chimneys and vents. Made from rubber and metal, flashing prevents water from seeping down from these penetrations.

Install the Shingles

With all the protective measures in place, you can install the asphalt shingles. Ensure that all pieces are secured tightly along the right slope and that there are no gaps or pinholes.

Finish the Installation with Ridge Cap Shingles

After installing the main layer of shingles, the process ends with the installation of ridge cap shingles. Manufacturers design these to cover the ridge of your home’s roof. The ridge refers to the point where two planes meet. You can avail them in various styles and colours to match the main layer of shingles.

Advantages of Asphalt Shingle Roofs

Despite metal roofing having gained popularity, the asphalt roofing solution continues to dominate the market. Enlisted are the advantages of installing asphalt shingle roofs for your home.

Affordability

Asphalt shingles are one of the most affordable roofing materials. Therefore, even a homeowner with a tight budget can build a new roof with ease. These shingles provide quality and affordability, thereby achieving the right balance.

Ease of Installation

Asphalt shingles are lightweight and small in size, which is why they are easier to handle. They further reduce labour cost even when an expert installs the roofing. When your roofing material is easy to handle, installation becomes easier and faster. Besides expenditure, you also save time when you can focus on other chores.

Excellent Fit and Style

Asphalt shingles come in various colours and styles that you can choose to suit your home’s style. With these roofing solutions, you will never have to compromise on the aesthetic appeal of your home. Besides, when you choose a variety of colours and textures in these shingles, you can customise the aesthetic appeal of your home.

Disadvantages of Asphalt Roofs

No roofing solution is perfect, and your favourite asphalt shingle roof is no exception. Despite its advantages, the roofing comes with several disadvantages as well. These include the following.

Growth of Mould and Mildew

Does your home receive enough sunlight? If not, your roof is susceptible to growth of mould and mildew. These roofing systems absorb moisture easily from the environment, leading to a build-up of mould and mildew.

Vulnerable to Wind Damage

Do you live in an area experiencing high wind and have installed an asphalt shingles roof? If you have failed to install them properly, high winds can damage your roof and even rip off your roof. Strong hail and extreme weather conditions can also crack and damage your roof. 

Shorter Lifespan

Since they are light and cheap, asphalt shingles do not last as long as other roofing solutions. The overall life expectancy of an asphalt shingles roof is between 15 and 50 years. Post that, your roof generally requires a replacement.

Cost of Installing Asphalt Shingle Roofing in Indian Homes

Usually the cost of installing an asphalt shingle roof lies between INR 80 and 200 per square foot. However, the price varies depending on the type of shingles you choose and the complexity of installation. While traditional or three-tab shingles are the most cost-effective, the installation charges of luxury shingles vary between INR 120 and 200 per square foot.

Conclusion

Planning to build a new roof is never a cakewalk. You must be aware of the various loopholes associated with your roofing solution before investing. However, you must keep in mind the structure of your house and the climatic conditions of the place where you live.

As a prominent construction firm in India, Brick & Bolt undertakes every project with utmost dedication. Whether you are building a new home and looking to install shingles roof or planning to re-roof your house, the professionals offer design-build services with real-time tracking, transparent communication, quality checks and regular updates on your roofing projects.

Land Conversion Certificate – Process, Documents & Fees

0
land conversion certificate

The population boom in our country has resulted in a situation of having 488 people per square kilometer. In earlier days, people from rural areas traveled to urban regions to avail themselves of abundant opportunities. However, in recent times, this trend has reversed. People from urban areas want to relocate to rural locations to find solace and escape city congestion. They can’t relocate to a ready-made apartment in rural locations. They need to buy a plot to build their dream house. While acquiring a plot, an individual must ensure the land is clear of legal issues. The foremost verification should be to assess that the land is not agricultural and that it is all clear to construct a building. As per Indian law, no individual is allowed to build a commercial building on agricultural land if it has not undergone the land conversion process. This article will explain clearly the land conversion and various aspects of it to make the construction process hassle-free.

What is Land Conversion

agricultural land vs. converted land

Abiding by the Indian legal procedure, before kicking off any constructional work on agricultural land, it is mandatory to acquire a land conversion certificate. The process behind the conversion of agricultural land for other purposes is called land conversion. Without this land conversion being carried out, no individual can use the land for developmental purposes such as building residential, commercial, industrial, and medical facilities. He/she may be punished if they proceed without acquiring a conversion certificate.

Purpose of the Land Conversion Certificate

The certificate is a legal document that enables the transition of land from original use to another specified purpose. Obtaining a land conversion certificate ensures that the developmental projects on land whose original purpose is different become legally permissible. The land conversion certificate also affects tax rates. In India, the tax rate for agricultural land is less compared to the tax on commercial land. Possessing the certificate ensures appropriate tax charges are collected. Overall, the certificate reduces the potential risk of an individual being charged or fined in the future. The absence of a land conversion certificate can even lead to fines or demolition of structures built on the land.   

Documents Needed for Land Conversion

While the governing authorities and their rules may vary based on the state, documents needed for land conversion remain the same. This document submission varies among states, with some states demanding additional documents. To a certain extent, these lists of documents may differ among states. Some of the most commonly required documents for land conversion in all states are,

  •  An identity proof of the landowner.
  • A duplicate copy of the sale deed and partition deed. The partition deed is only required incases where the land is inherited.
  •  Record of Rights, Tenancy, and Crops (RTC) is required.
  •  Mutation status of the land and a encumbrance certificate.
  • Survey maps.
  •  An extract containing the ownership of the land.
  • A Non-Objection Certificate from the local municipal council or the gram panchayat.
  •  The payment receipt for land revenue.

Process for Applying for Land Conversion Certificate

Fees for Land Conversion

Realising its importance, the government has simplified the process of obtaining land conversion certificates that are available both offline and online. Below, a clear step-by-step procedure for obtaining this key piece of documentation via online and offline has been listed.

Land Conversion Process Offline

The process of obtaining a land conversion certificate involves visiting the local revenue department or the village panchayat office. One could get a form of documentation that needs to be submitted to the office.

  • Request for conversion authorisation from the deputy commissioner or the collector by applying to them. Along with your applications, a few papers such as the land record certificate, copies of the land map, the measurement plan, and the letter of mutation must be submitted.
  • Surveyors will carry out the verification of the application. The relevant information will be verified by the authority referring to the tehsildar’s office. An on-site inspection is carried out to ensure the land is vacant.
  • During these procedures, the application may be turned down if the land is in dispute. Along with the authority, a sub-divisional officer or collector will appoint a planning and development authority to verify.

 If these procedures proceed without any obstruction, the change of land use application will be accepted. As the owner of the land, you must ensure the land is not used for any other purpose aside from the reason mentioned in the change of land use.

Online Land Conversion Certificate in Karnataka

  • The first and foremost step is to visit the revenue department’s official website. Next, you should fill out the application and upload it for processing.
  • Visit the Karnataka government’s official website for land record systems. i.e., Land Records Bhoomi.
  • Provide necessary details such as name, email address, mobile number, Aadhar number, and address to register on the website.
  • An OTP will be sent to the registered number, and you should maintain a username and password to log in.
  • Affidavit-based conversion options should be chosen.
  • Scanned copies of the requisite documents should be uploaded.
  • The respective authorities will carry out an inspection based on the submitted documents. The owner is expected to pay a fee after the Deputy Commissioner’s(DC’s) approval. This enables them to download and print the land conversion certificate.

Fees for Land Conversion

The fee at which the land is converted depends on two factors.

1.  In which state are we talking about?

2.  Based on the intended use of the land

Land converted for residential use costs ₹327 within 12 km of city corporation limits, ₹218 within the taluk limit, and ₹89 within rural areas. For the same localities, the cost varies if the land is intended for commercial purposes. Land within 12 km of city corporation limits costs ₹654, ₹327 within the taluk limit, and ₹218 within rural.

Conclusion 

The Land Conversion Certificate for any new construction on agricultural land is something that needs to be obtained. Otherwise, it may lead to serious penalties. The process might differ from one state to another, but the state insists upon the submission of relevant documents, verification, and applicable fees. Further, with insight into the processes of land conversion, and by diligently following the required processes, individuals may successfully convert the lands for desirable purposes without legal hurdles to proceed with their construction projects.

Are Porotherm Bricks Good or Bad – A Comprehensive Guide

0
Are Porotherm Bricks Good or Bad

In the ever-growing construction industry, there are several types of bricks available. Porotherm bricks have a unique identity, distinguishing them from other brick types. Do you need clarification about using Porotherm bricks for your dream project? We’ve got you covered. This blog explains the pros, cons, applications and suitability of Porotherm bricks in construction.

Overview of Porotherm Bricks

Porotherm bricks are perforated bricks made using clay, rice husk, fly ash and slurry from granite. These bricks are available in horizontal and vertical forms, offering good thermal insulation properties and protecting the structure from extreme external temperatures. These bricks are eco-friendly and have a wide range of advantages. Due to numerous benefits and vast applications, these are widely preferred among builders.

Advantages & Disadvantages of Porotherm Bricks

A side-by-side comparison of Porotherm bricks vs. traditional bricks

Advantages

  • These bricks are strong and durable and can be used as both load-bearing and non-lead-bearing walls of the structure.
  • They are lightweight and easy to handle. This reduces the chances of breaking bricks while carrying them to the upper floors.
  • The lightweight nature of the bricks reduces the overall dead load and cost of the structure.
  • These bricks are highly durable and can withstand for a longer period of time, up to 150 years.
  • These bricks have excellent thermal and acoustic insulation that helps build more secure rooms and structures without being affected by external noises and temperatures.
  • These bricks are highly resistant to fire and water, so they can be used in extreme weather conditions and be applied in all types of construction.
  • These bricks are made completely using natural resources and waste (i.e., slurry & fly ash), making them eco-friendly and suitable for constructing green buildings.
  • These bricks can help the building maintain the room temperature throughout the year. They keep the structure cool during summer and warm during winter.
  • The lightweight nature and easy handling make it easy to install, maintain, and repair.
  • Using Porotherm bricks instead of traditional bricks reduces the construction time.

Disadvantages

  • Due to low density and high water pressure, these bricks cannot be used for large, high-rise structures, especially in the foundation and base slab.
  • These bricks have high efflorescence when exposed to water. They form a white powdery layer on the bricks, affecting the structure’s unplastered aesthetic.
  • The manufacturing process and construction using these bricks require skilled labour.
  • The availability of these bricks is limited and high demand raises the price. 

Are Porotherm Bricks Suitable for your Project?

Porotherm bricks house"

Porotherm bricks are applicable in almost all types of construction and are one of the most preferred brick types in modern construction fields. Here, we look at some factors that will help you understand why Porotherm bricks could suit your dream construction project.

  • These bricks are 60% lightweight compared to conventional building materials, which reduces the dead load and the overall structural cost.
  • The lightweight nature of the brick makes it easy to handle, boosting the construction speed.
  • They are good thermal insulators and are 45% more efficient in resisting heat than traditional construction materials.
  • The brick’s thermal properties save energy on heat reduction and air consumption.
  • The raw materials used in producing porotherm bricks use clay from de-silted dead water tanks and natural additives such as coal ash, sawdust, and rice husk. Using waste materials makes it an eco-friendly brick option, credited by the Indian Green Building Council for ratings.
  • Porotherm bricks consume less water for the manufacturing and construction process when compared to other building materials.
  • They have a high compressive strength of 10 N/mm², which is comparatively greater than concrete bricks. This high compressive strength makes it applicable for load-bearing structures.
  • These bricks are highly durable, can last for more than 150 years, and are an ideal material for permanent structures.
  • These bricks can be recycled and reused and are ideal for Green Buildings.

Recommendations of Porotherm Bricks for Specific Projects

Although Porotherm bricks are used for various construction projects, they cannot be employed in certain structures. Here are some factors that affect the usability of Porotherm bricks in specific projects.

  • Porotherm bricks have a density of 694 to 783 kg/m³, which is comparatively lower than conventional bricks. This makes them unsuitable for large structures.
  • The Porotherm bricks have a water absorption ratio of 15%, which is higher than clay bricks. This makes them unsuitable for structures prone to water damage and located near the water table.
  • These bricks have a high efflorescence rate and could fall victim to salt attacks when exposed to water and excess moisture.
  • These bricks cannot be used to construct foundations and base slabs, where the negative pressure of water and capillary action could reduce the stability of the structure.
  • These bricks have a high demand in areas with limited availability, which naturally increases the cost of the bricks.

Conclusion

Porotherm bricks have been a game changer in the construction field. These bricks save a lot of time and money in the production and construction. These bricks reduce the use of traditional bricks, steel, and other building materials. The lightweight nature, high resistance against heat and sound and durability boost the structure’s lifespan. These bricks can also be combined with interior decorations, glass and paint to give an aesthetically pleasing look. On the other hand, these bricks require skilled construction labour, and their limited availability increases their price.

Sloped Footing – Benefits & Process in Construction

0
sloped footing

Footings are the bedrock of any construction. They are crucial component that play a vital role behind every solid foundation. A footing is nothing but a structural element carefully designed to transfer the immense loads caused by a structure into the ground beneath safely.

It ensures that the building remains safe and upright without being subjected to structural failure or uneven settlement. Not surprisingly, footings are available in various designs and types, each with their own characteristics and challenges.

One of the widely used types is sloped footing. In this article, we’ll uncover the significance and specifications of sloped footing. Continue your reading to know more:

What is Sloped Footing?

A sloped footing, also termed a trapezoidal footing, is a type of isolated foundation. It is meticulously designed with sloped or inclined sides that help increase the contact of the footing’s surface area with the soil. The sides are extended from the base of the column to the outer edges of the footings. They allow for distributing the load of the building more efficiently and reduce pressure on the ground.

Benefits of Sloped Footing

Let’s have a look at the benefits of sloped footing:

Reduced Soil Pressure: Sloped footing has the benefit of spreading the loads and weight evenly over a large area of soil. It potentially reduces the soil pressure and the risk of settlement failure. This type of footing is quite essential for areas with unstable or soft soil conditions.

Increased Bearing Capacity: In comparison to flat footing, sloped-type footing maintains an increased contact area with the soil. It efficiently distributes the loads into the foundation, providing a higher bearing capacity. This makes it an ideal choice for structures on weaker soils and those subjected to carrying heavier loads.

Economical: Sloped footing consumes very little concrete, which drastically reduces the cost of material purchases in construction. This can be a suitable option for projects with specific budget constraints.

Adaptability: Unlike other footing types, sloped footing can easily adapt to uneven ground conditions. This flexibility is beneficial for designing construction projects on sloping ground or uneven sites without any need for leveling or extensive excavation.

Key Components of Sloped Footing

A sloped footing includes several key components such as:

Base: The bottom surface of the sloped footing has direct contact with the soil, is flat, and is wider than the top surface. This design is particularly curated to distribute the loads into the ground.

Sides: This footing has sloped or inclined sides, which have been carefully designed to optimise soil bearing capacity and load distribution.

Top Surface: Compared to the base, the top of the footing is smaller in area. It is connected to either the column or wall.  

Materials Used in Sloped Footing

The materials used in sloped footing include:

Concrete: Concrete is the primary material used to construct the sloped footing. It provides essential rigidity, strength, and durability to withstand the structural load.

Reinforcement: Rebar (steel reinforcement bar) is embedded in the concrete to improve the footing’s strength and durability in areas with uneven soil conditions. The amount required and placement of reinforcement are typically based on the soil condition and load requirements.

Concrete Blocks: Concrete blocks are a more economical and cheaper option than other materials. They are easy to construct and don’t require any additional formwork to support. However, the are not waterproof.

Design Specifications

Size and Shape: Evaluate the footing area of construction based on the column load and soil-bearing capacity. Considering the soil condition and challenges in construction helps decide the suitable shape, such as rectangular or trapezoidal.

Soil Bearing Capacity: The footing design requires additional care and attention to ensure the safe bearing capacity of the soil. Conduct a thorough soil investigation to gain insights.

Concrete Mix Design: By considering the structural load and environmental conditions, you can specify the concrete’s compressive strength. It helps accurately predict the proportions of cement, water, and aggregates.

Reinforcement: Reinforcement is an important aspect to resist shear forces and bending moments caused by harsh weather conditions.

Calculation for Sloped Footing

The below-given is the formula for estimating the volume of the trapezoidal footing:

V=H/3∗(A1+A2+(SQRT(A1∗A2))

Here,

A1 = Area of lower portion

A2 = Area of upper portion

H = Height of trapezoidal portion

Construction Process of Sloped Footing

Construction Process of Sloped Footing

These are the steps involved in the construction process of sloped footing:

Excavation: Firstly, you need to excavate the soil to the required depth and width. Then level up the surface to the accurate depth and shape appropriate to the planned construction. Importantly, conduct a soil test to ensure the soil’s moisture content and bearing capacity.

Reinforcement: Install rebar or reinforcement steel bar within the excavation. Use wire ties to secure the rebar together to form a cage. To prevent corrosion or any other damages, cover the rebar with adequate concrete mix.

Concrete Pouring: The next step is to construct the formwork, either using steel forms or wooden planks. Pour the concrete mix at the appropriate consistency into the formwork to ensure the required strength and consistency.

Curing: Cover the concrete with plastic sheets to avoid rapid drying, which can lead to cracks and leakages. It is essential to monitor the temperature periodically and maintain sufficient moisture content until a specified number of days.

Drainage System: Constructing a drainage system is necessary to divert water away from the footing. You can install drainage pipes to collect water in and around the footing.  

Final Wordings

Footings are important structural elements in a foundation, which distributes the loads and weight evenly to the ground. They are a simple way to prevent structural failure or settlement. In comparison to other types, sloped footing is quite beneficial and simple to construct, especially on uneven surfaces and wet soil conditions.