Home Blog Page 19

Third Class Bricks – Get to Know its Properties & Advantages

0
Third Class Bricks

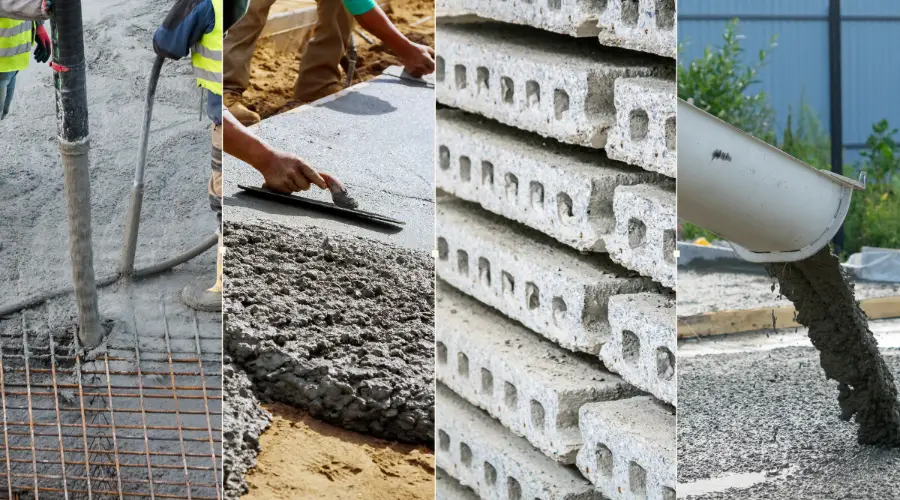
Brick is a significant building material used in a wide range of construction projects. They are primarily composed of resources like clay, concrete, and other materials. They can be used in both commercial and residential constructions, including building walls, pavements, and other structures.

They are available in various shapes, colours, and sizes, primarily known for their strength, durability, and fire-resistant properties. Bricks are categorised into various types, and this article carries some significant information about third-class bricks. Let’s delve into the topic and understand what third class brick is, its properties, and its advantages.

What are Third Class Bricks?

What are Third Class Bricks?

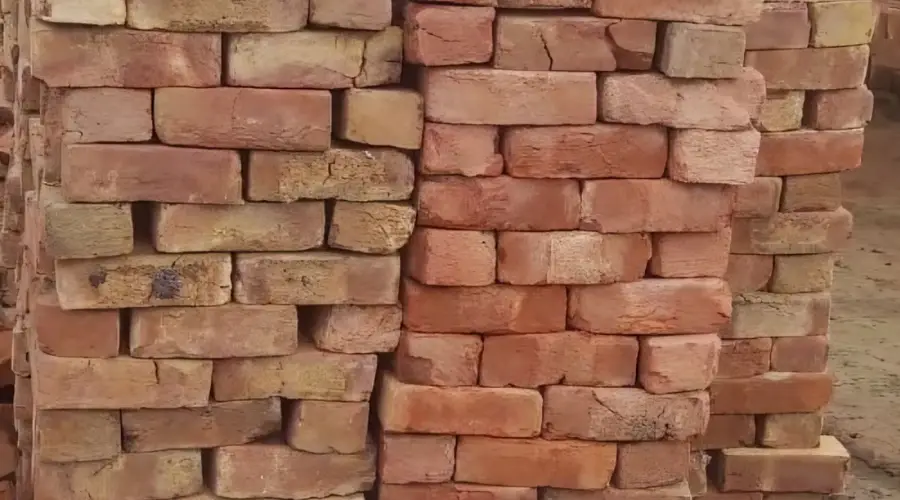
Third class bricks are low-quality bricks, which can’t be used everywhere like first or second class bricks. They are irregular in shape and size, have poor color uniformity, and have other significant defects. While dealing with any construction project, the strength and durability are the primary concerns of builders. If so, the quality standards of third-class bricks are not prominent and may be against the local building codes and regulations.

Characteristics of Third Class Bricks

Here’s how the characteristics of third-class bricks could be:

  • Possessed with a non-uniform appearance, shape, and size.
  • Unevenly or poorly burnt, which can mean overburnt or underburnt bricks.
  • They are yellowish in colour and have round or distorted edges.
  • They are weak in strength and durability.
  • They have a compressive strength of 35-70 kg/cm² and absorption between 22-25 percent.
  • Usually, bricks produce a metallic sound; however, they give a dull thud.
  • These bricks are slightly soft, and the surfaces seem rough.

Properties of Third-Class Bricks

Properties of Third-Class Bricks

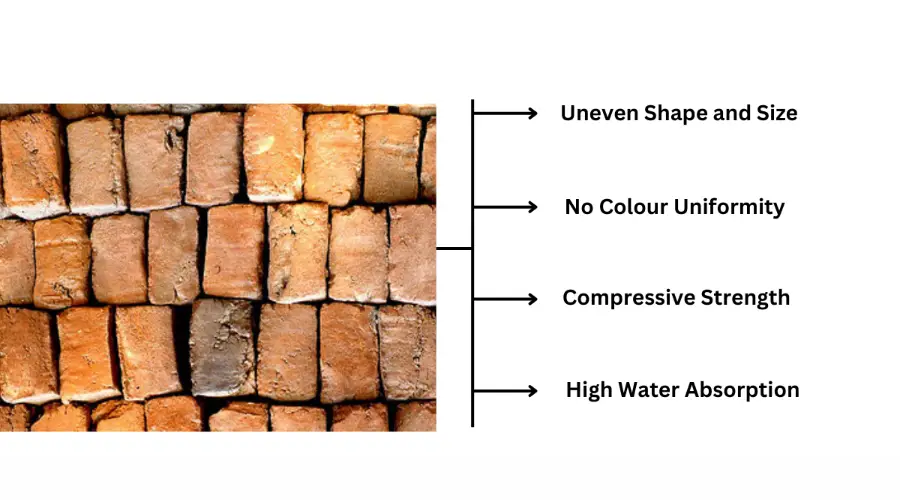
Third-class bricks are inferior in quality, which makes them unsuitable to use in construction. Let’s see some of their key properties:

Uneven Shape and Size: Third-class bricks are either overburnt or underburnt. They look irregular in shape and size, which can significantly cause cracks, distortions, or other defects in the construction.

No Colour Uniformity: The colour of third-class bricks is irregular, indicating that they are overburnt or underburnt. It is one of the easiest ways to identify poor-quality bricks when buying them for your construction.

Compressive Strength: Its compressive strength is greatly lower than that of the first and second-class bricks (i.e., 3.5 N/mm²). Such a range negatively influences the strength and durability of the structures.

High Water Absorption: Low-quality bricks are subjected to absorbing more water, which makes them less suitable to use in areas with frequent rainfall or high humidity.

Advantages of Third Class Bricks

While third-class bricks are lower quality, they also offer some advantages in specific applications, including:

  • They are cheaper than high-quality bricks. They can be a budget-friendly option for non-critical or non-load-bearing structures.
  • Their irregular shape and size can give unique appeal to your decorative projects. While infusing creativity with third-class bricks, you can achieve unique patterns and designs in garden walls.
  • They are soft in nature, which allows you to cut and shape them according to the construction requirements.
  • Bricks are made from natural materials and cause less environmental impact compared to other materials.

Disadvantages of Third Class Bricks

They have several disadvantages, such as:

  • They are not uniform in size or shape and may be slightly distorted.
  • Third-class bricks are poor in quality and are sometimes overburnt or underburnt.
  • They absorb nearly 20 to 25% of water by weight.
  • Third-class bricks are not suitable to use in areas with high humidity temperatures.
  • They can cause significant defects like cracks or distortions in the structures.

Quality Standards for Third Class Bricks

Third-class bricks offer poor performance in load-bearing structures. It possesses high water absorption rates, lower compressive strength, and poor durability when compared to first and second-class bricks.

It may be suitable for use in non-load-bearing structures as well as for decorative purposes. Other than that, it is advisable to consult the local building codes and regulations to ensure whether it is safe and suitable to use them in a particular construction project.

Manufacturing Process

Third-class bricks are manufactured by ground molding and burning in clamps. They are suitable for use in unimportant or temporary structures as well as for decorative purposes. The manufacturing process involves the following steps: 

  • Clay collection and storage is the primary step to do. 
  • Mix the clay with water and other essential materials to achieve the appropriate consistency. 
  • Pour the clay mixture into the molds to form bricks. 
  • Drying is the next crucial step, which needs to be done in an open sunny area. 
  • Once they are dried completely, burn the bricks in a kiln or clamp. 
  • Then let them cool down completely, and organize them by color and quality. 

How to Identify Third Class Bricks

Here are some key characteristics to identify the third class bricks:

  • They look non-uniform in shape and size, which can cause  significant defects like cracks, chips, distortions, and other visible defects.
  • They are softer and less dense, which is not suitable for use in load-bearing buildings.
  • Their surfaces are literally rough with irregular and distorted edges.
  • Unlike quality bricks, they produce a dull sound.

Practical Tips for Builders Using Third Class Bricks

Builders need to be aware of these information before using third-class bricks in construction such as: 

Limited Applications: Third class bricks are low-quality bricks, and they are suitable to use only in temporary or non-load-bearing structures, including fencing, garden walls, or decorative features. It is better to ensure that they provide sufficient strength and longevity in the areas where they are used.

Use Reinforcement: If you decide to incorporate third-class bricks in your construction project, ensure that they are reinforced with quality materials like concrete or steel. They act as a strong support to compensate for the lower structural integrity, preventing potential damages. 

Right Selection of Mortar: Analyzing the right mortar mix is essential to ensure the bonding and to avoid giving excessive stress to the third class bricks. Using lightweight mortar is advisable, instead of heavy-duty mortar, which is not suitable for low-quality bricks. 

Moisture Content: Drying is the most typical part of the brick manufacturing process. It is essential to ensure that the third-class bricks are dried well to practically minimize the water absorption issues during the curing process. You can use protective coverings to avoid exposure to high humidity and rain. 

Final Wordings

Third-class bricks are typically lower in strength, suitable only for use in inferior and temporary buildings. It is not advisable for use in areas that are subjected to heavy rains. While using them in any critical places, it is essential to verify the local building codes and regulations. Ensuring safety is a primary concern when dealing with any construction work.

Steel Grey Granite – Features, Uses, & Benefits

0
Steel Grey Granite

Granite is popularly used for architectural purposes for its unique beauty and appearance. In modern India, granites grab everyone’s attention and are installed in most Indian households. Steel grey granite is one of the most popular choices for granite stones in India. Its unique features and neutral colours make it more attractive; that’s why people are fond of selecting steel grey granites for their households. In this blog, we will discuss detailed information about steel grey granite to make informed decisions while choosing the right granite for your project.

What is Steel Grey Granite?

Steel grey granite is one of the popular natural stones that can be quarried in India and transported to many other parts of the country to satisfy the client’s requirements. Even builders can make sought-after choices for residential and commercial projects.

Characteristics of Steel Grey Granite

The primary characteristic of steel grey granite is its cool silver-grey colour. It has a uniform appearance with a consistent base that ranges from medium to dark grey. The design styles and colour palette of this steel grey granite seem to be neutral, and this sophisticated hue makes it a preferred choice for most users.

The distinctive speckled and mottled pattern attracts and provides calmness to the users. The small to medium-sized black-and-white mineral specks and grains strewn across the granite surface can produce a modest yet visually appealing impression. The textured surface of the stone is added by the specks and captures the interest of any space or surface where it is installed.

Applications of Steel Grey Granite

Steel grey granite is a celebrated natural stone that is known for its unique style and appearance and is used in a wide range of applications while constructing commercial or residential properties. Let us see how steel grey granite enhances the quality and outlook of residential and commercial projects as follows:

  • Kitchen Workspace (popularly known as kitchen countertops):
Kitchen Workspace -Steel Grey Granite

Kitchen workspace is an important part of a house that is considered more auspicious. Steel grey granites are ideal for decorating your kitchen space and making your day more pleasant. People love to have scratch-resistant granite that is resistant to heat and stain. It is easy to maintain and provides a long-lasting appearance. 

  • Backsplashes

You may wonder why steel grey granites are the preferred choice of many people. Most people love the pebble effect and different vein patterns that suit your backsplashes and prevent grease, water, or any other kitchen stains. The subtle design pattern, easy maintenance, and polished surface make it suitable for any busy kitchen.

  • Bathroom Vanity Tops

These are the short runs of countertops that are attached to the sink. It enhances the light through their reflective surface and offer a spacious feeling for the users. This granite is suitable for even daily use and is long-lasting and moisture-assistant.

  • Perfect for Commercial Spaces for a Rich Appearance

Commercial settings can be exaggerated by using steel grey granites to create  reception desks, bar tops, and countertops. It elevates the professional environment as well as handles heavy traffic.

Best for Both Indoor and Outdoor Spaces

Both Indoor and Outdoor Spaces - Steel Grey Granite
  1. Outdoor Kitchen Workspace

These days, outdoor kitchens are very trendy and stylish. People enjoy spending their free time outside. They enjoy outdoor cooking. To elevate this experience, the stylish steel grey granites are installed for easy maintenance and aesthetic appeal.

  1. Patios and Pathways

It adds elegance to the patios, Staircase and pathways. The medium grey perfectly blends with the natural surrounding atmosphere.

  1. Outdoor Tables and Benches

In gardens and patios, tables and benches can be made through these steel grey granites to enhance the look and feel when you are relaxing.

Advantages of Steel Grey Granite

  • Easy maintenance:

As it is an extracted resource from nature, it enhances the appeal of the surrounding environment. Regular sealing of these granite stones may help to increase their durability. It can also prevent staining and its appearance. Regular cleaning with mild detergents or liquids may help to maintain your granite stones. Potential damages can be prevented by using trivets or cutting boards. 

  • No Frequent Replacement is Required

Due to its durability, hardness, and long-lasting nature, it doesn’t require frequent replacement. It perfectly matches the surrounding place. Additionally, it is regarded as an environmentally beneficial product that doesn’t damage the environment. 

  • Customising Options

Each granite stone can be customised according to the client’s requirements. Dimensions and shapes can be adjusted to a particular use of the material. It can be altered for each purpose, like indoor and outdoor spaces. You can transform your environment by installing steel grey granites.

  • Finishing Options

As it is easily customisable, finishing can also be tailored according to needs. A matte look can be achieved through a honed finish and is ideal for an elegant look. A super smooth surface can be gained through a brushed finish and is perfect for a natural and rustic look.

Disadvantages of Steel Grey Granite 

  • Regular sealing is required to maintain the granite stones to balance their appearance and prevent stains.
  • Using harsh chemical cleaners may affect the granites greatly. Make sure to use only mild detergents for the cleaning process.
  • Hot pots and sharp objects may affect the granite stones. Try to use cutting boards or trivets to avoid contact with steel granite stones.
  • It requires more attention while transporting because of its fragility.

The Installation Process of Steel Grey Granite 

To build your granite steps safely and elegantly, follow these instructions:

  • Measure and Make ready

The area where the steps will be placed should be measured. To guarantee a solid base, level and clear the ground.

  • Place a Material Order

To order the appropriate amount of steps, get in touch with a supplier and provide your measurements.

  • Get the Base Ready

Compact the earth after excavating the area to the required depth. After pouring the concrete foundation, allow it to completely dry.

  • Make a Layout Plan

To guarantee accuracy, mark the locations of each step.

  • Apply Adhesive to It

Cover the base where the first step will be placed using cement or adhesive.

  • Position the Steps

Make sure that every step is level and aligned before repeating.

  • Trim to Fit

If necessary, the steps were cut to size with a diamond-bladed saw.

  • Joint Filling

Use granite filler or cement to level out the spaces between the steps.

  • Allow it to Settle

As directed by the manufacturer, let the glue and filler thoroughly dry.

  • Wash and Seal

Use a moist cloth to remove extra adhesive and filler. To preserve the surface and improve its appearance, apply a granite sealer.

Maintenance and care of steel grey granite

Strong chemicals and abrasive cleaning methods are not recommended to clean steel grey granites. A mild soap or detergent with lukewarm water is enough to maintain your granite stones. Commercial cleaners may have patches or residues on the granite. For strong stains, use a mixture of baking soda with lemon juice. Spread the paste to the affected region and set aside for at least five minutes. Rub the area lightly with a scrubber, taking care not to scrape too hard. Handle it lightly. Scratches in granite are easily removed by rubbing a toothbrush with mild detergent. To prevent water stains, thoroughly clean the granite stone with plain water and rub it with a clean, dry towel. If you wish to protect the surface, apply a granite sealer after it is totally.   

Conclusion

Steel grey granites complement modern design ideas for kitchen countertops, backsplashes, and indoor and outdoor settings. It delivers a premium outlook in places where they are installed. It enhances the appearance of the surroundings. A wonderful choice for both residential and commercial projects that elevates the look and gives a natural rustic outcome.

FAQ’s

1. Is Steel Grey Granite a good choice?

Yes, steel grey granite is the best choice for anyone who wants a rich appearance in their commercial or residential project. It is an excellent option for enhancing the look of your home.

2. What colour is Steel Grey Granite?

Steel grey granite stone is available in shades of grey and small flecks of lighter grey.

3. Which country is Steel Grey Granite sourced from?

Steel grey granite originates from India and is available in various finishes, such as honed, leathered, and polished. 

Possession Letter – Key Details, Verification & Legal Insight

0
possession letter

You are currently waiting for the keys to your home or flat you purchased. The possession letter is a crucial document in this process. It confirms that the developer has completed the property and is ready to hand over the keys. This letter is not just a formality but also has some legal implications for both the buyer and the seller. 

Simply having a place to reside is not enough; one must possess the legal right to own the property. In this case, the possession certificate plays a crucial role. Whether you’re buying, selling, or securing ownership, this document is necessary. In this blog, we will cover the definition, significance, benefits, and other important details of possession letters.

Overview of a Possession Letter

One document that certifies your legal ownership of a property is a possession certificate. It contains information such as your name, the description of the property, and the date of ownership. When purchasing or selling real estate, this certificate is crucial because it attests to ownership and guarantees a seamless transaction.

It provides more convincing evidence of legal ownership than a possession letter, and is issued by local authorities, formally confirming the transfer of ownership from the seller to the buyer. The developer or builder certifies that the property has been turned over to the buyer by providing a possession letter. It does not demonstrate legal ownership but simply demonstrates physical possession. A possession certificate is necessary to demonstrate legal ownership.

Key Components of a Possession Letter

When you are interested in owning a property, you are going through a lot of documentation processes. The possession letter is among the most crucial paperwork. This document stands as a clear marker of ownership for the property that a buyer owns. The procedure by which the seller sold the property and transferred ownership rights to the buyer is outlined in this legal document. 

A possession letter must comprise the below-mentioned essential factors:

  • Handing Over Date: The date on which the seller is going to hand over the property to the seller is mentioned in this possession letter.
  • Property Description: Every detail of the property, such as the plot number, apartment number, and other important information, can be included in this letter.
  • Buyer Acknowledgement: It is crucial that the buyer acknowledges the possession letter.
  • Signatures: Both parties, the buyer and the seller, must sign this possession letter and validate it.
  • Outstanding Payments: Pending due amounts or liabilities can be mentioned in this part.
  • Loan Integration: If a buyer has any intention of getting a loan against property, then this document is crucial for applying for any loans.

Possession Letter Format:

Possession Letter (source: 99acres

Verification and Validation of Possession Letters

The following steps and procedures are taken into consideration while applying for a possession letter. 

Required Documents:

The important documents can vary depending on each state or city in which the property is located. 

  • Sales records or the property’s registration agreement
  • The seller’s completion or occupancy certificate 
  • Property tax receipts
  • Identity proof
  • Address proof
  • Other documents related to the legal authorities

Visit the Municipal Office

Visit the nearby municipal corporation or the local municipality that can be responsible for providing possession certificates. It will be the development authority or town planning department.

File the Application

Submit the application form to apply for a possession certificate. Attach all the needed documents that support the application. Make sure that you have attached both the original documents and photocopies of them.

Pay the fees as prescribed for submitting the application

Pay the fees associated with the application at the payment counter and obtain the receipt.

Verification process

The authorities verify the submitted documents and inspect the property that complies with the local building code.

Follow-up

Track the application status by referring to the reference number provided during the submission process. At the designated office, you can directly inquire about the progress of the application status.

Issuance of Possession Certificate

After the completion of the verification process, a possession certificate is issued. The time may vary on the issuance of the certificate.

Legal Considerations in Possession Letters

Legal Considerations in Possession Letters

In real estate transactions, the possession certificate is crucial because:

  • Declaration of Ownership: It prevents ownership disputes and demonstrates that the property is yours.
  • The Buying and Selling Right of the Property: It serves as proof of ownership for both parties involved in buying or selling the property that they own.
  • Legal Protection: It safeguards anyone from fraudulent claims and protects your property rights.
  • Loans: Banks need proof of ownership if anyone is applying for a loan against the property.
  • The Resale Worth of the Property: It increases the resale value of your home and makes it more appealing to potential purchasers.

Conclusion

The transfer of ownership and possession rights is verified by the possession certificate. It serves as evidence that you are the property’s owner and is provided by the developer or seller. To obtain it, adhere to the local government’s protocols. To guarantee a seamless transaction and protect your ownership, professional assistance is advised.

FAQ’s

1. What is a possession certificate?

One document that certifies your legal ownership of a property is a possession certificate. It contains information such as your name, the description of the property, and the date of ownership.

2. What are the required documents for applying for a possession certificate?

The essential documents required for applying for a possession certificate are as follows:

Sales records or the property’s registration agreement
The seller’s completion or occupancy certificate 
Property tax receipts
Identity proof
Address proof
Other documents related to the legal authorities

3. How can we get the possession certificate?

If anyone has to apply for a possession certificate, they may go directly to the local municipal office or apply through the official online website.

4. Is acknowledging and validating the possession letter given by a seller essential for a buyer?

Yes, it is an important part of receiving the possession letter. One has to validate and acknowledge the possession letter provided by the seller to confirm the transfer of possession and property rights.

A Comprehensive Guide to Steel Structure Erection

0
Steel Structure Erection

Precision and competence are essential factors to consider while erecting a steel framework to ensure effectiveness and safety. The erection process of steelwork includes assembling the steel components onsite. Before connecting the steel components, they must be positioned in the right place to ensure the stability of the steel components. Read on to learn all about steel erection, its types, processes and tools and equipment required.

Overview of Steel Structure Erections 

Steel can handle stress and deformation (ductility) and can be used for multiple applications like high-rise structures, bridges, and other structural components for its resilience and longevity. Steel structures are being built more commonly in today’s era to meet growing construction demands.  The process of steel erection is complex and requires careful attention to detail to ensure safety of all the people involved. 

Types of Steel Structures

Types of Steel Structures
  • Steel Frame Structures

The most frequently seen structure is a steel frame, which is utilised in everything from residential projects to skyscrapers. Their resilient and firm framework is made up of horizontal beams, vertical columns, and connections made with bolts or welding.

  • Steel Truss Structures

Uniform transfer of weight and enhanced stability can be achieved through interconnected triangles, which are used in steel truss systems. These frequently used roofs, bridges, and other steel structures have the strength to sustain over long periods of time. 

  • Steel Arch Structures

Buildings and bridges can be built using steel arch structures. The curved arch steel supports the whole weight of the structure and is produced by an arch formed with several interconnected steel components. These structures are built to withstand harsh weather conditions for enduring over long time periods.

  • Steel Cable Structures

Steel cable structures create a suspension system by supporting a building’s weight with steel cables. Often utilised for roofs and suspension bridges, the cables are extended across the structure to offer support and are fastened to towers or columns at either end. Additionally, for increased stability, they are sometimes fastened to concrete blocks or the ground.

  • Steel Space Frame Structures

To sustain the weight of a building, steel space frame structures employ a three-dimensional framework made of welded or bolted steel tubes. Large buildings such as sports arenas and airports frequently use these structures. Such structures are generally finished by covering the framework with cladding and roofing materials.

  • Light Gauge Steel Structures

Light gauge steel buildings, which are frequently utilised for residential and small commercial buildings, have lightweight steel frames. These frames are constructed using thin sheet steel, cut into C or Z shapes, and fastened together using bolts or screws.

  • Pre-Engineered Steel Structures

These structures are made by combining standardised and prefabricated parts at construction sites. These steel structures can be easily seen in industrial buildings such as warehouses, distribution centres, and factories.

Tools and Equipment for Steel Erections

Tools and Equipment for Steel Erections

At every stage of construction, certain materials, tools, and techniques are needed for erecting a steel building. Planning and knowing how to use the equipment is essential for ensuring quality and safety. The following is a list of the necessary resources and usage instructions:

  1.  Mobile Devices

It includes equipment and vehicles used for material transportation and assembly, such as delivery trucks, cranes, and hoists. Only authorised equipment and certified operators are permitted on the property. Equipment must be kept at least 4.5 meters away from power lines that are 220V or higher. Unless there is an emergency, only one signalman is allowed to direct operators.

  1. Slings

To lift and carry heavy objects, slings like cables, chains, ropes, or webbing are utilised. Before using slings, check their durability. To avoid damage, cushion slings at sharp edges. To lessen the strain on slings, avoid jerking weights when lifting. Slings should be properly preserved while not in use.

  1. Support Structures

Workers can support the framework or perform operations at heights using movable platforms. Scaffolds must be set up on level ground with wooden platforms (at least 20 cm by 20 cm) serving as foot bases. Make sure scaffolds don’t obstruct cranes or other movable machinery. At least four times the planned load should be supported by scaffolds. For safety, outfit scaffolds with platforms, ladders, midrails, and handrails.

  1. The ELCB Box

Electrical shocks can be avoided by an Earth-Leakage Circuit Breaker (ELCB). Three-pin plugs, sealed boxes, and ELCBs with a 30–60 mA rating are required for electrical systems. For convenient access, at least one ELCB needs to be mounted on the roof.

  1. Manual Instruments

It requires basic hand tools such as drills, saws, clamps, and screwdrivers. To keep tools from falling, fasten them to your wrists. Give precise directions on how to utilise each tool. Steer clear of improvised or temporary tools.

Steel Structure Erection Steps

As erecting steel structures involves several risks and challenges, crucial steps must be followed for an effective installation process, as follows:

Step 1: Getting Ready for the Erection

Any project’s success depends on the calibre of its equipment and building supplies. Problems like inadequate or poor-quality materials and irregularities in the structural designs can cause delays in construction and lower the project’s quality. Before moving on, contractors must carefully examine and confirm that the equipment and materials match the necessary standards.

Step 2: Construction of Foundations

When constructing a steel structure, the foundation is the initial phase. Its kind is defined by the load of the building and the strength of the soil, which is established by a soil survey. Reinforced concrete pads or strip foundations are appropriate for mild or moderate loads since they transfer weight straight to the ground below.

Step 3: Installation of Columns

For most steel buildings, columns and beams serve as the main load-bearing support. Strict technical and production criteria must be followed throughout the installation to guarantee structural integrity, safety, and functionality. Columns are welded to base plates to connect them to the foundation; square or rectangular shapes are ideal for ease. To control production and transportation constraints, columns are connected every two to three stories. Splices are welded for circular columns and these are typically situated 0.6 meters above the floor.

Step 4: Erection of Steel Beams

Beams, which are normally 3 to 9 meters long (up to 18 meters in certain situations), carry weights (such as floors and roofs) to columns.

Connections from beams to columns:

  • Easy Connections: For vertical loads, employ solutions like double angle or flexible end plates.
  • Rigid Connections: Use full-depth or extended end plates for torsional and vertical loads.
  • Beam-to-Beam Connections: End plates are used to join beams to each other. By installing brackets or notching, secondary beams are levelled with primary beams.

Step 5: Install the other components

The project’s basic structure is completed by the erection of the remaining components, such as small braces and additional rivets or bolts, once the main frame has been aligned and installed.

Step 6: Examine Before Complete Covering

The steel structure is carefully examined to make sure it is built correctly and prepared for the finishing procedures before moving on to the last phases. Any mistakes in this stage may affect the overall quality standard of the construction process. 

Step 7: Installation of Floor Systems

Floors are put in either during or after the building of beams. They stabilise the structure and support vertical loads. Typical floor systems include:

  • Composite floors with metal decking or concrete.
  • Units made of precast concrete.

Conclusion

Steel buildings are affordable for medium to large-scale projects because of their sophisticated design and large-scale manufacturing. They arrive sooner than conventional materials, and inclement weather doesn’t postpone installation. Damage diagnosis and prevention are aided by their obvious deformation before failure. They are earthquake-resistant because of their lightweight design and robust joints. These structures provide easy expansion, flexible pipeline installation, and roomy interiors with up to 60-meter spans, making them a popular choice for many projects.

FAQ’s

1. How is a steel frame properly erected?

Beams, columns, and trusses are used in steel erection to create the framework for buildings and bridges. The steel parts are lifted and positioned into position by cranes and hoists.

2. What is the role of erection aids in steel construction?

To guarantee precise, secure, and effective steel assembly, erection aids such as bolts, angle seats, or lugs are utilised. They are selected according to the particular requirements of every project.

Dry Mixing – Process, Benefits & Key Applications

0
Dry Mixing

Achieving better performance in an eco-friendly and cost-efficient way is the most demanded modern construction need. This plays a vital role in the selection of concrete. However, the market does not have much concrete that ticks all the checkboxes. This is where dry mix concrete plays a major role, as it satisfies almost all the requirements. Here, we look at dry mixing, its application, its pros and cons, and everything you need to know about it.

What is Dry Mixing of Concrete?

Dry-mix concrete or dry-batch concrete is a mixture of cement, sand and coarse aggregate in a dry state without mixing water. Due to the low water content in concrete, it is widely used in water-prone areas, where it acquires the water content required to bind the mortar. This type of concrete is commonly used in construction that is in contact with the ground.

Application of Dry Mixing of Concrete

road bases in dry mixing of concrete
  • It is most commonly used for constructing substructures and sleepers, as it can use groundwater to bind the mortar.
  • This concrete is ideal for building a foundation and trench filling.
  • It is used to build base layers of roads, driveways, and paving stones.
  • It can be used as grouting material for laying tiles.
  • It can be used for flooring the building.
  • It is ideal for repairing concrete structures and providing reinforcements.

Advantages & Disadvantages of Dry Mix Concrete

Advantages

  • Despite having less cement in the mixture, they have high strength & durability, providing stability and structural integrity.
  • It can withstand heavyweights and resist deformation.
  • It can be used for external structures as it can withstand harsh weather conditions.
  • Compared to other concrete mixtures, dry mix is cost-effective, requiring less labour and cement.
  • The dry mix can be bagged and stored on-site for a long time and used when required.
  • Since the dry mix is pre-mixed and bagged, it is easy to use, reducing the need for on-site machinery.
  • The usage of dry mix increases the speed of the construction. The lack of water in the mixture reduces the curing period, resulting in rapid progress in construction.
  • The low usage of cement reduces the carbon footprint, and using natural sources as aggregates makes it an eco-friendly concrete option.
  • As dry mix concrete is made under regulated conditions, it has high quality & consistency.
  • It minimises the need for excess material and reduces waste production caused by on-site mixing.

Disadvantages

  • Dry mix is unsuitable for large-scale complex structures due to its quick setting time and it cannot be reused after it has set.
  • It requires adequate water on-site due to the mixture’s low to zero water content.
  • This mix is not applicable for all types of construction, limiting its usage to structural purposes and not for aesthetic and surface finishes.

Material used in the Dry Mixing Process

Material used in the Dry Mixing Process

Cement

Cement is the primary raw material used for the dry mixing process. It acts as an adhesive to blend with other aggregates and make the concrete mix into a workable form. Although a primary raw material, it is used in limited amounts compared to other aggregates in the mixtures.

Fine Aggregate

Sand is the most commonly used fine aggregate in the mixture of dry batch concrete mix. It provides a great bond with cement and helps improve the concrete’s strength. It is used six times more than cement in the mixture. Aggregates such as lime or fly ash can also be used as a fine aggregate.

Coarse Aggregate

Coarse aggregates, such as crushed gravel and stones and cement and sand mixtures, are used. The coarse aggregate is available in a higher quantity in the mix than sand and cement.

The ideal mix ratio of dry concrete mix is 1:6:12, where one part of cement, six parts of sand, and twelve parts of coarse aggregate are mixed.

Dry Mixing Process

Storing Raw Material

The first process of production of dry mix is storing the necessary raw materials, including cement, sand, and other additives, in storage containers or silos.

Batching

The raw materials are then weighed and batched based on the construction needs and type of structures that need to be built.

Mixing

The batched raw materials are mixed carefully according to the standard mix proportion of 1:6:12 or customised proportion. The raw materials are mixed using a special mixing machine, ensuring that the ingredients are distributed evenly and completely without any lumps.

Packing

After the dry mix of concrete, the concrete is packed into durable containers and bags and kept ready for shipping. 

Quality Check

A sample of the dry mix concrete is tested to find the quality of the concrete to make necessary quality control measures. If the concrete lacks certain properties, additives can be added to achieve full efficiency.

Storage & Transporting

After the production and quality tests, the concrete is packed, stored and transported carefully to the construction site.

Conclusion

Dry mix concrete is a game changer in construction and masonry works. It provides numerous benefits and advantages, including improved quality, reduced labour, cost efficiency, and increased speed of construction. This concrete is also eco-friendly, reducing the carbon footprint. They are simple and easy-to-work concrete in the industry and are known for their usage in grounded and underground structures.

FAQs

1. What types of projects are most suitable for dry-mix concrete?

​Dry mix concrete is ideal for projects such as foundations, substructures, and road construction due to its high strength and durability.​ It is also suitable for applications like flooring and repairs where quick setting and low water content are advantageous.

2. How is dry mix concrete affected by extreme weather conditions?

In cold weather, dry mix concrete’s hydration process may slow down, potentially causing freezing issues, while hot weather can lead to rapid curing and cracking. Proper curing techniques and temperature control measures are essential to mitigate these effects.

3. Can dry-mix concrete be used for decorative purposes?

Yes, dry mix concrete can be used for decorative applications such as stamped concrete, coloured overlays, and exposed aggregate finishes. Its versatility allows for a range of aesthetic enhancements while maintaining structural integrity.

Microfiber Cement – Properties, Applications, and Benefits

0
microfiber cement

Innovative products are evolving regularly to adapt with the demand for fast-moving modern technologies in the construction industry. Cement is an inseparable component of building materials that plays a significant part in building construction. One of the most significant growths in the modern construction industry is that of microfiber cement. Read on to learn all about this innovative material. 

What is Microfiber Cement?

Fine synthetic fibers, typically polyester, are combined with cement to create microfiber cement. These fibers contribute to preventing external factors from causing wear, shrinkage and breakage. It is appropriate for areas that are subject to large temperature swings or seismic activity because of its synthetic fibers, which increase strength and lower the chance of breaking under stress. Furthermore, it provides improved corrosion and moisture resistance, guaranteeing structural stability even in moist or coastal situations. 

Manufacturing of Microfiber cement 

Individual ingredients, including fly ash, gypsum, and clinker, are fed into the ball mill independently during the manufacturing process, guaranteeing excellent efficiency and consistency in the finished product. Superior quality and performance are ensured by using high-quality clinker with a composition of 48–52% C3S (tricalcium silicate) and low CA (aluminate) content. To further improve the overall quality and performance of the cement, electrostatically precipitated dry fly ash from certain sources that adhere to stringent quality criteria is added. 

The improved performance and longevity of the cement are ensured by a special microfiber dosing system that blends the microfibers at the appropriate amount and is supported by substantial research. The necessary particle size distribution is attained by means of an effective air separator, guaranteeing the densest “sand-cement” matrix and enhancing its strength and functionality.

Properties of Microfiber Cement 

The properties of microfiber cement are as follows:

Enhanced Durability

It is highly resistant to wear and tear, with microfibers helping to evenly distribute stress and prevent cracks and fissures from forming.

Weather and Seismic Resistance

It demonstrates exceptional steadiness in resisting physical damage and deterioration and also maintaining its integrity over time. This microfiber cement is suitable for regions which experience extreme temperature changes. 

Stops Cracking and Enhances the Life Span of a Structure:

Plastic shrinkage fractures may show up a few hours after concrete is poured in many cases. Concrete is treated with microfibers to prolong the life of the construction and maintain its aesthetic appeal. By evenly dispersing the tensile stress across the cement matrix, it stops cracks from occurring.

Corrosion Resistance: 

Microfiber cement’s plastic fibres create a barrier that keeps away moisture, a major cause of corrosion. This improves structural stability, especially in areas with high humidity or precipitation. It reduces rust, extending the life of reinforced components even in hostile situations. Therefore, microfiber cement is ideal for coastal areas, where exposure to salt often accelerates the degradation of traditional materials.

Longevity: 

By providing long-term structural stability and lowering the need for maintenance and repairs, microfiber cement extends the life of buildings. 

Applications of Microfiber Cement

Microfiber cement can be used for various applications in the construction industry, such as:

  • The Purpose of Microfiber in Laying the Foundation for a New Building

The function of the foundation is to support the overall weight of superstructures and distribute this weight evenly to the ground. By adding microfibers to cement, the stability of the base of the structure is increased. The stronger the base, the more sturdy the building would be. Microfiber cement has the unique property of resisting high temperatures, making it suitable for regions experiencing frequent temperature changes. Its corrosion resistance feature also supports structures that are built in areas that are moderately wet or have extreme moisture content in the soil.

  • Microfiber in Plastering Walls
Microfiber in Plastering Walls

Plastering is done to provide smooth and level finishing to walls. This can be enhanced by adding microfiber cement. Its resistance to shrinkage and moisture penetration property helps to maintain the durability of the structure by avoiding external damage to the structures.

  • Casting a Roof with Microfiber
Casting a Roof with Microfiber

As it resists the penetration of water and excessive heat into the structure, it is considered the most suitable roofing material. The life span of the roof can be increased as it can withstand harsh weather conditions.

  • Widely Used in Infrastructure Projects and Seismic Zones

Structures that can be built for public use like roadways, bridges, tunnels, etc., may use microfibers to ensure long-term stability and to resist external overload stresses. As it has the property of resisting heavy environmental stresses, it is also suitable for seismic zones and infrastructure projects.

Benefits of Using Microfiber Cement

Microfibers offer several advantages, making them a preferred choice for various construction applications as follows:

  1. Superior Longevity

Microfiber cement is so resilient to deterioration that it requires fewer repairs and upkeep over time. It prolongs the life of structures by withstanding environmental stresses like dampness, temperature changes, and heavy loads.

  1. Protection Against Corrosion

In damp locations or coastal regions, where traditional materials may deteriorate more quickly, microfiber cement is perfect because its synthetic fibers help prevent moisture infiltration, which is a major cause of corrosion.

  1. Better Crack Resistance

By better distributing the tension throughout the cement mixture, the fibers stop cracks from forming as the mixture cures. As a result, the structure becomes more solid and has improved functional and aesthetic features.

  1. Boosted Structural Integrity

The fibers strengthen the cement’s structural integrity by acting as reinforcement. This is especially helpful in places where there is a lot of wind or earthquake activity.

  1. Reduced Maintenance Expenses

Over time, microfiber cement can result in significant savings by lowering long-term maintenance expenses by decreasing the chance of deterioration, corrosion, and cracks.

  1. Wide-Ranging Applications

Microfiber cement provides versatility for a variety of construction projects, from residential buildings to commercial complexes, and even for plastering walls and roofing.

  1. Sustainability 

Microfiber cement lasts longer and requires fewer repairs; it is a more environmentally friendly choice because it lessens the overall impact of the building and demolition waste on the environment.

Conclusion

Microfiber cement’s remarkable toughness and long lifespan have revolutionised the construction sector. This cutting-edge material is a popular option for builders and homeowners alike since it guarantees durability and dependability. Think about using microfiber cement technology for your next project to get better results and a long-lasting structure that will stand the test of time.

FAQ’s

1. What benefits does microfiber cement offer?

Among the many important benefits of microfibre cement are its exceptional strength, decreased water penetration, and many more. Additionally, it is a cement that resists cracking, which keeps iron rods from rusting.

2. What sets microfiber cement apart?

Microfiber Technology is added to cement to increase its binding strength. Since the microfibers act as microscopic reinforcing agents, the cement may endure seepage, moisture, shrinkage, and thermal cracks for many years

Cement Grout – Applications, Process in Construction

0
cement grout

Grouting is an important construction process that helps increase structural integrity, stability and durability. It is the process of injecting a pumpable pasty material into the structure to improve its physical characteristics. The industry has numerous grouting processes; however, cement grouting is one of the most common and efficient methods. This blog will explain what cement grout is, its application, and its process. It will provide you with a clear understanding of whether this grouting will solve your construction needs.

What is Cement Grout?

Cement is one of the most commonly used grouting materials to stabilise the soil and level the structure. Cement grouting is the process of injecting a mixture of cement, sand, and water into the structure’s gaps, cracks, and voids. These are effective repair techniques for structural concrete members and masonry walls. It is also used for hydro structures to prevent water infiltration and potential leakages.

Properties of Cement Grout

Fineness

The cement used for the grouting process should be free from lumps and should be well grounded. Good quality cement should be fine enough to make it more workable when mixed with water and other aggregates.

Soundness

The prepared cement grout should not shrink upon hardening, as it could lead to poor sealing in the cracks and further deterioration.

Consistency

The cement, sand, water, and other additives used in the grout should be mixed in proportion to bring the grout to a proper paste consistency to seal the gaps in the structure effectively.

Compressive Strength

A sample of cement grout should be tested at equal intervals after one to three days of the setting time, during which the compressive strength of the cement grout should be increased.

Setting time

The cement grout used for construction and repair should harden when mixed with water. The initial setting time of the cement grout should not be too short, and the final setting time should not be too long. 

Application of Cement Grout

Application of Cement Grout
  • Cement grouting can be performed when the cracks are dormant.
  • They can be used to treat honeycombing in concrete structures.
  • The cement mixture fills the hollow or void portion of the masonry works.
  • These are ideal for repairing deep-leached mortar joints.
  • They can be used to bind the old and new concrete structures.
  • They can repair shrunken slabs by injecting the cement grout and raising the slab height hydraulically.
  • They can repair foundations by drilling a deep hole and injecting the cement through mud-pumping.
  • They can reinforce existing structures, such as walls, floors, beams, slabs, etc.
  • The cement grout can be used to fill the gaps between the tiles.

How to Apply Cement Grout?

Here is a step-by-step procedure to apply cement grout to repair cracks in the concrete structure.

  • Drill holes in the structure along the cracks and in and around the hollow spots. If there are too many cracks, the holes can be drilled at 500 mm to 750 mm spacings in both directions around the area to be grouted.
  • Use galvanised iron pieces (GI Pieces) of 20 mm x 200 mm with one end threaded or fix them to PVC nozzles in the holes with rich cement mortar.  
  • All the cracks and the annular space around the GI pipes are sealed using cement mortar.
  • All the cracks should be cut open to a ‘V’ shaped groove, cleaned, and sealed with rich cement mortar.  
  • To saturate the masonry, the grout holes should be injected with water a day before the grouting. All the holes are plugged with wooded plugs or locked PVC nozzles. The bottommost plug and two adjacent plugs are removed, and water should be injected into the bottom hole with pressure.
  • Check for water coming through the adjacent holes and repeat the process until all the holes are covered.
  • While grouting, the same process is repeated; however, the cement grout is injected into the holes.
  • The prepared grout should be fully stirred under pressure to avoid setting.
  • The grouting is carried out until the cement paste covers all the adjacent holes.
  • After grouting, curing should be done for 14 days for the structure to achieve full efficiency.

Cement Grout Care & Maintenance

Cement grouts are normally sealed after installation to prevent discolouration staining and keep the moisture out. This makes it easier to clean the cement grout. However, the cement grout needs regular inspection and cleaning. Using a mixture of water and mild detergent and cleaning the surface regularly could prevent the structure from developing further cracks.

Conclusion

Cement grouting is an efficient and cost-effective way to prevent the existing structure from causing further deterioration. The grouting can fix the pre-existing structures’ cracks, holes, water infiltration, and hydraulic lifting. Although this process seems easy, drilling holes and injecting grouts require skilled labourers to restore the maximum efficiency of the structure. After grouting, proper cleaning and maintenance will help prevent the building from further damage. 

Crush Sand – Types, Properties, Applications, & Process

0
crush sand

With the rise in building construction, the demand for sand at construction sites has also grown significantly. To meet this increasing demand, industries have begun manufacturing sand. Crushed sand is made artificially by crushing large igneous rocks, granite, and other stones. A fixed sieve provides homogeneity in the sand, while proper production processes decrease the chance of adulteration. To protect natural resources, crushed sand is produced as an alternative to fulfil construction needs. Let us see more detailed information about crushed sand, such as types, properties, applications, advantages, and disadvantages.

What is Crushed Sand in Construction

Large stones are crushed into tiny pieces, which are subsequently cleaned and graded to produce crushed sand, an artificial substance. It is suitable for concrete, brick, and blockwork and is mostly used in mortar and concrete mixtures as an alternative to natural river sand. Other names for crushed sand include M-sand, crushed stone sand, artificial sand, and pozzolan sand. 

Types of Crushed Sand

Crushed Sand for Brick or Block Work

The following are the several types of crushed sand (M-sand):

Crushed Sand for Concreting:

For concrete applications, the granules range in size from 150 microns to 4.75 millimetres. It must comply with IS Code 383:1970.

Crushed Sand for Plastering:

Crushed sands are ideal for tiling and wall plastering, the granules range in size from 150 microns to 2.36 millimetres and comply with IS Code 1542:1992.

Crushed Sand for Brick or Block Work:

Crushed sands are specifically designed for masonry, brick, and block-laying projects.

The Granules range in size from 150 microns to 3.55 millimetres and comply with IS Code 2116:1980.

Properties  of Crush Sand

S.NoPropertiesDescription
1Manufacturing processLarge aggregate pieces, boulders, or stones at a quarry or mill are crushed to create crushed sand.
2ShapeAngular or cubical
3TextureHard or rough
4Dry density1.75 kg per cubic m
5Particles passing 75 micronsUp to 15% (IS: 383 – 1970)
6Specific gravity2.73, depending on the parent rock
7AdulterationFewer impurities
8ApplicationsIn comparison to river sand, it is highly recommended for RCC, brickwork, and blockwork.
9Environmental impactEco-friendly compared to natural sand.

Application of Crush Sand

Greater Strength Concrete: Crush sand is an effective alternative building material to river sand. It is the perfect material for construction since it is made with exact gradation and suitable physical characteristics including shape, smooth texture, and consistency. By lessening problems like segregation, efflorescence, gaps, and capillarity, its physical characteristics increase the strength of concrete.

Increased Durability: Made from premium granite, crushed sand has regulated chemical and physical characteristics that make it appropriate for use in concrete construction. By lowering permeability and moisture intrusion, these characteristics assist concrete structures to withstand severe weather conditions, prolong their lifespan, and stop steel corrosion.

Better Workability: Crushed sand has dimensions, forms, and textures that make the concrete easier to work with. Its regulated physical characteristics make concrete more effective and workable by lowering the amount of cement and water required to bond with coarse particles.

Advantages of Crush Sand

  • Crushed sand has more compressive and flexural strength than natural sand because it is graded properly and has a higher fineness modulus.
  • While it is devoid of silt, dust, and clay, the particles are packed more densely, making the concrete stronger.
  • It is produced close to building sites, which guarantees a consistent supply and lowers transportation costs.
  • Crushed sand is appropriate for high-quality concrete because of its perfect shape, smooth texture, and uniform gradation.
  • Even in severe climates, durability is guaranteed by well-balanced physical and chemical characteristics.
  • It reduces holes, steel corrosion, segregation, honeycombing, and other flaws in concrete.
  • Strength and durability are increased by the smooth, cubical texture produced by VSI shaping machines.
  • Concrete workability and mortar flexibility are enhanced by appropriate gradation and cubical particles.
  • It solves environmental issues and is a sustainable substitute for river sand.
  • It has a larger unit weight, less permeability, and superior scratch resistance because it is silt and clay-free.
  • It is affordable, readily available close to locations, and lowers transportation expenses.

Disadvantages of Crush Sand

  • Improperly crushed angular or flaky particles require more cement and water, which makes them unsuitable for concrete.
  • Crushed sand is more costly than river sand in some places, such as West Bengal, due to inadequate crusher setups.
  • Costs may increase because high-grade pumpable concrete for tall buildings needs more cement using M-Sand than river sand.

The Manufacturing Process of Crush Sand

The crushing of granite rocks produces crushed sand, which is also known as M-sand in general. Crushers smash coarse rock deposits, separating the resultant material into various sizes. Sieving and washing further refine the sand, removing tiny particles and contaminants.

Steps in M-Sand Preparation

  • Extraction and Aggregate Crushing
  • Screening, sorting, air classification, and storage/handling

Manufacturing Process:

  • The first stage involves crushing stones of various sizes into aggregates using Vertical Shaft Impact (VSI) crushers.
  • During the second stage, the aggregates are treated in a Rotopactor to yield sand with the desired grain size.
  • In the final stage of manufacturing crushed sand, dust is screened out, followed by washing to remove tiny particles, resulting in a clean M-sand. 
  • Cleaning guarantees that the fraction of microfines (particles smaller than 75 microns) is less than 15% by weight. The washing procedure also keeps the resulting sand moist or partially wet, reducing water absorption during concrete manufacturing. This enhances the concrete’s work capacity and strength.

Conclusion

Environmental problems like erosion of rivers and coastlines and pH changes are brought on by the illegal large-scale exploitation of natural sand. Crushed sand, also known as manufactured sand, offers a sustainable alternative because it is free of impurities like silt, clay, organic matter, and soluble elements that could reduce its strength and durability. Crushed sand requires energy to create, but it can be generated locally, saving money on transportation and reducing environmental effects. 

FAQ’s

1. What is the difference between crushed sand and natural sand?

Crushed sand can be used as a substitute for natural sand. It is made by crushing and grading granite stones and boulders, resulting in manufactured sand, also known as crushed sand or stone dust. This artificial sand serves as an alternative to the natural sand sourced from riverbeds.

2. What is crushed sand?

Crushed sand, sometimes referred to as manufactured sand or M-Sand is a fine aggregate made by breaking up big rocks and stones into smaller pieces.

Concrete Laying Process – Steps, Types, Tools & Applications

0
Concrete Laying

Concrete is crucial to construction because it provides the framework and basis for many different types of structures, guaranteeing their stability, strength, and longevity. The foundation for building long-lasting, secure, and functional structures is the installation of concrete. In this blog, we will explore the steps to be followed for laying the concrete as well as the types and tools involved in the laying process.

Steps in the Concrete Laying Process

Step 1: Preparing the Ground

  • Site Preparation:

Remove the topsoil, weeds, and stones from the area. Use a spade or rake to prepare and level the ground. While removing soil to the appropriate depth, ensure the base is approximately 75 mm wider than the slab to accommodate the formwork.

  • Base Preparation: 

Use a compactor, roller, or tamper to compact a hardcore sub-base that has been laid out. To stop moisture loss and dampness problems, cover it with a plastic sheet (damp-proof membrane) and a thin layer of sand.

  • Estimate Concrete Requirements:

Determine the approximate amount of concrete needed by using a concrete calculator or by getting in touch with a nearby supplier and providing information such as the area and thickness needed.

Step 2: Formwork Preparation

  • Formwork Configuration:

The limit of the slab is made of 25 mm thick hardwood strips that are attached to wooden pegs at 1-meter intervals. Cover the space with plastic sheets and use bricks to support it.

  • Establish a Slope (Fall): 

In order to allow for water drainage, slope one side of the formwork down a little bit (for example, by 25 mm for each meter).

  • Add Joints for Large Spaces: 

Use softwood boards (10–12 mm thick) to separate spaces larger than 4 m in any direction. Place a thick strip of bituminous concrete felt between adjacent slabs.

Step 3: Ordering and Laying Concrete Delivery: 

  • Delivery:

Make arrangements for a ready-mix supplier to deliver the concrete, making sure the vehicle has site access. Set up the workspace and make sure there are enough workers and tools available.

  • Spreading and Compacting:

Pour the concrete a little bit higher (10–15 mm) than the finished surface for spreading and compacting. Using a tamping beam, move the concrete in a sawing motion to compact and level it.

Step 4:  Finishing and Curing 

  • Finishing options

For driveways and pathways, a tamped finish is a rough, non-slip surface.

Float Finish: A low-slip, smooth floor and workshop finish.

Steel Float Finish: Exceptionally smooth for ponds and indoor flooring.

Brush Finish: A coarse texture that is appropriate for driveways and paths that is applied before setting.

  • Curing Concrete: 

To keep the concrete from drying out, cover it with plastic sheeting. Leave a space for air beneath the sheet in chilly temperatures. In winter allow ten days for curing, and in the summer, for seven days.

  • Travel Guidelines: 

After two days, permit foot travel; after seven days, permit vehicle traffic.

Application of concrete laying

The foundation of contemporary construction, concrete is esteemed for its strength, resilience, and adaptability in a variety of structural and functional uses. It provides outstanding load-bearing capacity and stability, acting as the framework for fundamental components including walls, slabs, columns, and beams. Concrete offers the crucial support and durability required in infrastructure, from high-rise structures that define urban skylines to roads and pavements made to endure heavy traffic. Its use in hydraulic constructions, bridges, and dams further demonstrates its capacity to withstand extreme pressure and water erosion, protecting the integrity and safety of vital projects.

Concrete can be used for a variety of purposes outside of structural ones, such as seawalls to stop erosion in coastal locations, tunnels that must be fireproof, and retaining walls to stop soil erosion as well as surges. While decorative concrete adds visual appeal to both interior and outdoor spaces, pre-cast items like panels and blocks increase construction efficiency. Concrete sound barriers are used in urban design to lessen noise pollution and enhance the quality of life. These many uses highlight how essential concrete is to creating settings that are robust, sustainable, and useful. 

Types of Concrete Used in Laying

Types of Concrete Used in Laying

Depending on the particular needs of the project, different kinds of concrete are utilised in the building. The following are typical varieties of concrete used in laying:

Ready-Mix concrete: This is a pre-mixed concrete that has been delivered to the job site in a clean and readily usable state. It is perfect for big projects and guarantees constant quality.

Reinforced concrete (RC): Concrete and steel bars can be incorporated into it. It is frequently utilised to build floors, roof slabs, and beams in high-rise buildings.

Precast concrete: It is prefabricated. It is used in low- to mid-rise structures, such as office buildings, hotels, and flats. It is perfect for beams, columns, staircases, walls, roofs, and flooring.

High-Performance Concrete: In addition to offering excellent structural strength, it is also a cost-effective solution for building since it can be sized to smaller buildings

Lightweight Concrete: The low density of lightweight concrete is a result of the mixture’s use of lightweight coarse materials like slate, shale, or clay.

Self-Compacting Concrete (SCC): SCC doesn’t need to be vibrated and greatly improves flow ease and rate by using stabilisers and superplasticisers.

Fibre-Reinforced Concrete: Portland cement concrete reinforced with metallic or polymer fibers is commonly referred to as fibre-reinforced concrete. Increased resistance to plastic shrinkage cracking and service-related cracking is one of the fibres’ beneficial properties. Fibres aren’t meant to be the main source of reinforcement; they are added as the concrete is being formed.

Pervious Concrete: It cools the concrete surface by allowing moisture from underneath to evaporate. Pervious concrete doesn’t absorb as much heat from the sun since it has less thermal mass. Furthermore, it doesn’t retain or absorb a lot of heat.

Air-Entrained Concrete: In it, tiny air bubbles improve its resistance to freeze-thaw, making it appropriate for cold climates and frost-prone regions.

Polymer Concrete: Concrete that substitutes a polymer for lime-type cement as a binder is known as polymer concrete. Epoxy granite is one particular kind in which just epoxy is utilised as a polymer.

Tools and Equipment Needed for Concrete Laying

Tools and Equipment Needed for Concrete Laying

A range of instruments are needed for concrete laying to guarantee a precise, timely, and long-lasting construction. Each instrument is essential from mixing to finishing. For structural integrity, a constant mixture of cement, water, sand, and gravel is ensured using concrete mixers. Bull floats smooth out the surface and remove imperfections, while screeds level and smooth freshly poured concrete. Vibrators eliminate air pockets to increase density and strength, while plate compactors stabilise the base material to provide a firm foundation. Rebar cutters and benders prepare reinforcement for larger constructions, while hand instruments like shovels and wheelbarrows help with material handling. Structural problems are avoided by using precise instruments like laser levels to guarantee an even surface.

Aluminium or magnesium trowels are used to finish and smooth the surface, and curing chemicals are used with sprayers, aiding in moisture retention for appropriate curing. Workers are protected by safety equipment including steel-toed boots and gloves, and finishing brooms give outdoor concrete textured, non-slip surfaces. Modern tools like power chisels increase productivity, while power tools like drills and saws allow for exact adjustments. Using the proper tools guarantees quality, safety, and longevity when laying concrete, regardless of the size of the job.

Conclusion

Concrete constructions are made to support a wide range of stresses and environmental factors, such as exposure to seawater, freezing salts, sulfate-rich soils, scratching, and wet-dry cycles. The structural loads and environmental conditions that the concrete will experience determine the mix proportions and material selection. Concrete structures exhibit remarkable strength and durability during their lifetime when they are correctly designed and built.

FAQ’s

1. What materials are used in concrete?

A binder, usually cement, rough and fine aggregates, mainly sand and stone, and water makes up concrete, a composite material. These are the components that makeup concrete.

2. What are the different applications of concrete?

Concrete is used in structures, foundations, roads, bridges, dams, tunnels, coastal protection, retaining walls, decorative projects, precast elements, and noise barriers for durability and strength.

Everything You Need to Know About Building Life Cycle Analysis

0
Building Life Cycle Analysis

The concept of sustainability in construction is gaining attraction globally as governments, industries, and communities look for more environmentally friendly practices. An essential tool in achieving sustainable construction is building life cycle analysis (LCA). This methodology provides a systematic approach to evaluating the environmental impacts of a building over its entire lifespan, from conception to demolition. This blog explores the significance, process, and tools involved in LCA for buildings, highlighting the ways in which it inspires modern building methods. 

What is Building Life Cycle Analysis?

Building life cycle analysis is a scientific method used to assess the environmental impacts related to every stage of a building’s life. This involves extraction of information on materials, production, transportation, construction, operation, maintenance, and demolition or disposal. By taking an overall view, LCA for buildings promises a better understanding of resource consumption, waste generation, and emission over the building’s lifespan.

The process identifies opportunities for reducing environmental burdens, leading to more sustainable design and construction practices. For example, optimising material selection during the design phase can sustainably reduce carbon footprints and energy consumption during the operational phase. 

Stages of Building Life Cycle Analysis

1. Material Extraction and Manufacturing

The analysis begins with the evaluation of materials used in the construction of a building. This phase involves the life cycle analysis of materials, including the energy used and emissions released during extraction, processing, and manufacturing. For example, materials like concrete and steel have high absorbed energy due to their intensive production processes. 

2. Transportation 

The next stage is assessing the environmental costs of transporting materials to the construction site. This step looks at fuel consumption, emissions, and the potential impacts of logistics on the surrounding environment. 

3. Construction

During the construction phase, the analysis focuses on resource usage, waste generation, and energy demands. Efficient construction techniques and waste management systems can minimise these impacts. 

4. Operation and Maintenance

The operational phase of a building often has the most important environmental impact. It includes energy consumption for heating, cooling, lighting, maintenance and all other operational activities during the building’s usage and occupancy. Using energy-efficient systems during design can considerably reduce these impacts, extending the building’s lifespan and lowering overall environmental costs. 

5. End-of-life (Demolition and Disposal)

A building is demolished at the end of its life, and its materials are disposed of or recycled. Evaluating these processes in the LCA for buildings highlights opportunities for material recovery and reuse, reducing landfill waste and conserving natural resources.

The Importance of Building Life Cycle Analysis

  • Promotes Sustainable Construction: LCA identifies strategies to reduce environmental impacts and resource consumption by checking the material life cycle and other building processes.
  • Informs Decision-making: LCA helps stakeholders such as architects, engineers, and policymakers to make informed decisions regarding material selection, energy use, and building design. 
  • Compliance with Green Building Standards: Many green building certifications, such as LEED (Leadership in Energy and Environmental Design) and BREEAM (Building Research Establishment Environmental Assessment Method), require LCA as part of their evaluation criteria.
  • Economic Benefits: Through optimisation, LCA helps reduce energy costs, operational inefficiencies and material waste, offering long-term benefits to building owners and developers.

Tools and Software for Building Life Cycle Assessment

Several LCA software solutions are available to simplify and harmonise the building life cycle assessment process. These tools are designed to handle complex datasets and provide detailed observations of environmental impacts.

  • SimaPro: It is a versatile tool used to perform LCA for buildings. It offers comprehensive databases and robust reporting tools to assess environmental impact at every stage of a building’s life.
  • GaBi: GaBi provides advanced tools for modelling the material life cycle analysis. It is trendy for its extensive material databases, which allow precise impact assessments.
  • Tally: Tally is an LCA software plugin for Building Information Modelling (BIM). It blends well with Autodesk Revit (a popular software used for architectural design and drawings), allowing designers to assess the environmental impacts of their models in real time.
  • One Click LCA: One click LCA focuses on simplicity and ease of use. This software helps users quickly assess environmental impacts, making it an excellent choice for early-stage design evaluations. 

Case Study: LCA in Action

A case study that shows the value of LCA is the construction of a sustainable office building in Stockholm, Sweden. The project uses LCA software to calculate different material choices and design alternatives.

  • Materials: The analysis revealed that using cross-laminated timber (CLT) instead of conventional steel could reduce embodied carbon by 40%.
  • Operational Efficiency: The building reduced its operational energy consumption by 30% by adding energy-efficient HVAC systems and renewable energy sources.
  • End-of-Life: Recycling strategies were created in the design, allowing 70% of the building materials to be reused after demolition. 

Challenges in Building Life Cycle Analysis

Despite its advantages, applying LCA in construction projects is not without some challenges, such as:

  • Data Availability: Accurate LCA depends on access to reliable and thorough data about materials and processes, which may often be hard to obtain.
  • Complexity: The multifaceted nature of construction projects makes it challenging to accurately model every stage of a building’s life.
  • Cost and Time: Conducting an LCA can be resource-intensive, especially for large or complex projects.
  • Standardization: Variations in LCA methodologies and standards can lead to inconsistent results, complicating project comparisons.

The Future of Building Life Cycle Analysis

Governments and organisations worldwide are implementing policies to encourage or mandate the use of building life cycle assessments. These initiatives aim to reduce the environmental footprint of the construction industry, which accounts for nearly 40% of global carbon emissions.

As sustainability becomes the basis of construction, the role of LCA will only grow. Advancements in LCA software, integration with digital technologies like BIM, and the adoption of standardised methodologies will make the process more accessible and reliable.

Conclusion

Building life cycle analysis is an essential tool for promoting sustainable construction. By evaluating environmental impacts across all stages of a building’s life, LCA empowers stakeholders to make data-driven decisions that benefit both the planet and the economy. 

As technology advances and awareness grows, the adoption of LCA for buildings will become the norm rather than the exception. By embracing this methodology, the construction industry can take a major step towards a greener, more sustainable future.