Home Blog Page 100

Best Tiles for Home: A Comprehensive Guide

0
Best Tiles Image

Choosing the best tiles for your home is an important decision that affects both its appearance and functionality. However, it can be difficult to determine which tiles will suit your needs when there are so many to choose from. In this blog, Brick & Bolt will help you understand the best tiles for your home, different types of tiles, where they work best, and how to keep them in good condition so you can make an informed choice.

Different Types of Tiles

Types of Tile Image

There are several types of tiles available on the market from house front tiles designed to withstand the elements to interior options that can be used in various areas of your home. The most commonly used tiles in homes are mentioned below.

Ceramic Tiles:

Ceramic tiles are one of the most popular options for interior designs because they can be used in many ways, and they are cheap and easy to clean. It is made from natural clay and heated at high temperatures to make a hard surface that will last. Ceramic tiles can be used on both floors and walls because they come in many shapes, sizes, and colours. They are often used in kitchens, bathrooms, and living rooms.

Porcelain Tiles:

Porcelain tiles are a type of ceramic tile that is made from finer clay and is heated at higher temperatures. This process makes them denser, stronger, and less likely to get wet, making them perfect for use outside and in places with many people walking through.

Terracotta Tiles:

Terracotta tiles are made from natural clay and have a unique, earthy look. They are porous, so they need to be sealed to keep water and stains from getting in. Terracotta tiles are great for giving rooms a rustic look.

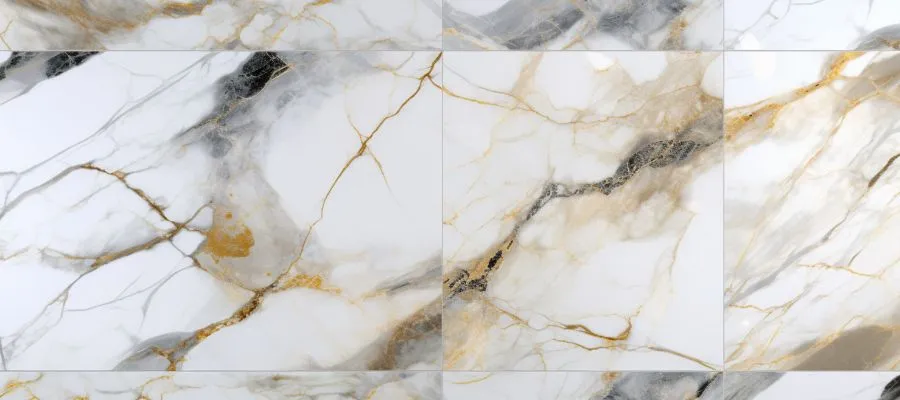
Natural Stone Tiles:

Natural stone tiles, like marble, granite, and slate, look expensive and will last for a long time. Each stone tile is different, giving your home a unique look. Even though they last a long time, they need to be cared for regularly to keep their appeal.

How to Choose the Best Tiles For Home?

When choosing the best tiles for your home, you need to think about a number of things to make sure you make the right choice for your needs and preferences.

1. Choose where you want to put the tiles, such as in the bathroom, kitchen, living room, or outside. Different places have different needs when it comes to protection from water, slips, wear and tear.

2. Tiles can be made of clay, porcelain, glass, cement, natural stone (like marble, granite, or slate), and other materials. Each material has its own properties, like how well it resists water, how strong it is, and how often it needs to be maintained.

3. Tiles range from small patterns to large-format tiles in terms of their size and shape. Think about the room’s size and the style you want to achieve. Bigger tiles can make a room look bigger, and smaller tiles can make designs that are more complicated.

4. There are a huge number of colours, designs, textures, and finishes for tiles. Select a style that goes with the general look and feel you want to create in your home.

5. Think about how many people will walk in the area where you want to put the tiles and how much wear and tear they might get. Some tiles last longer and don’t get scratched, stained, or faded as easily as others. You should also think about how much upkeep you’re willing to do.

6. To keep people from slipping in wet places like bathrooms and outside, choose tiles with a surface or pattern that doesn’t let water in.

7. The cost of tiles can vary a lot based on the type, size, and quality of the tile. Set a reasonable budget and order your choices based on that.

8. Although tiles are one of the best types of flooring material, talk to tile experts or experienced workers to get advice based on your needs and to make sure the installation is done right.

Best Floor Tiles for Your Home

When choosing floor tiles, especially for places with a lot of foot traffic, think about how long they will last and how well they won’t slip. Because they are strong and come in many styles, porcelain and ceramic tiles are great options. Natural stone tiles can also look beautiful in hallways and living rooms, but they may need more maintenance.

Best Tiles for Living Room

The living room is the main area for relaxing and having people over. Pick tiles that are both stylish and long-lasting. Polished porcelain tiles can make a room look more elegant, while ceramic tiles that look like wood can make a room feel warm and inviting. Terracotta tiles are great for giving a room a rustic feel.

Best Tiles For Kitchen

Tiles in kitchens need to be easy to clean and not stain or get wet easily. Because they are strong and don’t have many holes in them, porcelain tiles are great for kitchen floors and borders. Glossy ceramic tiles can also be used for backsplashes, where they protect and look good at the same time.

Best Tiles For Bathroom

Bathroom tiles need to be able to handle a lot of water and be cleaned often. Since porcelain tiles don’t get damaged by water, they are great for bathroom floors and walls. Adding large tiles that look like marble can make a room look more expensive. You can also use ceramic tiles for the walls and borders of your bathroom. 

Floor Tile Design Trends

Floor Tiles Image

Some of the floor tile design trends are mentioned below

Blonde Wood-Look Tile Flooring: 

These tiles are made to look like light-colored wood floors like maple or ash. They look warm and natural like woods but are long-lasting and easy to clean like ceramic or porcelain tiles. Blonde tiles that look like wood can make a room feel light and airy.

Neutral Tile Flooring: 

Neutral tile flooring is made up of tiles that have a soft colour scheme, like brown, taupe, or shades of grey. These tiles have a simple, neutral look that goes with a lot of different types of interior design. A lot of people choose neutral tiles to make their living areas feel calm and classic.

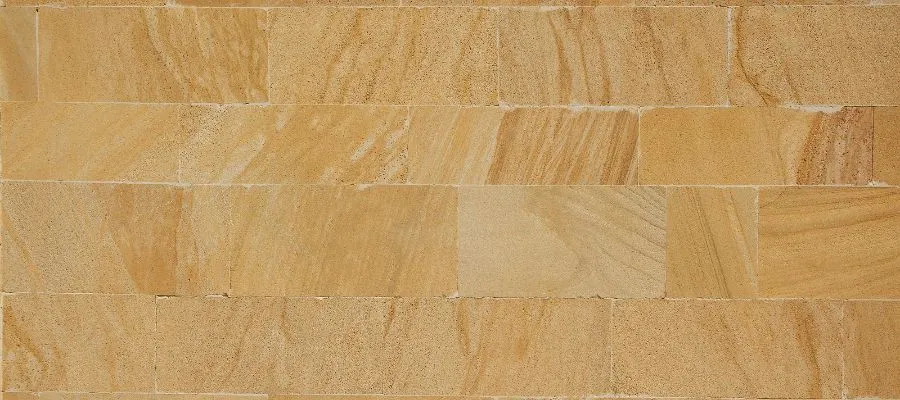
Warm-Toned Tile Flooring: 

Tiles with warm tones, like terracotta, rust, and honey, have rich, earthy colours. The warm and friendly look of these tiles can make a room feel more like home. People often use warm-coloured tiles in their homes to create a Mediterranean or rural look.

Wooden Floor Tiles: 

Wooden floor tiles, which are also called “wood-look tiles’’, are made to look like wooden floors but are made of ceramic or porcelain, so they are durable and won’t get damaged by water. These tiles can look like different types of wood, including different species, grains, and finishes. They give floors a realistic wood-like look without the upkeep that comes with real hardwood floors.

Tile Maintenance Tips

  • Cleaning tile floors with a vacuum or broom is a good way to keep them clean. Mop the floors with water and a light detergent. Make sure to rinse well so that residue doesn’t build up.
  • Use a sealant on porous tiles like clay and natural stone to keep them from getting stained or wet. Seal these tiles again and again to keep their protected layer.
  • Over time, grout lines can get dirty. Mix baking soda and water together to clean the grout, and then use a grout product to keep it from getting stained again.
  • Clean the tile and grout with mild cleaners so you don’t damage them. Harsh chemicals can wear away the protection sealant and change the colour.
  • Cracks or chips in the tiles should be fixed right away to keep your flooring in good shape and stop further damage.

Tile Prices

Understanding the price range of various tiles can help you make a budget-conscious decision. Here are some general guidelines:

Ceramic Tiles: The cost of ceramic tiles starts from Rs 25 per square foot, depending on the quality and design.

Porcelain Tiles: They usually cost between Rs 64 per square foot, with higher-end options reaching up to Rs 74 per square foot.

Terracotta Tiles: They can range from Rs 10 to Rs 50 per square foot, but additional costs for sealing and maintenance should be considered.

When choosing the best tiles like marble flooring for your home, you need to think about how they look, how well they work, and your budget. Ceramic tiles are long-lasting and can be used in many ways. Terracotta tiles add a rustic look. Think about what each room needs and how your home is designed as a whole. Keep up with tile care to make sure your floor looks great and works well for years to come. You can make an informed choice and create a beautiful home with the best construction company in Delhi, setting if you know about the different types of tiles, their prices, and how often they need to be cleaned.

Wallpaper vs Wall Decals: Home Renovation Pros, Cons & Types

0
Wallpaper vs wall decals

Regardless of home size, everyone wants their house to look attractive and pleasing. To this end, people will try to increase their aesthetic appearance with decorative items.

There are many choices for decorating walls. Two popular options are wallpaper and wall decals. Both can change how a room looks, but they are different and work better for some situations than others.

In today’s Brick & Bolt blog, we will discuss the different types and the comparison between wallpaper and wall decals to help you decide which is right for your home.

Wallpaper 

Wallpaper, a versatile and traditional wall covering that comes in rolls and is applied using adhesive, has the power to transform entire walls with its myriad of patterns, textures, and colours, inspiring endless design possibilities.

Advantages of Wallpaper

  • Wallpapers come in many different designs, patterns and textures. You can choose the ones you like.
  • Wallpaper makes plain walls look nice and interesting.
  • Good quality wallpaper lasts a long time without getting damaged easily.
  • Wallpaper can cover up small cracks or bumps on walls.
  • Nicely chosen wallpaper can increase the value of a property.

Disadvantages of Wallpaper

  • Putting up wallpaper takes a lot of work – preparing the walls, measuring, cutting and applying it.
  • Removing old wallpaper is very difficult and can damage walls.
  • Wallpaper is best for dry rooms, not bathrooms or kitchens with moisture.
  • While some wallpapers are cheap, high-quality ones can be expensive.
  • Wallpaper styles can go out of fashion, so you may need to change them to follow new trends.

Different Types of Wallpaper

Wallpaper

1. Liner Wallpaper(Lining Paper)

Liner wallpaper was are also called Lining papers. They are made from paper or fibreglass. It helps hide wall flaws and reduces the need for repairs. You can use it as a base for fancy wallpaper or on its own, and you can even paint it. It’s also easy to put up and take down.

2. Printed Wallpaper

This is a common type of wallpaper available in many colours and patterns. It’s cheaper than handmade wallpaper but can tear easily. The water-based ink makes it unsuitable for kitchens and bathrooms.

3. Vinyl Wallpaper

This has a printed paper base coated with vinyl, making it durable. Thicker vinyl coatings make it stronger. It’s great for kitchens and bathrooms since it can handle steam and is easy to clean.

4. Foil Wallpaper

This creates a shiny, metallic effect using polished metal foil. It highlights wall flaws due to its reflectiveness, so preparing the walls properly is important.

5. Flock Wallpaper

This has a velvety, raised pattern made from fibre printed on paper. It’s more expensive and delicate, best for rooms with little activity.

6. Mylar Wallpaper

Made with a polyester film layer, it has a shiny, foil-like appearance. Wall preparation is needed, but it can be washed and is easy to remove. Suitable for kitchens and bathrooms.

7. Bamboo Wallpaper

This kind of wallpaper is made by hand from real bamboo and stuck onto paper. Each roll may vary in colour because it’s natural. Care is needed during installation, and it can’t be washed.

It is considered an artistic medium, allowing interior designers to experiment with natural imagery, bold textures, and intricate patterns.

Wall Decals 

Wall decals

Wall decals, also called wall stickers, are generally made of vinyl and have an adhesive backing, making them easy to apply and remove. They come in various shapes, sizes, and designs and are often used to create specific images or patterns on a wall. Wall stickers for home decoration have become increasingly popular because of their ease of application.

Advantages of Wall Stickers/Decals:

  • Wall decoration stickers are easy to apply because they have a sticky back that you can peel and stick onto the wall.
  • They come in many different designs, like pictures or motivational quotes, so you can choose the ones you like.
  • You can remove decals and reuse them somewhere else without damaging the wall.
  • Decals are cheaper than things like wallpaper or paint for decorating walls.
  • Besides walls, you can stick decals onto furniture, mirrors, windows or even laptops.

Disadvantages of Wall Stickers/Decals:

  • Wall stickers may not last long because they get worn out over time. The sticky backing can stop sticking after a while.
  • Decals may cover a smaller wall area than wallpaper or paint.
  • When putting them up, air bubbles can form under the decal, making it look uneven.
  • While many decal designs are limited in size, detail, and custom design compared to other options,
  • Decals may not stick well to rough or textured wall surfaces.

Different Types of Wall Stickers/Decals

1. Murals

These are perfect wall stickers for home decoration. They are large wall stickers that cover the complete wall. They are usually used for advertising, branding, or providing information in places like museums and schools.

2. Stickers Made of Vinyl

These are made of vinyl material and come in different sizes. Since bigger stickers can stretch and tear with time, smaller ones are better. These are useful at home or in the office for decorating purposes.

3. Traditional Stickers

These self-adhesive wall stickers are made of PVC plastic and cut into different shapes using a single colour. They are printed on vinyl and then cut out. If you only need one colour, then this will be perfect.

4. Block-Cut Vinyl

These can be more colourful and can have different finishes, such as shiny, mirror-like, or sparkly. You can choose any texture you like for these.

5. Fabric Wall Graphic

These self-adhesive wall stickers are made of materials other than PVC and give your walls a fabric-like appearance.

Wallpaper vs Wall Decals

WallpaperWall decals
InstallationCovers large areas seamlessly, adding texture and depth to a room.Easy to apply with peel-and-stick backing; allows repositioning until satisfied with the placement.
Durability Highly durable and able to last many years without wear, it hides wall imperfections. However, it is susceptible to damage in high-humidity areas like bathrooms and kitchens.Wall decal is a temporary decor solution. They resist moisture and are easy to clean, so they work well in humid areas. However, after a while the decals may start peeling off the wall because the sticky backing loses its stickiness over time.
AestheticsAdds significant visual interest and texture, creating a permanent and polished look.Wall decals are usually used for adding a few decorative accents, not for decorating an entire room with a single theme.
CostHigh initial cost but durable, making it cost-effective in the long run.Generally less expensive; an affordable way to update decor without significant financial commitment.
Ease of RemovalRequires careful removal to avoid damage.Easy to remove without leaving stains or damage on walls.

Conclusion

Ultimately, wallpaper and wall decals have merits, and your specific design goals, budget, and the intended use of the space should guide your choice between them. Whether you choose wallpaper or wall decals, both can transform your walls into spaces that showcase your personal style.

Renovate Smart: Unlocking Home Renovation Loan Tax Deductions

0
Home renovation loan tax deductions

A home is not just about a roof over your head. It’s the essential factors of livelihood that offer safety and security to your family. It’s everyone’s dream to live in a beautiful house. People spend their life savings to make their dream homes. With time, some improvements and modifications might be required in your home. Sometimes, home renovation can cost out of budget. Using your savings for such a huge expense can exhaust your savings in one go. 

You can get a house renovation loan to modify, refurbish, or renovate your home. The main advantage of a house renovation loan is that it allows you to do house renovations with a contemporary design and a more comfortable living space, customised as per your tastes and aesthetic preferences. These loans are similar to a house loan. While a home loan enables you to acquire a house, house renovation loans are meant to improve the home that you already own.

In this blog, Brick & Bolt discuss home improvement loans, application procedures and home renovation loan tax deductions.

Understanding Home Improvement Loans

House repair tax deduction

A house improvement loan is a type of home loan used to repair or improve your house. This loan can be used for both internal and external home renovation purposes. They can include painting, whitewashing, tiling, flooring, waterproofing, plumbing, sanitary work, etc.

Procedure to Apply for a Home Improvement Loan

To get a home improvement loan, you first need to estimate how much money you’ll need for the planned renovations and submit those plans to the bank. The bank will typically provide 85-90% of the estimated cost, while you have to pay the remaining amount.

The bank’s technical team will review and approve your renovation plans and cost estimates. They will also evaluate your ability to repay the loan based on your income and other factors. Once everything is approved, the bank will give you the loan amount.

What can be Included in a Home Renovation Loan?

The income tax department says you can deduct the money you spend on home improvement loans from your taxable income. You can also deduct the amount if you pay for home improvements directly without taking a loan.

Home improvements refer to any renovation or construction work done to your existing home. This includes:

  • Building a new balcony
  • Extending a room
  • Adding a room or floor (if you have a permit)
  • Painting
  • Replacing floors or tiles in the bathroom or kitchen
  • Plumbing work
  • Basically, any work covered under a home improvement loan

You cannot generally use a home improvement loan to buy furniture or appliances for your home, including security systems. However, if installation or construction work is required for these, the bank may approve the loan under the home improvement category.

Home Renovation Loan Tax Deductions in India

Deduct house repairs

The Income Tax Act 1961 in India allows homeowners to claim tax deductions for the costs of repairing and renovating their homes. These deductions can help homeowners cover expenses related to renovations, repairs, and improvements to their homes. Understanding the requirements and deductions can help homeowners increase their tax benefits while improving their homes.

  • Section 24(b) of the Income Tax Act permits deductions for the interest paid on home renovation loans. This is a major tax deduction in India. It covers loans taken for renovating, repairing, or reconstructing a home. For homes you live in, you can deduct up to Rs. 2 lakhs per year in loan interest. There is no limit on the deduction for interest on home improvement loans for rented properties or properties deemed to be rented.
  • Section 80C of the Income Tax Act allows deductions for the principal repayment of home renovation loans up to Rs. 1.5 lakh per year. This includes the repayment of loans taken for building or buying a house.

To get these home renovation loan tax deductions, homeowners must use the home improvement loans only for renovating, repairing, or rebuilding their homes. To be eligible for home renovation tax benefits, the loans must be taken from banks, housing finance companies, or cooperative societies.

There are also some other sections of the Income Tax Act that allow home renovation loan tax deductions.

  • Section 80EEA: Allows a discount of up to Rs. 1.5 lakh per year on the interest paid on home loans for affordable housing purchases. The value of the property for stamp duty sake must be less than or equal to Rs. 45 lakhs, and the taxpayer must not own any other residential property at the time when the home loan is approved.

To claim these home renovation loan tax deductions, homeowners must keep invoices, receipts, loan documents, and completion certificates related to the home renovation costs. Seeking personalised advice from a tax advisor or chartered accountant can help maximise the deductions and ensure compliance with tax rules and regulations. By taking benefit of these tax benefits, homeowners can improve their homes and save money on their taxes in India.

Claiming House Repairs on Taxes

The amount of deduction you can claim depends on how much ownership share you have in the property. The home loan must be taken in your name. However, if there is a co-borrower on the loan, they can also claim the deductions. You can only start claiming the home loan tax deductions from the financial year in which the construction of the house is completed.

  • If you are a salaried employee, you need to submit the home loan interest certificate to your employer. This certificate shows your ownership share, borrower details, and the breakdown of your EMI payments into interest and principal amounts. Your employer will then adjust your tax deductions accordingly.
  • If you don’t submit this certificate, you will have to calculate the taxes yourself and claim any refund during tax filing. You may also have to pay additional taxes if an amount is due.
  • For self-employed individuals or freelancers, you don’t need to submit these documents to anyone, including the Income Tax department. However, you will need them to calculate your advance tax liability every quarter. Make sure to keep these documents safe in case of any queries from the IT department and for your own records.

Conclusion

Taking advantage of home renovation loan tax deductions can be a smart move for homeowners to renovate their houses. You can increase the tax benefits by knowing the eligibility criteria, documentation requirements, and different sections of the Income Tax Act that allow these deductions.

Remember to keep records of all expenses, loan documents, and completion certificates. Professional advice from a tax consultant or chartered accountant can also help you understand the complexities of tax laws.

Ultimately, investing in your home improves your living experience and offers potential tax savings. Through home renovation loans and the accompanying tax deductions, you can create a comfortable and customised living space and a better financial life.

Ultimate Guide to POP Designs for Drawing Room: Transform Your Space with Stunning Ceilings

0
POP Design Photo

Many homeowners consider an aesthetically pleasing drawing room a top concern when it comes to interior design. The drawing room is the centrepiece of your home, where you welcome guests and get together with family. POP (Plaster of Paris) designs offer a world of possibilities, from simple wall patterns to fancy ceiling decorations. In this blog, Brick & Bolt will explore the variety of POP designs for drawing rooms, including styles, trends, and useful things to remember to make your drawing room look beautiful.

What is POP (Plaster of Paris)?

Plaster of Paris, or POP, is a versatile building material that can also be used for decoration in many ways. It is a fine white powder gypsum plaster that hardens quickly after being wet and left to dry. POP is often used to make building elements like cornices, mouldings, and false ceilings. Because it has a smooth finish and can be designed in many ways, it is also a favourite among interior designers.

Benefits of POP Designs for Drawing Room

Some of the benefits of POP designs for drawing rooms are mentioned below

  • POP designs can turn a plain drawing room into a stylish, classy area.
  • Pop is a strong material that can last a long time, even with normal use.
  • It’s very customizable because it can be shaped and designed in many ways.
  • POP ceilings can make a room quieter and warmer.
  • It works well to hide wires and other flaws in the ceiling.

POP Ceiling Designs For Drawing Room

Pop ceiling design Image

1. Coffered Ceilings

Adding coffered ceilings to your drawing room is a classic choice that will never go out of style. This design uses a grid of inset panels, which can be square, rectangular, or even octagonal. POP for a coffered ceiling lets you add fine details and smooth the result. Check out our previous blog on dropped or suspended ceilings for commercial use or official use.

 2. Tray Ceilings

Tray ceilings make the ceiling look raised by raising the middle part. Drops in the POP ceiling design for drawing rooms can be small or big, and lighting can be added to the spaces between the drops to make the room feel warm and welcome.

3. Curved Ceilings

Curved POP ceilings can give a room a more modern look. These patterns can soften the edges of your drawing room and give it a unique look. The modern decor looks great with curved ceilings, which can be made stand out with LED strip lights.

4. Patterned Ceilings

With POP, you can make complicated patterns with floral themes, geometric shapes, or abstract designs. These decorative ceilings can be the centre of attention in your drawing room, giving it a touch of class and luxury.

5. Backlit Ceilings

If you use backlighting in your POP ceiling design, it can improve the mood of your drawing room. You can put LED lights behind the POP panels to create a soft, diffused glow that brings out the pattern in the ceiling and makes the room feel cosier. Learn more about trends in false ceiling light designs from our previous blog.

POP Wall Designs for Drawing Rooms

POP wall ceiling Image

1. Accent Walls

One big POP wall can be the focal point of your drawing room. POP allows you to change things, from picking a simple texture to making a complicated painting. Patterns based on nature, abstract art, and harmonious geometric shapes are all popular choices. Adding accent walls with POP designs to your drawing room can make the room look a lot better.

2. Nook and Shelves

Adding nooks and shelves to your POP wall design can make it more useful and stylish. These parts can showcase art, books, or decorative items, making the room look better overall.

3. Panelling

Putting pop panels in your drawing room can give it a classy and stylish look. For this plan, you’ll need to make raised wall panels. You can paint them or leave them white for a classic look.

How to Choose the Right Plaster of Paris Design for Your Drawing Room

When choosing a POP style for your drawing room, think about these things:

  • Patterns that are easier and more streamlined may work better in smaller rooms, while patterns that are more complicated and ornate may work better in larger rooms.
  • High ceilings make using more complicated designs, such as coffered or stacked ceilings, easier. If your ceilings are low, choose simple patterns so the room doesn’t feel crowded.
  • The type of lighting you use, and where you put it can have a big effect on how your POP design looks. You might want to use LED lights or spotlights to draw attention to certain places.
  • POP is usually white, but you can paint it to match your room’s colour scheme. Pick colours that complement the rest of your style.

Trending POP Designs for 2024

1. Minimalist Designs

A common trend in interior design right now continues to include minimalism. POP designs with simple, clean lines and subtle colours can give your drawing room a modern and classy look.

2. Biophilic Designs

Biophilic designs use natural materials like leaves, flowers, and textures. This trend adds a bit of nature inside, making the space feel calm and fresh.

3. Art Deco Revival

The bold geometric designs and high-end finishes of Art Deco are back in style. Art Deco features in pop designs can give your drawing room a touch of glitz and sophistication.

4. Custom Murals

Custom murals made with POP let you create unique patterns. Whether it’s an abstract piece or a detailed scene, a custom mural can make your drawing room stand out.

Installation and Maintenance of POP Designs

Installation of POP Designs

Skilled labour is needed to install POP designs. Hiring professionals with extensive experience is important to ensure the design is carried out properly and safely. The process involves putting together a framework, adding the POP mixture, and then waiting for it to dry and set.

Maintenance of POP Designs

POP designs don’t need much maintenance, but they do need some care to stay looking their best:

  • Regularly dust the POP surfaces with a soft cloth or cleaner to keep dirt and grime from building up.
  • For a better clean, use a damp cloth and mild soap. Do not use harsh chemicals that could hurt the surface.
  • Small cracks or chips may appear over time. A professional can fix these to restore the POP design to its original appearance.

Commercial and Transactional Considerations for POP Designs

It’s important to think about the cost and the return on investment when choosing POP patterns for your drawing room:

Cost

Costs for POP designs depend on how hard they are to make, how big the room is, and how much the builders charge. Most of the time, POP ceiling patterns cost between ₹75 and 120 per square foot. Because more work and supplies are needed, custom murals and wall designs with lots of small details may cost more. If you are planning to build a new home, then you can use Brick & Bolt’s cost estimator tool to get an estimate for your construction cost.

Return on Investment

Investing in POP themes can make your home look better and increase its value. A well-designed pop design for a drawing room can make a lasting impression on potential buyers. If you want to sell your home in the future, this is an investment that will pay off.

Conclusion

POP designs for drawing rooms are a stylish and flexible way to make your home look better. There are a lot of different options to choose from, whether you like the classic beauty of coffered ceilings or the modern look of floating designs. You can choose a design that fits in with your general style and looks good by thinking about things like the size of the room, the height of the ceiling, and the lighting. POP designs can make your drawing room a beautiful and welcoming place that you and your guests will enjoy for years to come if they are installed and taken care of properly.

Add these ideas and trends to your drawing room to make it not only look nice but also useful and comfortable. With the right POP design, your drawing room can become the heart of your home, a stylish and comfortable space that everyone will love.

If you want to know about construction services in Delhi, visit Brick & Bolt. The best construction company in Delhi is here to help you with the best construction quality and on-time delivery.

Solvent Based Paint vs Water Based Paint

0
Solvent-based paint vs water-based paint

Paint is very important for the aesthetic outlook of any building. In the market, many types of paint are available based on a different basis. Paints are broadly classified into two main categories: solvent-based vs water-based paint, distinguished by the type of base or solvent used in their formulation. The choice between solvent-based vs water-based paint can greatly impact the outcome of painting projects. 

Understanding the differences between solvent-based and water-based paint is very important in selecting the right product for your specific requirements. Read today’s blog on Brick & Bolt to learn more about solvent-based and water-based paints.

Solvent-Based Paint

Solvent-based paint possesses both the pigment and the binder in an organic solvent carrier. The organic compounds give a hard and durable finish that withstands scratches on your wall. 

Solvent-based paints contain organic solvents, typically derived from petroleum or other sources. These solvents act as carriers, allowing the paint to be applied smoothly. After you’ve painted the surface, the solvents essentially disappear into the air, leaving the hardened, adherent paint layer.

Water-Based Paint

Paint with pigment and binder mixed in water as the primary solvent is called water-based paint. It is also called latex or acrylic paint. Water-based paints do not need organic solvents to maintain the paint’s liquid condition or ease drying. Here, water works as the carrier and evaporates over the drying time, leaving the surface with a solid, sticky layer.

Water-based paints typically contain water, binders like acrylic or latex, colouring pigments, and additional ingredients such as thickeners, preservatives, and surfactants. These paints come in various formulations, including pure acrylic, vinyl acrylic, and acrylic latex. Each formulation offers different performance characteristics, such as ease of cleaning, flexibility, and durability.
Read More: Low-cost painting options to give a rich and classy look

Solvent-Based vs Water-Based Paint: Major Differences

Water based paint

1. Drying Time

The drying time of solvent-based paints is notably longer than that of water-based paints. Organic solvents typically have higher boiling points and evaporate more slowly than water. This slower evaporation rate leads to a longer drying time for solvent-based paints.

2. Durability and Longevity

Solvent-based paints are less durable and more apt to scratching and wear, while water-based paints are highly durable and resistant to abrasion and chemicals.

Solvent-based paints perform exceptionally well outdoors due to their ability to withstand UV radiation, extreme temperatures, and moisture. This makes them a popular choice for exterior surfaces like doors, trim, and metal structures. While water-based paints are only suitable to indoor use.

3. Environmental Impact

Solvent-based paints have potential safety risks of fire and explosion during production, transportation, storage, and use, especially in confined construction areas, which can lead to suffocation and explosions. Also, the organic solvents in these paints can harm human health. 

Solvent-based paints have high levels of VOCs (Volatile Organic Compounds), with some conventional products containing over 400 units. This puts pressure on companies to address environmental protection and safety concerns when producing and using solvent-based paints.

Conversely, water-based paints are environmentally friendly and safe during production, transportation, storage, and use. They have significantly contributed to energy conservation, emission reduction, safety, and environmental protection.

4. Application Process

Solvent-based paints can be more difficult to work with than water-based paints. They often require more surface preparation, such as sanding, degreasing, and priming, to ensure proper adhesion. Additionally, the strong odor and fumes from the solvents require sufficient ventilation during application. While water-based paints are generally easier to apply and more user-friendly. They have a lower odour and can be applied directly to properly prepared surfaces without extensive priming or sanding. Clean-up is also much easier with soap and water.

Oil-based paint

5. Finish and Appearance

Solvent-based paints can provide a wide range of finishes, from high-gloss to flat or matte. These paints tend to have a smoother, more uniform appearance, with fewer brush marks or imperfections visible. The slow drying time of solvent-based paints allows the paint to level out and flow better, resulting in a more consistent finish. The pigments and resins in these paints are more resistant to fading or discolouration, allowing the colours to remain vibrant for longer periods.

While water-based paints have improved significantly in terms of finish and appearance, they may still have some limitations compared to their solvent-based paints. The faster drying time of water-based paints can make achieving a completely uniform finish more challenging, as brush marks or lap marks may be more visible, especially for inexperienced painters.

Read More: The Ultimate Guide to Choose the Interior Paint Colours For Your Home

Conclusion

The choice between water-based and solvent-based paints depends on several factors, such as project requirements, environmental concerns, and personal preferences. While solvent-based paints present superior durability and a wider range of finishes, water-based paints are more environmentally friendly, easier to apply, and suitable for most interior projects. 

Water-based paints are the ideal option for your home indoors, while solvent-based paints are only suited for outdoors, where dirt and temperature change more often.

Mastering Brick Masonry: Everything You Need to Know

0
Brickwork

When you look into any building structure, walls play a major part. Every wall has its unique Brick masonry technique, which will play the main role in the stability of the structure. But you know what Brick masonry is? 

It’s the basic construction technique that has evolved over time. From traditional methods to modern innovations, brick masonry continues to be a cornerstone in construction projects across the world. 

Keep on reading this Brick & Bolt blog to learn more about Brick masonry’s types, importance, and construction guide.

What is Brick Masonry?

Brick masonry is a procedure of setting bricks in an organized way in the mortar. It is a long-lasting and proficient method in construction. Various types of mortars and bricks, with different applications and characteristics, compose a brick wall that withstands external loads.

Here, the bond that binds the bricks together results from filling suitable mortar in the joints between the bricks. The placement and mixing of mortar need special focus in brick masonry as they are central to the longevity and functionality of the structure.

Types of Brick Masonry

Brick masonry comes in several forms, each with its own  features and uses:

1. Solid Brick Masonry

Solid brick masonry uses bricks placed together with mortar, leaving no gaps or spaces. Builders often use this type to create walls that can bear heavy loads, as it offers great strength and lasts a long time.

2. Hollow Brick Masonry

Hollow brick masonry uses bricks with empty cores. These bricks weigh less and provide better insulation than solid bricks. Builders often use them on non-load-bearing walls.

3. Facing Brick Masonry

Facing brick masonry employs high-quality bricks on the exterior  walls to make them look good. These bricks have more even colors and shapes. Masons use them to create attractive patterns.

4. Reinforced Brick Masonry

Reinforced brick masonry adds steel rods or mesh into the mortar joints to make walls stronger. This type works well in places that are susceptible to  earthquakes or other stresses on buildings.

5. Composite Brick Masonry

Composite brick masonry combines bricks with other materials, like stone or concrete blocks, to boost strength and reduce  costs. People use this type in different projects where they need specific qualities from various materials.

Significance of Brick Masonry

Brick masonry construction

Brick masonry carries significant importance in construction for many reasons:

Energy Efficiency

Brick masonry reduces the heat transfer through masonry brick walls. Irrespective of the hot and sunny outside, the bricks take a long time to absorb that heat and transfer it to the interiors completely. Also, it maintains the heat inside the home remains trapped for a longer duration during the cold months. So it is energy efficient.

Better Longevity

Brick masonry is a good choice for enduring and economical construction Because it neither fades nor needs continuous maintenance like drywall. 

Fire Protection

One of the major advantages of brick masonry is its inherent fire safety. It does not fuel fires or emit toxic gases, even in the case of fire. This makes it a natural fire barrier, ensuring the safety of your buildings and the people within them.

Reduction of Noise

The mass of brick masonry also prevents the noise outside from pervading the interiors, and the thickness of the walls decreases sound transmission in the interiors.

Some Basics for Brick Masonry

Brick masonry

Understanding the basics of brickwork, including types of bricks (like clay and concrete) and bonds (such as stretcher and header), is crucial for ensuring structural stability and aesthetic appeal. Knowledge of these fundamentals helps to choose the right materials and techniques for better masonry construction.

Types of Bricks Used in Brick Masonry

Following are the general types of bricks used in brick masonry

Common Clay Bricks

These bricks are made by baking wet clay in an oven at high heat. They’re strong and tough, so they’re used a lot in building houses, especially where there’s plenty of clay around.

Engineering Bricks

Engineering bricks are super tough and made with the best clay. They’re heated at high temperatures to make them strong and resistant to chemicals and water. They’re used in buildings where strength is crucial.

Fly Ash Bricks

These bricks are a smart way to recycle materials from coal power plants. They mix the leftovers from burning coal with other materials and convert them into bricks. They’re strong and good for the environment.

Concrete Bricks

These bricks are made from sand, cement, water, and big bits of stone. They’re convenient because you can make them right where you need them and change their size to fit different jobs. They’re used for lots of different building projects.

Types of Bond in Brick Masonry

There are numerous types of bonds used in brick masonry. The major types are: 

Stretcher Bond

When you lay bricks so only the long sides show, halfway covering the ones above and below, that’s a stretcher bond. It’s the simplest brick pattern.

Header Bond

In this type of bond, each row of bricks is placed with the short end facing out, which is called a header. You can also call it a heading bond.

English Bond 

The bricks are laid with a mix of long and short sides. Some rows have the short end facing out (header), while others have the long side showing (stretcher). Sometimes, special bricks are placed at the corners to break up the straight lines.

Flemish Bond

This is a unique and eye-catching pattern where each row has a mix of long and short sides showing, like an English bond. But in Flemish bond, each row alternates between headers and stretchers, creating a captivating checkerboard effect that’s sure to impress.

Tools and Materials for Brick Masonry

Effective  brick masonry work needs the right tools and materials. Here’s a list of key tools and materials used in brick masonry:

Tools

  1. Trowel: A flat tool with a point that spreads mortar and shapes joints.
  2. Brick Hammer: Cuts bricks and takes off extra mortar.
  3. Spirit Level: Makes sure bricks are even and straight.
  4. Brick Chisel: Cuts bricks with precision.
  5. Jointing Tool: Smooths and forms mortar joints.
  6. Masonry Saw: Cuts bricks to exact sizes.
  7. Mixing Tools: These include a board or trough to mix and a hoe or shovel to blend mortar.

Materials

  1. Bricks: Available  in different sizes, shapes, and materials such as clay, concrete, and fly ash.
  2. Mortar: A blend of cement, lime, sand, and water that sticks bricks together.
  3. Reinforcement: Steel bars or mesh used in strengthened masonry.
  4. Waterproofing Agents: Help to shield masonry from water seepage.

Brick Masonry Types

The brick masonry types can be divided into mud brickwork and cement brickwork.

Brick Masonry with Mud

Mud/clayey soil has been used as a building material for ages. In mud brick masonry, mud serves as the mortar. Bricks are bonded through a mud mixture, which is more flexible than cement mortar. This particular type of brick masonry offers different benefits, including cost-effectiveness due to its usage of local materials, good insulation against heat, ease of work with and repair, and buildings with natural shine.

Mud brickwork is the cheapest way to build with bricks, but it has some drawbacks. Instead of cement mortar, builders use mud to fill the gaps between the bricks. These mud gaps can only be 12 millimetres wide. Mud brickwork works best for buildings that are no taller than four meters.

Cement Brickwork

As the name suggests, bricks are laid in cement mortar in this case. Cement brickwork can be further subdivided into three categories: first class, second class, and third class.

Brick masonry with cement is the most commonly used type in modern construction. It uses cement mortar as the binding agent to create robust and long-lasting structures. Bricks are arranged in various patterns, like stretcher or header bond, based on the design needs. This brick masonry type provides strong, stable, and durable buildings.

This brick masonry type offers benefits such as high structural strength and durability, resistance to moisture, fire and pests, a wide range of design possibilities, and a modern and clean aesthetic. 

Brick Masonry Techniques

The right methods play a key role in producing high-quality brick masonry work. Here are some basic techniques used in brick masonry:

1. Bricklaying

As for bricklaying, it is a construction process that  involves placing bricks in a specific  pattern with a preset  interlock and joining the adjoining bricks with mortar. The four basic bond patterns are stretcher bond, header bond, English bond, and Flemish bond. All are dissimilar, and every one has its own structural characteristics.

2. Mortar Mixing

The mortar requires the right ratio to set. Normally, it is prepared with a ratio of cement to sand of 1:3 and sufficient water to enable one to work the mix easily. They could also place the lime in order to enable it to be workable and  to retain water.

3. Joints and Jointing

The spaces between bricks need to be even and filled with mortar. A jointing tool smooths and shapes these spaces, making the masonry look better and resist weather more.

4. Curing

Curing keeps the masonry damp for a few days after building to let the mortar harden right. This step helps to prevent cracks and makes the masonry stronger.

Construction Procedure for Brick Masonry

  • First, mix the mortar with water until it’s smooth and easy to work with.
  • Then, spread the smooth mortar evenly along the base-line using a wide tool called a trowel.
  • Next, place the first row of bricks in the mortar. Put mortar on the end of each brick and firmly press it into place so the mortar squeezes out from the sides.
  • Use a level to make sure the row is straight.
  • Add another layer of mortar on top of the first row to start the second row.
  • Start the second row with half bricks to make sure the rows are staggered for stability.
  • Continue adding bricks, making sure to keep them straight and using a level to check at each step.
  • Continue doing this process for every row until you reach the desired height.

How to Improve the Quality of Brick Masonry?

Following are some tips to make your brickwork better:

  • Make sure walls are at a perfect 90-degree angle and avoid gaps between rows of bricks.
  • Fill every vertical joint with mortar during the pointing in construction to keep moisture out and make the structure strong.
  • You must know before plastering that scrape the brick surface 12 mm deep for a smoother finish.
  • Spray a bit of water on the surface before laying new bricks.
  • Keep mortar joints less than 12 mm thick.
  • Build brick structures at a pace of one meter per day.
  • Wait at least seven days for the mortar to fully set before using the brickwork.
  • Over time, brick masonry has improved, making it even more valuable in construction.

Common Problems and Fixes in BrickWork

Even with good planning and execution, brick projects can run into some usual problems. Knowing these issues and how to fix them helps make sure your project turns out well:

1. Salt Stains

Salt stains are the white, powdery stuff you sometimes see on brick surfaces. They happen when salts that can dissolve in water inside the bricks or mortar move to the surface and form crystals as the water dries up.

  • Solution: Make sure to waterproof and drain to reduce  water exposure. Use cement with a low alkali content and clean the surface with a mild acid solution if you see efflorescence.

2. Cracking

Many things can lead to cracks in brick masonry, such as temperature variations causing expansion, settling structures, or improper drying.

  • Solution: Put in expansion joints to handle movement, let bricks dry, and fix any building issues that might put stress on the masonry.

3. Spalling

Spalling happens when the surface of bricks flakes or breaks off. This often occurs because of freeze-thaw cycles or water infiltration.

  • Solution: Pick bricks that don’t absorb much water, treat them to keep water out, and make sure water can drain away from the walls.

4. Poor Bonding

When bricks and mortar don’t adhere well, it can make the whole structure weak and fall apart.

  • Solution: Mix the mortar properly and make sure the bricks are clean and a bit wet before you lay them. Fill the gaps, but don’t use too much mortar.

Conclusion

Brick masonry is a major element in construction, acting as the backbone of numerous structures worldwide. By understanding its types, bonds, and construction procedures, one can get its potential to create robust and visually appealing buildings. With attention to detail and keeping the best practices, brick masonry continues to be refined and perfected, ensuring both longevity and a better outlook in construction projects. As we aim for excellence in brickwork, we honour its legacy while embracing the innovations that move it forward, increasing its indispensable role in the built environment.

What are the Different Types of Rental Properties

0
Rental Properties Image

Sometimes, figuring out how to rent something is hard because there are so many choices. It’s important to know about the different types of rental properties so you can make choices that fit your lifestyle, budget, and goals, whether you’re a first-time renter, a seasoned tenant, or someone who wants to become a real estate investor. In this blog, Brick & Bolt will review all the different types of rental properties, their benefits, and things you should consider in this in-depth guide. By the end, you’ll know everything you need to know to feel confident when renting.

Different Types of Rental Properties

Rental Images

1. Apartments: 

Apartments are the most popular type of rental property because they offer flexible living areas for single people, couples, and small families. Apartments are available for various tastes and prices, from small, cosy studios to large, multi-bedroom homes. If you’re looking to construct apartments in Bangalore, Brick & Bolt, the leading construction company in Bangalore, is here to help you with the best construction quality and on-time delivery.

You can rent the following types of apartments as per your requirements: 

Studio Apartments: These are great for single people or people who like to keep things simple. The living, sleeping, and kitchen areas are all in one open space, which makes them very efficient and inexpensive.

One-Bedroom Apartments: The floor plan design of these apartments has a separate bedroom, a living room, and a kitchen. They offer more privacy and space without raising the price.

Two-Bedroom and Three-Bedroom Apartments: Apartments with two or three bedrooms are great for couples, roommates, or small families needing more space and usefulness.

2. Condos:

Condos(Condominiums) offer a unique mix of homeownership and rental convenience, making them a good choice for people who want the benefits of ownership without the upkeep duties. Condo renters can enjoy amenities like swimming pools, exercise centres, and common areas and the freedom and flexibility of renting.

3. Townhouses or Rowhouses:

Townhouses are an excellent choice between single-family homes and apartments because they offer the privacy of a separate home while promoting a sense of community within a shared complex.  The row house plan design includes private entrances, large living rooms, and often outdoor spaces like patios or porches. They have more than one floor and walls shared with other units in the neighbourhood.

4. Single Family Homes:

As the name suggests, single-family homes are perfect for people who want privacy, room, and freedom. They are ideal for families, professionals, and people who want to feel like they have a place they can call home.

Detached Homes: They are separate from other homes and give their owners full control over the whole house, including the yards, gardens, and roads.

Townhomes: These are built similarly to standard townhouses, but the people who live in them usually own both the house and the land it sits on, which gives them more freedom and control.

5. Multifamily Homes: 

These are homes with two or more different living units on the same property. They are a good choice for investors who want to maximise rental income and diversify their real estate portfolios.

Duplexes: Duplexes have two separate living units with an entrance, living space, and amenities. This makes them a great choice for investors who want to rent out more than one unit to different renters. If you are in Bangalore and want to know more about the construction cost of a duplex home, read our detailed blog on Duplex House Construction Costs in Bangalore.

Triplexes and Fourplexes: These are built similarly to duplexes but have three or four different living units. Smart investors can rent them out for more money..

6. Vacation Rentals: 

Vacation Rentals are an alternative to hotels and resorts that offer travellers temporary places to stay worldwide.

Short-Term Rentals: Short-term rentals are great for weekend getaways, family vacations, or work trips because they offer home comforts with the ease of flexible lease terms and amenities designed to meet traveller’s needs.

7. Student Housing: 

Student housing meets college student’s needs and wants by offering convenient and affordable places to live near school.

Student Apartments: These purpose-built complexes have separate bedrooms within shared living areas. This creates a sense of community while giving students space and privacy.

8. Commercial Rental Properties: 

Businesses that need office, retail, or industrial room to run and grow their businesses can rent commercial rental properties.

Office Space for Rent: Office spaces are great for businesses of all kinds because they give professionals a dedicated workplace with all the necessary services and amenities.

Retail Space for Rent: Retail spaces in high-traffic areas such as shopping centres or downtown districts offer businesses visibility and exposure to potential customers.

Other Types of Rentals

Besides the common types of rental homes we’ve already discussed, you might be interested in a few other types. Some of these are:

Luxury Rental Properties: These are high-end rentals with great features, finishes, and places for picky renters.

Rent-to-Own Properties: This type of agreement allows renters to rent a property with the chance to buy it later, allowing them to become homeowners.

Furnished Rental Properties: Fully furnished rental homes are great for short-term stays or people who don’t have furniture because they have everything they need to feel at home.

Pet-Friendly Rental Properties:  This allows pets, making them perfect for pet owners who want to find a place to live with their furry friends.

Additional Rental Property Considerations

When looking at rental homes, it’s important to consider more than just the type of home. Additionally, here are some more things to think about:

Location: Choosing the right location for your home is crucial. The neighbourhood, proximity to services and ease of getting around can greatly affect your general living experience.

Amenities: When looking at rental properties, consider their amenities, such as laundry rooms, parking, and play areas. Figure out which features fit your lifestyle and tastes.

Lease Terms: Pay close attention to the details of the lease agreement, like the amount of rent, the length of the lease, pet rules, and who is responsible for repairs.

Budget: Make a budget that includes more than just monthly rent. This should include things like gas, parking fees, and repairs.

Benefits of Rental Properties

Rental properties are good for both renters and investors in many ways. Here are a few of the most important pros:

Flexibility: Renting lets people move around freely without worrying about the costs of owning a house.

Lower Maintenance Responsibilities: Renters usually don’t have to do big repairs and maintenance, which saves them time and money.

Access to Desirable Locations: Renting lets people live in desirable areas without the big financial commitment of owning a house.

Diversified Investment Portfolio: Buying rental homes is a good way for investors to diversify their portfolio.

Furthermore, you must carefully consider your needs, tastes, and budget to find the right rental property. If you know about the different types of rental properties, then you can make smart choices that fit your lifestyle and goals, whether you want the ease of an apartment, the privacy of a single-family home, or the investment potential of multi-family properties. Using the tips and things to think about in this guide, you can start looking for a rental property confidently, knowing you have all the information you need to find the perfect place to live.

Boost Your Home Security: The Essential Guide to Safety Grill Installation

0
Safety Grill Installation

Theft is becoming more common in India, putting homeowners under intense pressure to defend their homes from invaders. The windows provide the easiest approach for thieves or burglars to access the home. So, what measures should homeowners take to ensure high-end security? This is where the idea of Safety grill installation plays a role in keeping up with safety without compromising the fine-tuning of the house.

By installing high-quality safety grills, you can increase the safety and ventilation of your home. A security grill on the window, ventilator, and door of the house prevents burglars from entering. No matter what type of windows or frames are used, it is essential to follow best practices for fabricating safety grills for balconies to guarantee that they are properly installed and fabricated.

Here, Brick & Bolt will take you through the proper procedures for installing safety grills and the necessary safety grill precautions to guarantee a smooth installation.

Essential Process to Making Window Safety Grills

Here are easy processes to follow to construct a window safety grill: 

  • First, the window size needs to be measured.
  • In the next step, the window grill’s design, style, and material will be finalized depending on the homeowner’s preferences and requirements. It’s important to choose the right grill design for your home, which gives safety along with the aesthetic appeal of your home.
  • Quotes are provided once the design has been selected.
  • Upon approval of the quotation, the grill fabricator begins construction.
  • Grill fabricators will order raw materials. The raw material quantity is calculated based on the window size and grill quantity, i.e., the number of windows to be covered.
  • Metal is cut, welded, and shaped after receiving the raw material.
  • During the grilling process, an anti-rust solution is applied to prevent rust.
  • Black or desired type of paint is then applied to the grills.
  • After receiving the window grills, they are delivered to the site for installation.

Must Know Precautions to Take for Safety Grill Installation

A poorly constructed grill can negatively impact the look and strength of a window. To fabricate home safety grills, the following precautions must be taken:

1. Fabricate the Window Grills Correctly

Safety grills must be designed according to the size and space of openings, such as windows, vents, and doors. Steel flats or bars should be used according to the rolling mill’s design specifications. One safety-focused Grill fabrication tip is that you must use a cutter instead of a chisel during fabrication to obtain the exact width of each window grill component.

2. Drill Proper Holes in Security Grills

The side components of grills need to be countersunk before welding. The holes should be drilled instead of punched. Make sure the grill corners are at the right angle. A grill should have a straight horizontal and vertical line between all of its parts.

3. Weld Security Grills with Good Quality

Metal arc welding or flash rivet welding should be used to weld the corner. There should not be any touch welding, but the whole welding length should be welded. You should finish all joints with a grinder. No cavity holes must be left after welding. Iron windows should have grills properly welded to their frames.

4. Secure Security Grills with Steel Screws

Stainless steel screws should be used to fix the grills to wooden or aluminium frames. Screw heads should be countersunk without leaving them outside the grills. Drive the screws with a screwdriver rather than a hammer. When the grills are welded to steel/iron windows, they should be spaced 9 inches apart.

5. Use Good Materials for Security Grills

Grills should not contain cracks, surface flows, rough edges, or imperfect materials. The surface should not be rusted, scaled, or pitted. The mechanism must be constructed from steel, whether it is flat, square, or round.

6. Caution when Installing Safety Grills

Security grills must have a distance between their horizontal rods or flats of no more than 3 to 4 inches to prevent hacksaws from cutting the grills easily. When more space is available, intruders can use trained monkeys to steal valuable items.

What are the Benefits of Installing Safety Grills?

Fabrication Process of a Safety Grill

Home and building owners should consider window safety grills an essential addition, offering far more benefits than aesthetics. The sturdy metal structures are often installed over windows to improve security and offer several other benefits. The following are some of the benefits:

1. Security Enhancements

There is no doubt that window safety grills offer a significant boost in security. These additional layers of security make it nearly impossible for unauthorised individuals to gain access through windows, particularly on ground floors or near vulnerable areas. The grills resist damage and tampering, preventing potential intruders from entering.

2. Prevents Accidents

Window safety grills are not just security features. They are also safety features, especially for families with children and pets. Children are prevented from accidentally falling out of windows, which can cause severe injury. Pets cannot escape or fall out, which makes them safe.

3. Free Flow of Air and Ventilation

The modern window safety grill does not compromise ventilation. In addition to allowing proper airflow, it maintains the necessary level of security. Safety grills Fresh air is enjoyed without sacrificing safety, making it ideal for homes with cross-ventilation needs.

4. Deterrence of Pests

Safety grills on windows deter human intruders, rodents, and insects. Covering your windows prevents pests from entering your home and enhances a safe environment.

Conclusion

Installing safety grills is a great way to shape the security of your home. But you need to take safety measures during grill installation on doors and windows, ensuring the perfect installation and Stainless steel fabrication of safety grills. If you are looking to construct a house that brings along safety grills, Brick&Bolt is the ultimate choice to meet your home construction requirements. We adhere to our QASCON standards, ensuring the house’s efficient quality management. 

Our dedicated team of real estate developers builds dream houses that meet your requirements. As the best construction company in Pune, we focus on getting you close to your dream house with security features in place. Contact us today and construct a house that makes a difference. 

10 Essential Tips to Prepare Home for Monsoon and Prevent Damages

0
Home maintenance Image

When the monsoon season starts, it’s nice to get out of the hot summer weather, but it also brings its own problems. Your home can be damaged by heavy rain, strong winds, and high humidity if you are not ready. Forgetting the right steps can cause damage that costs a lot to fix. As a trusted and reputable name in the construction business, Brick & Bolt knows how important it is to keep your property safe during this time. So, we’ve put together these 10 monsoon home care tips to help you prepare your home for the rain and avoid damage.

Monsoon Home CareTips to Prevent Damage

Monsoon care images

The following are the essential monsoon home maintenance tips for your home.

1. Clean and Maintain Gutters and Downspouts

If your gutters and drains are clogged, water can build up and seep into your home foundation, walls, or basement, damaging them and growing mould. It’s important to clean out your gutters and drains of leaves, twigs, and dirt before the monsoon season starts. 

2. Inspect and Repair the Roof

When it rains a lot, a roof that isn’t strong enough can be one of the main places where water damage happens. Look over your roof for signs of damage, like missing or cracked shingles or broken flashing.

3. Seal Cracks and Gaps

Even small holes and cracks in the outside walls, windows, and doors of your home can let water in. Spend some time checking these places out and using good sealer or weatherstripping to close up any holes you find. This easy step can prevent wall seepage and keep it from damaging the inside.

4. Check and Maintain Drainage Systems

Good drainage systems are essential to keeping water away from your home’s base and preventing flooding. Check the outdoor drains, French drains, and catch basins to ensure they are clean and working properly. 

5. Trim Trees and Shrubs

During the rainy season, strong winds can break tree branches, which could hurt your roof, windows, or outside walls. Cut back trees and bushes that have grown too big, and get rid of any dead or falling branches that could damage your home.

6. Keep Your Doors and Windows Safe

Heavy rain and strong winds can damage your home’s windows and doors. Make sure that all of the doors and windows are properly sealed and working well. You might want to install storm shutters or impact-resistant windows to protect your home even more from the weather.

7. Check and Maintain Sump Pumps

If your home has a basement or crawl space foundation, you need to make sure your sump pump works right so water doesn’t build up and cause floods. Before the rainy season, make sure your sump pump works properly by testing it. You might also want to think about getting a backup battery or generator in case the power goes out.

8. Electric Connections

Electrical safety measures are crucial during the monsoon season, as humidity can rise, which makes electrical dangers more likely. Check the electrical links in your home, like the outlets, switches, and circuit breakers, for any damage or corrosion. It’s best to have a professional plumber take care of any problems you find with your home’s electricity to ensure it’s safe and up to code. Electrical connections that aren’t working right or are broken can cause short circuits, fires, or even death by electrocution. It’s important to fix any problems before the rainy season starts.

9. Painting

The monsoon season is sometimes a great time to paint inside because the higher humidity can help the paint stick better and dry faster. But it’s important to ensure your home has good airflow and that any painting on the outside is done before it rains. If you want to paint during the rain, use high-quality paints that won’t peel, bubble, or allow mould to grow. Consider the best type of paint and hire professional painters to ensure a flawless finish and proper surface preparation, especially for exterior painting projects.

10. Create an Emergency Plan

Even if you plan ahead, bad things can still happen during the rainy season. Create an escape plan for your family that includes ways to get out of the house, people to call in case of an emergency, and a safe room in your home in case of bad weather.

If you follow these 10 important monsoon home care tips, you can help keep your home safe from the damage that the rainy season might bring. Remember that prevention is key. Being cautious can save you a lot of trouble and money on repairs in the future.

Brick & Bolt knows how important it is to keep your home safe and secure. Our skilled workers are here to help you with your building and home improvement needs. 

With Brick & Bolt’s help, you can be ready for the rainy season and keep your home safe. Contact us right away to set up a meeting or ask for a quote on your home repair project. 

Unveiling the Power of Pointing: A Guide to Stronger, More Beautiful Construction

0
Types of pointing in construction

Whenever you see walls in any structure, they are commonly made of bricks and stones. But how are they bound together? Mortar, a paste of cement and lime with fine aggregates and water, is the binding material there. Pointing is the process of finishing the mortar joints. Pointing prevents water from entering the brick and stone walls. Pointing also enhances the appearance of the walls. Want to know more about this?

Keep reading to the Brick & Bolt‘s todays blog to learn more about pointing in construction, its purpose, advantages and its types.

What are the Different Types of Pointing in Construction?

Recessed pointing

Pointing in construction has various types for specific requirements. Let’s understand some of the major types of pointing used in masonry

1. Flush Pointing

Flush pointing is the most broadly used and durable type of mortar pointing.  In this technique, the inclined mortar joints are cautiously filled with mortar, and any excess mortar is carefully removed, to giving a smooth and seamless finish. By eradicating spaces that can gather dust or water, flush pointing helps improve the longevity and cleanliness of the structure.

2. Recessed Pointing

Recessed pointing is an attractive type of mortar pointing that involves filling the spaces between bricks with mortar and pressing it slightly inside the wall. This creates a small gap of about 5 mm or more, making the mortar line stand out less. The result looks good because the indented lines add depth and shadows to the wall.

3. Beaded Pointing

Beaded pointing is a method of finishing brickwork by pressing mortar into the gaps between bricks and then creating curved grooves using a concave steel tool. This gives the mortar lines a unique, rounded look, adding an elegant touch to the wall. While it looks great, beaded pointing is more likely to get damaged compared to other methods.

4. Struck Pointing

Struck pointing type involves two steps to get the mortar joint. First, the mortar is stuffed and pressed to be even with the bricks. Then, the top side of the joint is pressed inward, generating a slope of about 10 mm from the bottom corner. This sloped shape helps rainwater drain off quickly, reducing water buildup on the wall.

5. Rubbed, Keyed or Grooved Pointing

Rubbed, keyed, or grooved pointing type is similar to flush pointing. In this technique, the gaps between bricks or stones are filled with mortar and levelled with the wall’s surface. However, what makes this type different is the groove added in the center using a special tool. This groove adds a unique and appealing look to the wall.

6. Tuck Pointing

Tuck pointing is a detailed technique where the gaps between bricks are filled with mortar, and a groove is made in the center. The groove is usually 5 mm wide and 3 mm deep. What makes tuck pointing special is filling this groove with white cement putty, which sticks out about 3 mm. This creates a nice contrast between the mortar and the white wall putty, making the wall look more attractive.

7. V-Pointing

V-pointing starts by filling the gaps between bricks and mortar and making it level with the wall’s surface. What makes V-pointing unique is the V-shaped groove made in the joint using a special V-shaped tool. This groove gives V pointing its name and a distinct look.

8. Weathered Pointing

The weathered pointing type involves pressing mortar into the gaps between bricks and then, while the mortar is still fresh, pressing back the top part of the horizontal joints by 3-6 mm with a pointing tool. This creates a sloping effect from top to bottom, making the edges look weathered or worn down.

What are the Benefits of Pointing in Construction?

Pointing mortar
  • Pointing protects mortar joints from weather and external damage.
  • It seals gaps between bricks to prevent rainwater from causing dampness.
  • Pointing adds strength and stability to the wall.
  • It makes walls look better.
  • Pointing helps prevent shrinkage and cracks in the joints, reducing wall damage.
  • Pointing helps maintain the wall’s thermal properties by insulating gaps.
  • It uses less cement for construction.

What are the Signs of Damaged Pointing?

Generally, mortar requires regular maintenance. Whenever you see the following signs, be ready to start repointing.

Damp Marks on the Wall

If you see damp marks on your walls, it could mean the pointing in the brickwork isn’t good enough. In those cases, water leaks through the wall and leaves marks as it moves down the wall.

Efflorescence

White deposits on bricks indicate water with dissolved salts seeping into the gaps. Eventually, these salts damage the bricks and make them look bad.

Precision is very important during the pointing process. If it’s not done properly, it will require repointing. So be careful of the above damage signs.

In conclusion, pointing is a major part of construction that ensures buildings are strong and look good. Knowing the different types of pointing in masonry, understanding their benefits, and observing for signs of damage will be helpful in protecting buildings and keeping them in good condition for many years.

Read More: Types of Bonds in Brick Masonry