Home Blog Page 7

Floor Screeding – Types, Benefits, and Advanced Techniques

0
Floor Screeding

Whether you’re renovating your home, building your dream office, or preparing a commercial space, you will expect its floor to be an even surface that is not only functional but visually flawless. 

For homeowners and businesses alike, floor screeding is an investment in quality, comfort, and peace of mind. It helps prevent noticeable dips, bumps or sloping areas which make the space uncomfortable to walk on. That’s where floor screeding plays a major role. In this blog, you will get a detailed overview of floor screeding.

What is Floor Screeding?

Floor screeding is the process of applying a screed mixture of cement, sand and water in the subfloor to create a smooth and levelled surface. They are highly durable, having the ability to withstand loads, foot traffic, heating and other impacts. 

In general, screeds are made of cement, sand, and sometimes additives that are mixed with water to achieve applicable consistency. It is widely used in residential, commercial, industrial and renovation purposes.

Types of Floor Screeds

Bonded Screed

Bonded Screed

The bonded screed is directly applied to the solid substrate using a bonding agent (adhesives) to ensure strong bonding. These screeds are usually 15 to 50 mm thick and are crucial in high-load bearing, and high traffic areas, such as driveways, parkways and heating systems with cast-in pipes.

Unbonded Screed

Unbonded Screed

Unbonded screed is applied on top of a damp-proof membrane and is not directly bonded with the substrate to reduce shrinkage and moisture issues. These function the same as bonded screeds but are thicker, exceeding 50 mm.

Floating Screed

Floating Screed

It is applied on top of insulation materials to provide better thermal and acoustic insulation to the structure. For this, the screed layer is usually thicker than the other two screeding types, i.e., around 65 mm. They are ideal for underground hearing systems, where insulation is crucial for energy efficiency.

Heated Screed

Heated Screed

Heated screeds provide good thermal insulation to efficiently transfer heat to the floor surface and are ideal for underfloor heating systems to prevent damage caused by heating pipes.

Materials Used in Floor Screeding

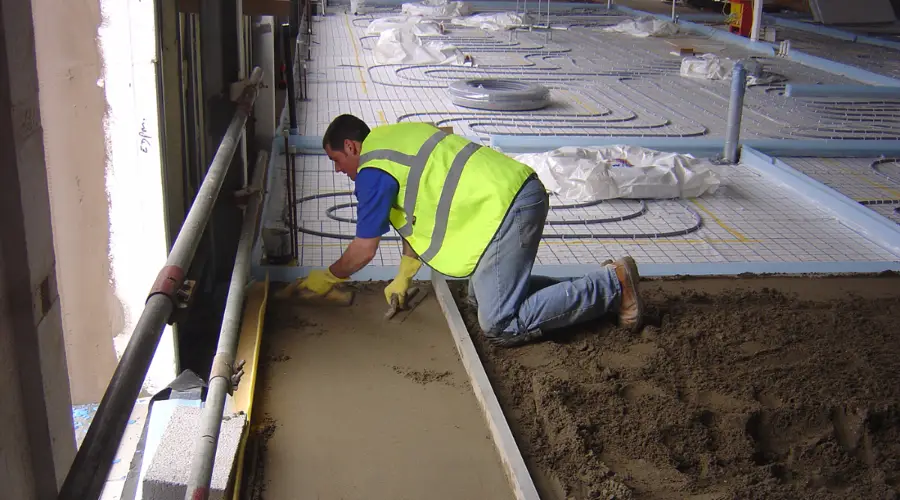
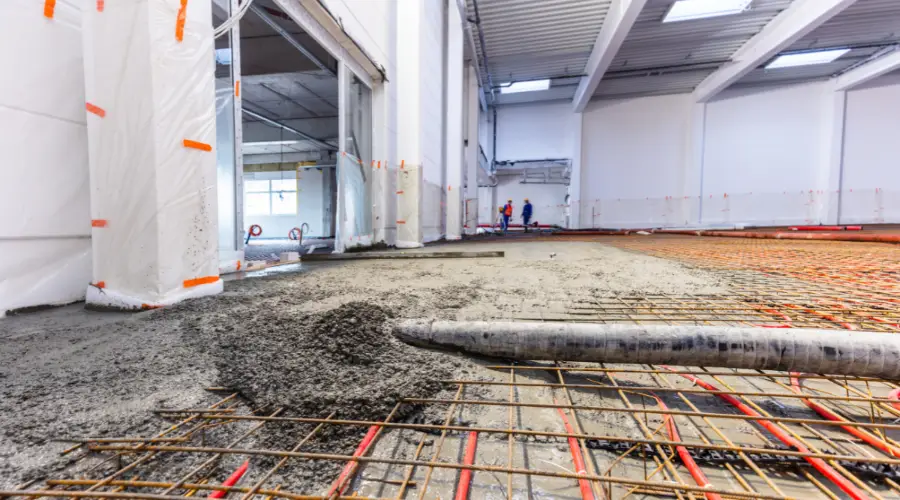
The materials used for screeding include cement, clean and sharp sand, water, and other additives to achieve specific properties. Usually, polymers, metal mesh or glass materials are used to reinforce the floor screedings. These materials are blended adhering to local standards and proportions, based on thickness.

To achieve screeding thicknesses of less than 40 mm, the cement-sand ratio should be either 1:3 or 1:4.5. For more than 40 mm, the cement-sand-coarse aggregate ratio should be 1:1.5:3.

Floor Screeding Process

Preparing the Surface

Inspect the substrate flooring surface to ensure a clean and moisture-free surface. Provide a damp-proof membrane if necessary to prevent the structure from potential moisture damage. After initial inspections, divide the floor into sections using straight timber battens to maintain consistent thickness. In the case of bonded screeds, roughen the concrete surface and coat bonding agents for proper adhesion.
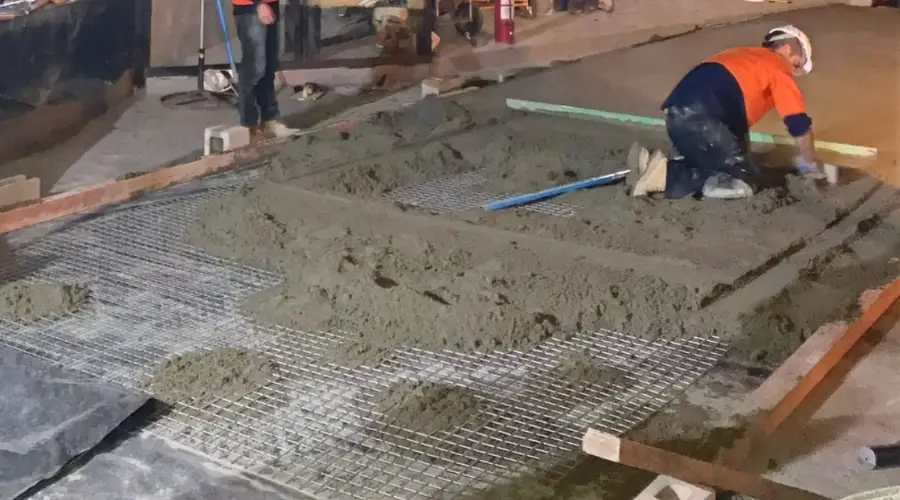
Mixing and Laying

Prepare the screed mix using cement, sharp sand, water and other additives at an appropriate ratio, to bring it to the proper consistency. Pour the screed mixture into small sections and spread it uniformly across the sections using a trowel.

Levelling

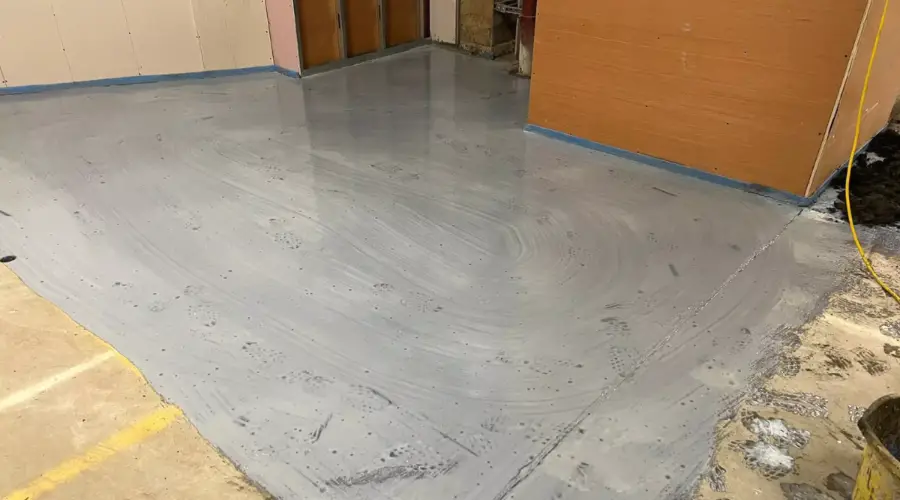
After laying, compact the screed using a screed board or float to remove air pockets and ensure an even finish. After compaction, use a straightedge across the surface of the screed in a sawing motion to make the floor surface achieve a smooth and levelled surface.

Curing

Allow the screed to cure properly by keeping the surface idle and free from heavy loads and traffic to achieve full strength and efficiency. Make sure the surface remains wet for a few days, so that it can gain adequate strength.

Importance of Proper Floor Screeding

  • It is essential to provide a smooth and level base for different flooring types, and effective installation of materials.
  • High-quality screed layers help in the effective distribution of loads uniformly across the surface, and in maintaining the structural integrity of buildings.
  • It plays a major role in underfloor heating systems to conserve energy and reduce heating costs.
  • It acts as a barrier against moisture by protecting the substrate and flooring.
  • Properly screeded floors help in minimising the maintenance cost spent on repairing and replacements.
  • High-quality screeding provides a smooth and flat finish, improving the overall look.

Common Mistakes in Floor Screeding and How to Avoid Them

Insufficient Surface Preparation

Preparing the surface is necessary for any construction process, as it plays a vital role in determining the quality and efficiency of the finished product. Similarly, poor or inadequate surface preparation affects the bonding. This can be addressed by giving additional care for cleaning and removing the impurities from the surface, and repairing cracks using binding materials.

Poor Mixing Ratios

Incorrect or poor mixing ratios of screed could affect its strength, causing damage to the structural integrity. This can be prevented by following the mixing guidelines suggested by the manufacturer or by using pre-mixed screeds.

Poor Application

Poor application of screed could result in uneven surfaces and loose surfaces filled with air pockets. This can be addressed using proper tools and techniques to spread the screed and providing adequate compaction during installation.

Screed Shrinks

Screed layers shrink when they dry and this could cause small cracks within the surface. This can be addressed by adding polypropylene fibres or edging foam to the mix to minimise shrinkage.

Cracks

The development of micro-cracks is one of the most common issues in screeding, which are often caused by a rushed drying process. This can be prevented by keeping the room under stable humidity and temperature conditions throughout the curing process.

Innovations in Floor Screeding

  • Laser Screed Technology uses laser-guided systems to provide precise levelling of concrete that can minimise errors and enhance the quality of the finished product.
  • 3D Printing Technology is used to create intricate and customised design patterns, allowing greater design flexibility and offering unique floor designs.
  • Automated Screeding Robots use advanced sensors and algorithms to automatically spread and level screeds precisely without the need for manual labour.
  • Rapid Drying and Curing Screeds reduce the drying and curing time, thereby improving the construction speed.

Conclusion

Floor screeding is a basic construction practice in providing strong, high-quality, smooth and durable flooring surfaces. Proper screeding prevents the structure from cracking and water penetration, helps in uniform load distribution and provides thermal insulation and longevity of the structure.

FAQs

1. What is the ideal thickness for a floor screed?

In specific, there is no ideal thickness for screeding as it varies based on its type, but it typically ranges from 25 mm to 100 mm.

2. Can I install underfloor heating with any type of screed?

Yes, you can. Underfloor heating can be installed employing any type of screed due to its thermal properties and installation characteristics.

3. What are the signs of a poorly applied screed?

Some common signs of poorly applied screeds are cracking, uneven surfaces, moisture problems, poor bonding with the substrate, and the development of air pockets.

Box Crib – A Comprehensive Guide to Construction

0
box crib

It is mandatory for any building to have the necessary support and stability to withstand loads, without causing any damage to the structure. If the structure requires additional support to carry the loads, providing permanent support or reinforcement can be costly. That’s where the box crib plays a crucial role. The strategic installation of box cribbing can provide temporary support to the structure at an economical cost and is versatile for different purposes. This blog explores box cribs and its versatility in various applications.

What is a Box Crib?

Box crib or cribbing in construction refers to the process of providing a temporary wooden structure that is specially designed to support structures. It helps withstand heavy loads and uniform distribution of loads. It prevents a structure from shifting, tilting or collapsing during construction and enhances its durability.

Components of a Box Crib

Cribbing Blocks

Wooden cribbling that is made of timber, oak, hardwood or engineered wood is the primary component of a box crib. These cribs are boxy in shape with the number of members in each layer varying from 4×4, 6×6, or 8×8 based on the load-bearing requirements. These blocks are stacked in a crossing pattern to form a stable structure.

Wedges

Cribbing wedges are used to adjust the height of the box crib, and level the surface to provide adequate support to the load-bearing structure.

Interlocks

Interlocks are the pattern in which the blocks are arranged in each layer, to increase the stability and load distribution. There are two common types of interlocking patterns in box cribs— straight crib (linear pattern), and angled crib (45-degree angle).

Shims

It is a thin piece of wood, metal, or plastic that is typically placed between the layers of blocks to adjust the height of the cribbing structure, to prevent shifting and enhance stability.

Applications of Box Cribs in Construction

  • Box cribs are most commonly used for stabilising heavy machinery, such as cranes, excavators or loaders, to provide necessary support and prevent shifting during operation or maintenance.
  • It provides necessary temporary support to structures, especially while undergoing maintenance works such as repairs, innovations, and modifications.
  • They are also used in stabilising vehicles when they are caught in accidents and emergencies to stop further rollovers or movements, especially in slopy areas.
  • It is also used in the trench shoring process to prevent the collapsing of soil and improve worker safety.
  • They are used as bridging components during construction and maintenance to ensure stability and safety.
  • They are used in marine construction projects to stabilise docks, piers and offshore platforms to resist the forces of water and waves. 
  • They are crucial in mining and excavation operations to provide adequate support for tunnels and underground structures.

Types of Box Cribs

Vertical Cribbing

Vertical cribbing is the process of stacking box cribs vertically to create a stable structure to withstand heavy loads and provide structural stability.

Horizontal Cribbing

As the name suggests, the cribbing blocks are arranged in a horizontal pattern, parallel to each other and help in the uniform distribution of loads.

Box Cribbing

Box cribbing is the process of arranging cribbing blocks in a box-like structure to provide high stability and load-bearing capacity.

Pyramid Cribbing

Pyramid cribbing involves arranging the blocks in the shape of pyramids to provide stable support to the load-bearing structure and help in distributing the loads efficiently.

How to Construct a Box Crib?

  • The first step in constructing a box crib is selecting a suitable area for installing – this area must be strong enough to withstand load without causing shifting.
  • The chosen area should be completely clean to ensure a secure and stable foundation.
  • Start laying the first course of blocks on the ground horizontally in a straight line, and closer to each block.
  • Level the blocks using shims or wedges, to adjust the height of the blocks.
  • After installing the first layer, lay the second layer of blocks in a crisscross pattern (perpendicular pattern), by closely interlocking the blocks.
  • Use shims or wedges, wherever necessary to adjust the blocks, and complete placing the blocks, until they achieve the desired height.
  • After laying, place the object or structure to be supported onto the cribbing structure and monitor whether the loads are distributed evenly.

Advantages and Disadvantages of Box Cribs

Advantages

  • They provide adequate support and stability and prevent the structure from potential accidents, collapsing and structural failures.
  • They have versatile usages in the construction industry and can be customised based on the application process.
  • Using box cribbing is a cost-effective solution when compared to other permanent structural modifications or reinforcements.
  • Box cribs are used for temporary applications and can be removed or modified based on the needs.

Disadvantages

  • Cribbing requires skilled and experienced professionals, as assessing the loads, soil conditions and other factors that influence the efficiency of cribs is crucial.
  • Box cribs require proper load distribution to avoid overloading and ensure uniform weight distribution.
  • Structures that use cribbing should be regularly monitored to ensure that they are free from potential risks such as deterioration, shifting, or settlement.

Safety Considerations of Using Box Cribs

Professional Assessment

Installation and maintenance of box cribbing should be taken under the guidance of experienced professionals, as assessing the loads, soil conditions and other affecting factors is crucial.

Load Distribution

The area chosen for the installation of cribbing should be strong enough to withstand loads, in order to avoid overloading or uneven distribution of loads.

Regular Inspection

Regular monitoring of cribbing structures is essential to check signs of deterioration, shifting, or settlement, at the earlier stages, to prevent further damage.

Proper Clearance

The cribbing should provide enough clearance to help labourers and equipment to operate safely, without causing any hindrance.

Conclusion

In summary, cribbing is an efficient technique in construction that provides necessary strength, support, and stability in various construction activities. They provide temporary support to the structure and are more economical than other permanent reinforcements. Although they are efficient, they require regular maintenance and skilled labourers for installation.

Ceiling Joist – Common Issues and Maintenance Tips

0
Ceiling Joist

Building construction involves traditional methods that are effective and have been made safer by engineering, contemporary technology, and building rules. While walls bear the weight of the roof and floors and convey it to the foundation, foundations support the entire structure. The entire area is covered by the roof, which also blocks out adverse weather. In a building, ceiling joists are an essential component that work together to hold the walls and roof together and prevent collapse.

Let’s discuss the role of ceiling joists in the construction of a building along with other components in detail.

What is a Ceiling Joist?

The horizontal elements, or ceiling joists, run parallel to the rafters and provide support to the building structure. They maintain everything in its place through the distribution of the roof’s weight onto the walls and prevent the walls from spreading outward. They usually stretch from one outer support wall to another and also may be supported by internal walls, columns or beams. Beyond their structural role, ceiling joists contribute to the look of your space, as they create the base of your ceiling and add a subtle aesthetic touch.

How do they look?

Ceiling joists are typically hidden by the finished ceiling but can be left exposed for style. They are similar to stud wall framing, placed horizontally across the tops of the walls. These joists run parallel to each other and the rafters above. They stretch across the space between the walls and are secured to the top plates, helping to keep the walls upright and transfer the weight of the roof. Ceiling joists also support the ceiling material, which can be one long board or several shorter pieces joined together to span the distance between the walls.

In addition to maintaining the walls’ stability, ceiling joists also connect the rafters, preventing them from spreading apart or collapsing under the roof’s weight.

Purpose of Ceiling Joists

Ceiling joists in homes help keep the roof stable by connecting the sloping rafters at the base and stopping them from spreading outward. This prevents the roof from sagging under loading.

They are attached to the walls and rafters, keeping everything secure and in place. Sometimes, builders use pre-made triangular frames called trusses, which combine rafters and joists. These are faster to install, more accurate, and can save money.

Ceiling joists have different jobs—they might just hold up the ceiling, support light attic storage, or even create space for an attic room. The rules for building them depend on their purpose. While floor joists also hold up ceilings, ceiling joists are mainly there to stabilise the roof.

Materials Used for Ceiling Joists

Structural elements called ceiling joists are usually composed of lightweight, easily worked-with softwoods like pine. However, depending on the needs of the building, they can also be built with stronger materials like metal, reinforced concrete, or engineered wood—a combination of wood and adhesives for increased strength. Most modern joists are 2’×4’ or 2’×6’ in size, but they can be bigger or smaller depending on their purpose, their effective span or their age. Exposed joists, often used for decoration, are usually larger and made from high-quality wood types like oak, maple, cedar, or pine. These may be rough-cut or finished smoothly to look polished.

Types of Ceiling Joists

There are two types of ceiling joists available: hidden and exposed. Each does their work as their name implies. Let us see their purpose as discussed here:

Exposed Ceiling Joists

Exposed Ceiling Joists

Exposed ceiling joists give a rustic, industrial, or historical look to a space. They’re commonly seen in renovated warehouses, old buildings, or some modern designs, offering a unique, open vibe.

However, the open structure can let dust, dirt, and insects fall into the voids. The rough, unfinished wood can also collect dust. Painting or sealing the wood can be tricky, though modern spray systems help. Another drawback is the potential for sound echoes, making it less ideal for some spaces despite the aesthetic appeal.

Hidden Ceiling Joists

Hidden Ceiling Joists

Hidden ceiling joists are covered with materials like drywall, plaster, or wood to create a smooth, uniform ceiling finish. The covering hides wires, insulation, and plumbing, making painting easier and keeping dust and bugs out. For those who like the exposed look, faux beams or joists can be added to give the best of both styles.

How to Find a Ceiling Joist?

To find ceiling joists, look up. If they are exposed, they’re easy to spot. If hidden, there are a few methods to locate them. Even though overlapping joists might not line up exactly, you can see their position and spacing by climbing into the attic with a torch and tape measure.

Gather a pencil, tape measure, and step ladder if you don’t want to enter the attic. Listen for the sound while standing on the ladder and tapping along the ceiling. Hollow spots indicate spaces between joists, while solid sounds mean you’ve found a joist. Tapping near light fixtures can also help locate the joist they are attached to.

For more accuracy, measure 12 inches over and tap again. If the sound is still hollow, try 16 inches, then 18 inches, and 24 inches. Insulation can make tapping harder to hear. If tapping doesn’t work, you can try using a stud finder or magnet.

With a Stud Finder

You can rent, buy, or borrow a good-quality stud finder or use an app to help locate ceiling joists. A reliable stud finder can tell the difference between insulation and framing. Use a step ladder to move the stud finder across the ceiling. Once it shows a joist, confirm its location by tapping a finishing nail into the ceiling.

With Magnets

A strong magnet can help you find the screw or nail heads that hold the drywall in place. Stand on a ladder, starting from a wall or corner, and slowly move the magnet across the ceiling to locate the joists.

Common Issues with Ceiling Joists

Sagging or Bowing

Due to excess weight or structural stress, ceiling joists may eventually begin to sag or bow. If left unchecked, this may result in uneven ceilings or even collapse.

Rot and Insect Infestation

Termites can cause significant damage quickly. Proactive measures and early treatment are key to preventing further infestations. Leaks in the roof or roof cavity can lead to decaying joists, weakening the structure and possibly causing a collapse over time. 

Maintenance and Inspection Tips

  • Check your ceiling joists frequently for deterioration, bowing, or sagging.
  • Look for any indications of moisture or water leaks, as they could cause rot.
  • Schedule pest control services if you’ve had termite issues before. 
  • Ensure proper ventilation to prevent moisture buildup. 
  • Seek expert help to fix any identified problems.

Conclusion

The purpose of ceiling joists is both practical and decorative. In order to prevent rafters from spreading and risking structural failure and collapse, they are usually horizontal structural components that provide stability.

To keep walls level and stop them from slanting in or out, they attach to the top plates of both exterior and interior walls. They also supply the framework that ceiling materials can be attached to. Thus, they are important structural elements, especially in buildings with sloping roofs.

Weep Holes – Essential Guide for Construction

0
Weep Holes

Have you ever seen small openings within your home’s wall, and wondered, why these holes are kept on the wall? Those openings are called weep holes and play a major role in protecting the structural integrity of a building. This blog will explore weep holes, its types, importance, design, installation and everything else you need to know about weep holes.

What are Weep Holes?

Weep holes are small openings in the building that allow water to drain from the structure. It is typically used to prevent the collection of water, improve ventilation, and reduce hydrostatic pressure within the structure. They are most commonly found in masonry walls, cavity walls, window frames, retaining walls and places near foundations.

Importance of Weep Holes in Construction

Water Drainage

Water Drainage

The primary function of providing weep holes is to drain water from the internal structure. When moisture deposits or infiltrates a wall, it causes various structural issues, such as material degradation, mould growth and structural failure.

Ventilation

Weep holes provide good ventilation within walls by drying out any trapped moisture, reducing the risk of moulds and decay. This helps in keeping the indoor atmosphere healthy and increasing the resistance of building  materials.

Preventing Structural Damage

Effectively managing and mitigating the moisture levels using weep holes prevents the structure from water-related damages such as damping and structural damage.

Temperature Regulation

The weep holes allow air to pass through the structure, helping to regulate indoor temperatures and keeping the structure pleasant under different environmental conditions.

Protection Against Pests and Embers

Weep holes, along with screens and barriers, prevent insects, pests and embers that are attracted to moisture from entering the structure. They are highly used in bushy and fire-prone areas where insects may enter.

Types of Weep Holes

Open Head Joint Weep Holes

The open-head joint is the most common type of weep hole that is formed by scraping the vertical joints of the bricks or other masonry units. These weep holes are generally spaced at 21 inches intervals, and are effective in draining water from the wall joints. Open head joint weep holes usually include plastic weep vents to prevent rain and insects from entering the building

Cotton Rope Wicking Weep Holes

It is a type of weep hole that is formed using cotton ropes, usually 12 inches in length. In this type, one rope is placed at the joint and the other end extends to the cavity wall and the water is absorbed from one end of the rope and evaporates on the other end. This method is very efficient, however is time-consuming.

Tubes Weep Holes

A pipe is installed at a slight angle to drain the water through it, from the bottom of the mortar joints. Plastic pipes or clay pipes are used for draining and are suitable for in-situ concrete walls and thick masonry walls.

Corrugated Channel Weep Holes

Corrugated draining holes are placed at the bottom of the mortar bedding joint using technology, and are effectively used to quickly drain the water through numerous channels.

Common Locations and Applications of Weep Holes

  • It is most commonly used in cavity walls at the base of the outer layer, above the flashing.
  • It is used in retaining walls to incorporate a drainage system behind the wall.
  • It can be visible in window and door frames, to discharge water from the internal structure.
  • It can also be used at the base of the foundation wall, which is generally not seen.

Design Considerations

Placement and Spacing

Weep holes are usually located at the bottom of the wall, and placed at regular intervals of 30 to 90 centimeters. In brick veneer walls, the holes are placed at the bottom of the wall, and for retaining walls, they are placed at 4-foot intervals.

Size and Shape

The weep holes usually range from 0.635 – 1.27 centimetres in diameter. For retaining walls, the diameter of the weep holes varies from 3 to 10 centimetres. They are usually circular with elongated openings. However, the soil type and water volume play an important role in determining the size and shape of the weep holes.

Materials Used

Numerous materials are used for providing weep holes in construction including brick, stone, plastic, clay pipes and more, depending on the type of walls.

Installation Practices

  • Weep holes are installed at the lowest points of the wall with spacing between 30 to 60 centimeters along the wall.
  • Ensure that the surface is clean and free from any sort of dust, debris and cavities before installing weep holes.
  • Install the type of weep holes, based on the design requirements. Each hole type has its unique characteristics and is useful for different construction types.
  • After installing the weep holes, an inspection needs to be done to identify that they are properly placed, sized, and free from any sort of obstruction.

Maintenance and Inspection

  • Weep holes require frequent maintenance at least once a year, especially in the rainy season.
  • Gentle cleaning can be done with a small brush, compressed air, or a gentle stream of water.
  • It is important to keep the places around the weep holes free from all sorts of impurities, obstructions and vegetation.
  • Proper landscaping and limiting water usage will reduce the risk of pest attacks.

Common Misconceptions

Myth: Weepholes are used only for aesthetic purposes

  • Fact: Weepholes are crucial in preventing water damage and structural problems.

Myth: Weepholes are only utilised in certain climatic conditions

  • Fact: Weep holes protect the structure from water and moisture damage, and are suitable for all climatic conditions.

Myth: Weep holes are only suitable for masonry walls

  • Fact: They are suitable for brick veneer walls, retaining walls, foundations, windows, and door frames.

What To Do If Your Home Doesn’t Have Weep Holes?

If your home is built without any weep holes, you can consult an experienced professional to identify the risks of water damage and the necessity of weep holes. If possible drill small holes or remove mortar joints to create weep holes.

It is essential to ensure that the water drainage around the foundation is effective and seepage doesn’t affect the structure. In case of water risks, a waterproofing membrane on the exterior walls can be used to prevent water ingress.

Conclusion

Weepholes are small but essential components in construction and protect the structure from potential water damage, ensuring structural integrity. Proper planning and choosing the right weephole techniques can mitigate the water damage risks of the building.

Rafters in Construction – Types, Materials & Benefits

0
Rafters

Rafters are primarily used to support the roof and appropriately distribute its weight throughout the building. By doing this, the roof is kept safe and sturdy and won’t sag or collapse under stress. They also help align the structure and create a strong and durable roofing system.

But do you know why rafters are so crucial in construction? Furthermore, a possible rafter system ensures that the roof is waterproof and receives sufficient support. An effective rafter system involves distributing the weight of the structure evenly and supporting the wall of the structure. In further reading, you will understand the significance of rafters, covering their varieties, composition, advantages, and factors to take into account when choosing the right rafters for your construction projects.  

What are Rafters?

Rafters are sloping beams used in buildings to make up the roof framework. They are typically set in succession from the ridge board, which forms the top of the roof to the eaves. The rafter is a key structural support for the roof and provides the foundation to attach roof coverings like metal sheets, tiles, or shingles.

Rafters are essentially in charge of forming the roof’s pitch and shape, which allows it to endure a range of weather conditions. Usually, pairs of rafters are fitted with other roofing components to create a triangle or an inverted “V.” Because of its strength and stability, this design enables the roof to support heavy weights and withstand wind and gravity.

Types of Rafters

In roof building, rafters come in a variety of forms, each intended for a particular usage and roof design. Builders and homeowners can select the best alternative for their construction needs by being aware of the many varieties. The primary varieties of rafters consist of:

Common Rafters

The majority of roofs are constructed with common rafters. They link the roof’s ridge to the eaves. Supporting and distributing the weight of the roof uniformly across the walls is their responsibility. These rafters serve as a platform for connecting roofing materials and are often uniformly spaced.

Hip Rafters

Hip rafters are used in hip roofs, which have all sides sloping downward towards the walls. The “hips” of the roof are formed by these rafters, which extend diagonally from the corners to the ridge. For roofs with several slopes or angles, hip rafters are crucial for strength and stability. Hip rafters help transmit the weight of the roof to the walls and provide additional support, particularly at the corners. The pitch of the roof is used to calculate the length of the hip rafters.

Valley Rafters

Valley Rafters

Valley rafters are diagonal rafters found in roofs with valleys when two parts of the roof intersect at an angle. They offer stability and guarantee a seamless transition between roof parts as they extend from the ridge board to the valley’s lower end. Similar to hip rafters, valley rafters need to be measured precisely because their length is determined by the pitch of the roof and the angle of the valley.

Principal Rafters

In big roof systems, principal rafters serve as the primary support rafters. Usually employed with purlins or other support beams in large buildings or conventional timber framing, they are stronger and heavier than ordinary rafters.

The stability of the building is maintained by the distinct functions of common, hip, and valley rafters in sustaining and distributing the weight of the roof. When building or repairing roofs, builders and homeowners can make better decisions if they are aware of these various rafter kinds.

Materials Used for Rafters

Depending on the needs, financial constraints, and architectural style of the project, rafter construction typically involves the use of steel, wood, or engineered materials. Every material has unique benefits and things to consider as follows:

Timber Rafters

Timber Rafters

As it is readily available, convenient to utilise, and reasonably priced, timber is the conventional material for rafters. Most residential roofs use softwood rafters like pine or fir, which are versatile and customisable on-site.

Benefits:

  • Simple to work with
  • Easily accessible
  • Reasonably priced

Drawbacks:

  • Without proper treatment, it can decay or get damaged by insects and moisture.
  • Reduced ability to support loads in comparison to steel or engineered materials.

Steel Rafters

Steel Rafters

Steel rafters are frequently used in modern residences that need stronger, more resilient roofing systems, as well as in commercial and industrial buildings. Steel rafters are resistant to fire, insects, and moisture while offering a higher load-bearing capacity.

Benefits:

  • Robust and long-lasting
  • Pest and fire-resistant
  • Ideal for extended distances

Drawbacks:

  • More costly than wood.
  • Need specific equipment and knowledge to install.

Advantages of Using Rafters

Rafters offer numerous benefits when used in the construction of a structure, which are as follows:

Design Flexibility

From conventional gable roofs to more intricate hip and valley roofs, rafter designs can be altered to fit a variety of roof types. Rafters provide the flexibility required to design a roof that satisfies both functional and aesthetic criteria, whether you’re building a modern business space or a traditional home.

Open Ceiling Space

By leaving the structural beams exposed rather than being hidden by plasterboard or ceiling panels, an open ceiling area with exposed rafters produces a chic, spacious appearance. Lofts, contemporary residences, and industrial-style structures frequently use this design to draw attention to architectural features and create an air of openness. In addition to adding visual appeal by giving a space a rustic, industrial, or modern character, exposed rafters help raise the ceiling, giving the impression that the space is larger.

Factors to Consider When Choosing Rafters

When planning and evaluating roof rafters for structural projects involving homes and small businesses, it is crucial to follow the guidelines set out by the International Building Code 2021.

Here are some useful guidelines for rafter analysis and design:

Structural Load Requirements

Calculate the necessary rafter spacing and size based on the expected roof loads, including dead loads (roofing material, insulation) and live loads (snow, wind).  Choose a suitable material (wood, steel, or cold-formed steel) depending on the required strength, load-bearing capacity, and structural specifications, taking into account the rafters’ span. 

Ensure adequate load transfer between the rafters and other structural components, including the correct connections, such as hangers or brackets. Adhere to the building code’s fastening and bracing specifications for maximum structural stability and resistance to lateral forces.

Cost Implications

Compared to prefabricated alternatives like trusses, a rafter building frequently necessitates precise on-site work, which raises labour costs. The cost of materials can increase much more when premium wood is used. Although steel rafters are initially more costly than timber, they have long-term advantages such as durability, ease of maintenance, and speedier construction. In many projects, these benefits might result in labour savings and reduced overall costs.

Durability and Maintenance

Both rafters provide long-lasting structural integrity when properly cared for. Particularly in older homes, rafter maintenance and inspections may need to be done more frequently. Steel rafters often require less maintenance and are less prone to warping or moving because they are prefabricated and designed for strength.

Conclusion

Rafters are the fundamental component of a roof, shaping the pitch, distributing the weight uniformly throughout the structure and providing necessary support. Builders and homeowners can make well-considered decisions that satisfy their needs by being aware of the various rafter types, materials, and design concerns. 

Traditional rafters are still a timeless option that adds strength, longevity, and a touch of aesthetic charm to any home, even if steel rafters are frequently used in modern construction for efficiency. Rafts add functionality and aesthetic appeal to the roof above your head, whether you’re building from scratch or remodelling.

Racking in Construction – A Comprehensive Guide

0
Racking

Racking is a crucial factor in construction that affects the integrity of the structure by causing instability, damage, or even collapse. This negative factor is prone to high-rise buildings and seismic areas. It is crucial to understand the causes and preventive measures to ensure the safety and longevity of the buildings. This blog will help in understanding the detailed overview of racking, the importance of racking resistance, and the prevention methods.

What is Racking?

Racking in construction refers to the lateral movement or swaying of a structure when subjected to external forces such as wind and other seismic activities. It is a serious issue that could result in instability, damage, and even the collapse of structures. It is generally used in advanced construction work to ensure the structural integrity and safety of a building and its occupants.

What are the Benefits of Racking Resistance?

Racking resistance provides numerous benefits to the structure, such as enhancing its durability and resistance against external lateral and seismic forces. Its stability and durability help reduce the potential chances of collapse and ensure the safety of occupants. 

Structures with racking resistance installed require minimal maintenance, reducing the maintenance cost and thereby increasing the lifespan. The improved safety features also help in increasing the property values.

Factors Affecting Racking Resistance

Building Design

Building Design

Building design plays a major role in determining racking. Features such as layout, height, and overall geometry of the building influence the resistance against racking. Taller buildings with irregular shapes are prone to racking compared to well-designed structures that have good resistance against structural stability.

Material Selection

The choice of construction materials and their quality can have a significant impact on racking resistance. Materials of high quality with appropriate strength provide the necessary load-bearing capacity. The density and quality play a critical role in ensuring the durability of the structure under stress.

Foundation Type

The type of foundation used for the construction could influence the stability of the building against lateral forces. Foundations that are strong and well-anchored improve the overall stability and help in the effective distribution of loads. A stable foundation reduces the risk of structural failure, protecting the structure against external seismic forces.

Environmental Conditions

Environmental conditions such as geographical location, seismic activity, and wind and snow loads can influence racking. Buildings located in seismic zones are more prone to racking due to earthquakes based on the magnitude and frequency. 

Load Characteristics

Loads are a major factor that influences the racking resistance of the building. Loads caused by the wind, machinery vibrations, live loads, thermal movements, and other external forces can cause lateral movement of the structure, affecting its integrity.

Methods to Prevent and Mitigate Racking

Prevention

  • Providing lateral stability using bracing systems (diagonal bracing, shear walls, or moment frames) is crucial to withstand external lateral loads. 
  • Selecting structural members of appropriate size and strength ensures that they can withstand impending loads without causing deformation.
  • Designing a structure to help uniformly distribute loads can prevent the risk of racking.
  • Proper installation of the bracing systems can provide necessary support to the existing structure.
  • Using high-quality materials provides the necessary strength and durability of the structure.
  • Regular inspection and maintenance during construction can help identify and prevent potential risks.

Mitigation

Identifying and addressing racking is crucial in mitigating the damages and preventing further problems. Cracking in walls/floors, poor closing of doors and windows, uneven settling, and visible deformation of structural members are some of the early visible signs of racking. Inspecting these signs early and providing appropriate remedial actions through bracing, reinforcement, or partial replacement could fix this problem.

Challenges in Racking Mitigation

  • Providing racking mitigation can be time-consuming and requires intensive labour to install braces/racking shores.
  • It requires careful calculations to determine the proper size and spacing to reduce the risk of misalignment and further deterioration.
  • In small and complex spaces, the installation of reinforcement could be more challenging.
  • Providing the racking resistance is temporary and cannot be a suitable solution for long-term or permanent structures.
  • In the case of extreme environmental conditions, the systems are vulnerable to failure or damage.

Racking Solutions in Construction

Shear Walls

Shear walls are vertical, load-bearing walls that act as a rigid barrier and help in transferring lateral loads to the foundation, preventing racking. These walls are generally used in tall and multi-story buildings, especially in high-wind areas.

Bracing Systems

Providing diagonal braces in the shape of an “X”, made of steel or timber between the beams and columns, provides stability against lateral forces and helps in uniform distribution of forces. These bracing systems are generally used in industrial buildings and in seismic areas.

Diaphragms

Diaphragms are horizontal elements that act like large decks to distribute lateral forces to vertical elements such as shear walls or braces. This approach is widely used in both residential and commercial buildings to enhance resistance against racking.

Moment-Resisting Frames

It is a framing structure that consists of beams and columns that are connected rigidly to resist the bending and rotational forces caused by lateral movements. These moment-resisting frames are flexible, yet strong enough to withstand forces. These frames are generally used in tall buildings, where aesthetic importance is crucial.

Conclusion

In summary, racking in construction is a serious issue that needs to be inspected and addressed at the earliest stage to prevent costly damages. By understanding the preventive measures and racking resistance, this crucial issue can be reduced or eliminated. It is always necessary to consult an experienced structural engineer to prevent and mitigate concerning structural issues. 

Concurrent Delay – Legal Impact & Mitigation in Construction

0
Concurrent Delay

Concurrent delays are a complex legal issue that plays a significant role in negatively affecting the overall completion of the project. It affects the cost, project completion time, disruption of business operations, and affecting the recognition of the project and stakeholders involved. This blog will help in understanding the legal perspectives, their impact, mitigation strategies, and other necessary information about concurrent delay.

Concurrent Delay

Concurrent delay in construction refers to two or more delays occurring at the same time, which affect the overall construction process and completion date. The delays may be independent, overlapping, or difficult to isolate due to both internal and external factors. These delays are quite common; however, they could lead to disputes between contractors, owners, and stakeholders of the project.

Legal Perspectives on Concurrent Delay

Extension of Time

If the concurrent delay is caused by the contractor, the courts generally entitle the contractor to an extension of time for the entire duration of the delay without any monetary compensation.

Responsibility for Cost Overruns

The court will analyse the costs stem, and whether the delay caused any cost overruns. If the analysis proves the contractor is the cause of the overrun, he will be required to take responsibility for those cost overruns.

Compensation for Delays

Indian courts, in some cases, grant time extensions and also charge compensation when the delays are solely attributable to the employer. This occurs when there is an imbalance of bargaining power between the parties.

Exclusion of Liquidated Damages

If the delay is caused by concurrent events, where contractors are not responsible, the liquidated damages may be excluded. 

Analysing Concurrent Delays

Critical Path Method (CPM)

Critical Path Method (CPM) is a powerful project management tool that is used to schedule, manage, and analyse the timing and sequence of the tasks. It will help to understand and identify the concurrent delays and their impact on the overall completion. It is easy to interpret the dependencies, how different delays coincide, and how they affect the overall project efficiency.

Contemporaneous Analysis

Performing contemporaneous analysis will help in evaluating the project schedules and identifying the real-time data rather than relying on retrospective assessments. The real-time analysis helps in identifying how the delays affect project timelines and enables stakeholders to make informed decisions related to extensions and damages.

But-For Test

The but-for test is an important method in determining the context of concurrent delays in construction. It provides detailed information about the delays and their impact on the completion of the overall project. It helps in clarifying entitlements to extensions of time and compensation.

Impact on Project Outcomes

Project Delays

Project Delays

The most unavoidable impact caused by concurrent delays is delaying the scheduled sequence of activities. This could lead to inefficiency and an increase in the project duration for a longer time than originally planned.

Financial Implications

Concurrent delays could lead to numerous financial risk in terms of ongoing labour, equipment, and material costs. If the contractor is responsible for liquidated damages, he might be liable to pay penalties to the owner. If the delayed claims reach legal proceedings, the legal costs could also have a significant impact, increasing the project expenses. 

Disruption of Business Operations

In some cases, the delayed completion of the project could affect business operations leading to a loss of revenue, loss of customers or tenants, and overall decline in the reputation of the project. This could affect both the owner and the contractor, leading to disruption in future collaborations.

Legal Disputes

The occurrence of concurrent delays could lead to potential disputes between contractors and owners. The legal disputes could involve determining the responsibilities, lengthy legal battles, and increasing the costs.

Strategies to Manage and Mitigate Concurrent Delays

Proactive Risk Management

Conducting a comprehensive risk assessment plan, concurrent delays can be mitigated in the early stages. Mitigation plans such as allocating time and resources in the project schedule to balance the potential delays should be explored. Exploring alternative suppliers or subcontractors for efficient material and equipment supply and planning transparent communication protocols with the stakeholders for timely completion and notification of potential delays are also essential.

Effective Communication

Maintaining open and consistent communication among all the stakeholders through regular project meetings for early notification of delays and encouraging collaborative problem-solving will help in addressing potential challenges and providing mutually beneficial solutions.

Detailed Documentation

Maintaining detailed records for all the project-related activities, delays, and communications, with supporting evidence, is essential. Keeping a record of daily logs such as delays, weather conditions, and changes in schedules can help in identifying the reason and stakeholder responsible.

Contractual Provisions

Clearly defining the concurrent delay clauses and how they will be handled in the contract is vital. The contract can include provisions for time extensions, financial penalties, apportionment of responsibilities, and an early dispute resolution mechanism.

Utilising Technology

Using modern technologies such as scheduling software and document management systems can help in tracking progress, identifying potential delays, maintaining project documents, and simulating the impact of different scenarios.

Expert Assistance

If there are any complex issues regarding the concurrent delay, consulting expert construction professionals such as project managers and attorneys provide effective guidance and mitigation advice.

Conclusion

In summary, concurrent delay is a major challenge in the construction process, that is caused by multiple delaying events occurring simultaneously. It is crucial to identify the reason behind the delays and the stakeholders responsible for it, making it complex. It affects the overall effectiveness of the project and could lead to disputes, costly penalties, and spoiling the reputation. However, using proper strategies and analysing techniques can help to manage and mitigate the risks involved.

Glass Railing Design for Balcony – Trendy & Stylish Choice

0
Glass Railing Design for Balcony

A little space that adds value to the house is balconies. People like to spend some time in these small open places having their favourite drink or coffee while enjoying the scenic view of the surroundings either in the morning or in the evening. Balconies are quiet places that are free from any disturbances. In this hurry phase of life, you can use your balconies to just calm your body and mind.

Balconies can be decorated by using different glass railing designs. Glass railing designs give value, aesthetic beauty, and luxury to your balconies. If you want colourful balcony ideas, you can opt for the best glass railing designs as discussed in this article.

10 Glass Railing Design for Balcony

Glass railings are a modern choice, featuring glass panels supported by framing components. They are meant to offer safe access to the open sides of platforms such as balconies, terraces, stairways, ramps, patios, and other high surfaces. Glass railings are available in different sizes, shapes, and styles, particularly if you are looking to decorate your balconies. Let us see the 10 different designs of glass railing that you can choose from.

1. Frameless Glass Balcony Railing

Fully frameless base shoe railings enhance a space’s light and open aesthetic. This durable system can be installed on various surfaces and is available in a range of finishes, including brushed stainless steel and black bronze, to suit different design styles.

2. Deck Glass Railing

Deck Glass Railing

A glass railing with aluminium posts offers a cost-effective and safe outdoor design solution. The aluminium posts are available in various powder-coated finishes to complement any décor and can be easily installed on wood or concrete decks.

3. Modern Glass Balcony Design

Modern Glass Balcony Design

A large balcony with a glass railing offers a sleek, modern look. Add chairs, a table, or decorations like wind chimes to create a relaxing space. For windy areas, choose durable glass railings designed to withstand the elements while maintaining style and comfort.

4. Large Glass Balcony Design

Large Glass Balcony Design

The large glass balcony design creates a bright, open space with huge glass walls that let you enjoy the view. A smooth flow can be experienced by employing large glass balcony designs between your indoors and outdoors, which adds a modern and cosy look.

5. Wrought Iron Railing with Stained Glass

Wrought Iron Railing with Stained Glass

Personalised designs enable homeowners to add a personal touch and a distinct style to their balconies. This can be achieved by using personalised stained glass panels with a combination of wrought iron railing. 

6. Wooden Railing with Woven Panels

Wooden Railing with Woven Panels

Wooden railings usually provide a welcoming ambiance. The mix of woven panels, wooden posts, and handrails gives your home a unique aspect and enriches its elegance.

7. Laminated Glass Balcony Railing

 Laminated Glass Balcony Railing

Many people choose modern design aspects that enhance the aesthetics of their homes. In modern construction design, laminated glass railings are popularly used in designing balconies for their chic and majestic look. Two or more layers of glass are joined together with a unique glue to create this kind of railing. Finally, you can add an elegant finishing touch to your home.

8. Tinted Glass with Stainless Steel Railing

Tinted glass panels and thin stainless steel posts provide a modern, stylish look that is both elegant and classy. This combination is ideal for giving any modern house or place of business.

9. Frosted Glass

 Frosted Glass

Frosted glass is a fantastic choice for a more stylish appearance. It lets natural light in while somewhat obstructing the view. If you want more privacy, frosted glass is also an excellent option.

10. Tempered Glass Design For Balcony Railing

Tempered glass is known for its strength and durability, which adds a unique look to your balcony. You will save time on maintenance because it is simple to clean and maintain.

Types of Glass Railings for Balcony

The current marketplace offers a variety of glass railing options. Framed, semi-frameless, and frameless glass railings are the most popular choices for balcony designs. You can understand their purpose as discussed below:

Frameless Glass Railings

Frameless glass guardrails have an elegant and simple appearance and require the least amount of support to hold glass panels securely. Key characteristics include:

  • Made of durable tempered or laminated glass panels.
  • Needs shoes, standoff pins, and channel systems for correct installation.
  • Can be used in various settings depending on finishing, thickness, and height requirements.
  • Patios, balconies, and pool enclosures can use this kind of railing.

Semi-Frameless Glass Railings

Combining the stability of framed designs and the refined elegance of frameless styles, semi-frameless glass railings are an excellent choice. Here are their features:

  • Compared to framed railings, semi-frameless glass railings offer greater transparency.
  • Vertical clamps stabilise the mechanism.
  • Patios, balconies, and other outdoor platforms can all employ this kind of railing.

Framed Glass Railings

Framed railings use PVC, wood, metal, or composite materials for support. Take a look at these features.

  • Framed glass rails provide support for users to access both indoor and outdoor spaces.
  • They can be used in both traditional and industrial settings and provides a safe walking surface.
  • They work best in places with lots of traffic and open surfaces, such as stairways and ramps. 

Advantages of Glass Railings for Balcony

Here are some basic explanations of the advantages of glass railings for balconies:

Increases Natural Light: Glass lets in a lot of natural light, which brightens and expands the feeling of space in your room.

Clear Views: You may enjoy the outdoors with a broad, unobstructed view through the glass railings.

Wind Protection: Glass railings serve as a windbreak, keeping the wind out while preserving the balcony’s airy atmosphere.

Strong and Safe: Even if they break, glass railings are safe because they are composed of durable, treated materials.

Makes Places Feel Bigger: Glass railings, particularly in small or dark places, provide the impression that a space is larger and more open to the outdoors.

Modern and Elegant: Glass railings go well with modern houses and give an appearance of being smart and sophisticated for your house.

Cleaning Method: Cleaning glass railings is easy—it’s just wiping them clean with a towel and some mild soap.

Safety for Children: Children are also kept safe because of the smooth glass rails that would make it difficult for them to climb up.

Fast Installation: It is faster compared to building a brick or metal railing. It will take less time and cause less disturbance when installed.

Customisable: Create a balcony that reflects your taste by choosing from a wide selection of designs, forms, and finishes.

Conclusion

In conclusion, a glass balcony railing system is a versatile and affordable option that adds stylish appeal to any property. It’s simple to maintain and suitable for a variety of applications. If you are considering putting glass railings in your home, you should choose the best designs as described above to add potential value for your money.

Glass Railing – Types, Advantages, Design, and Applications

0
glass railing

A new trend in the construction industry that elevates the outlook of the structure is the application of glass railing systems in modern projects. They are commonly used in public, commercial, and residential structures for improving the building’s safety features, style, and utility. Designers or architects utilise glass railings to elevate the appearance and purpose of patios, balconies, stairways, and other indoor and outdoor areas.

Glass railings come in a variety of styles. With comprehensive guidance, numerous setups, features, and optimal use cases are highlighted in this article to help you make informed design decisions. 

What is a Glass Railing?

Glass railings are a modern design choice that has been constructed of glass panels and frame components that are intended to provide safe access to the open sides of platforms such as balconies, terraces, stairways, ramps, patios, and other raised surfaces. Depending on how they are arranged, glass guardrails provide a clear and simple design that greatly improves the visual appeal of both indoor and outdoor areas.

Unlike traditional guardrails, glass railings provide an unhindered view and an air of openness. These railings typically have tempered or laminated glazing, which ensures transparency while preserving strength and longevity.

Types of Glass Railings

There are various glass railings, and they differ in their design. However, the most widely utilised kinds are framed, semi-frameless, and frameless glass railings.

Frameless Glass Railings

Frameless Glass Railings

With their elegant and simple appearance, frameless glass guardrails require the least amount of support to securely hold glass panels. The following are some of this railing type’s salient characteristics.

  • It is composed of durable tempered or laminated glass panels.
  • It needs shoes, standoff pins, and channel systems to be installed correctly.
  • Depending on the different finishing, thickness, and height requirements, it can be utilised in a variety of settings.
  • Luxury exteriors and interiors, such as patios, balconies, and pool enclosures, are the ideal settings for frameless glass railings.

Semi-Frameless Glass Railings

Semi-Frameless Glass Railings

Semi-frameless glass railings combine the elegant style of framed and frameless glass railings with structural support, as the name suggests. Consider the following characteristics of this sort of railing:

  • In comparison to frame type railings, semi-frameless glass railings provide greater transparency.
  • It features vertical clamps that give the system stability.
  • Patios, balconies, and other outdoor platforms can make use of it.

Framed Glass Railings

Framed Glass Railings

Framed railings utilise frames made of materials such as PVC, wood, metal, or composite materials to hold the glass panels in place. Consider the following features:

  • Users may access both interior and outdoor areas with support from framed glass railings.
  • It offers a secure surface for walking and can be utilised in both conventional and industrial environments.
  • High-traffic areas with open surfaces like ramps and stairways are perfect for it.

Advantages of Glass Railings

There are several advantages to glass guardrails. You may fully utilise these guardrails in your property to improve its beauty.

  • Glass railings resist rot, rust, and decay.
  • They eliminate the need for painting or staining, making them a cost-effective and hassle-free option.
  • The transparent panels offer clear, unobstructed views.
  • These railings are easy to install and provide reliable security, standing strong against high winds, accidental impacts, and harsh weather conditions.
  • Their translucent design creates an illusion of larger spaces, enhancing the property’s appeal and value.
  • The popularity of glass railings comes from their adaptability, variety, and ease installation process.
  • They are suitable for a wide range of applications, including homes, offices, hotels, and multi-family residences.

Design Considerations for Glass Railings

The designer/architect must evaluate the need for a glass railing and determine the appropriate type based on potential hazards, building use, and user safety. Key design specifications include:

  • For multi-purpose buildings, railings should either handle extreme conditions or include multiple types based on location.
  • Railings are required where level changes exceed 600 mm in homes or 380 mm in other buildings to restrict movement.
  • Designs must prevent falls or slipping through gaps within the railing.
  • Gaps in railings or infill should not exceed 100 mm to ensure child safety.
  • All railing components must comply with applicable regional safety standards.
  • Finished barriers should avoid sharp edges or projections to prevent injuries.
  • Infill panels and balusters should provide support and protection without additional risk of injury.
  • The design should account for a horizontal load applied at a height of 1.1 m above the finished floor.

Materials Used in Glass Railings

The materials used in glass railings are essential for their look and functionality. Choosing the right materials ensures strength and durability. The materials that can be used in glass railing systems are as follows:

Tempered Glass

Tempered glass is a safety glass that has been treated to enhance its strength and durability, making it suitable for glass railing systems. The heat resistance property of this material makes it suitable for outdoor applications due to its great strength and durability. In the worst circumstances, this material breaks into blunt pieces instead of sharp ones to prevent serious damage. 

Laminated Glass

Laminated glass is created by bonding multiple glass layers using a durable interlayer like EVA or PVB. Due to its composition, it is incredibly strong and a secure choice for glass railing systems. The interlayer keeps the bits of broken glass together and stops them from falling apart. Laminated glass is a useful and adaptable option for both indoor and outdoor use since, in addition to being safe, it also lowers noise and blocks damaging UV rays.

Applications of Glass Railings

Glass railings are suitable materials that are well suited for both indoor and outdoor applications, as mentioned below:

Indoor Applications

Indoor Stairs: Glass handrails enhance indoor staircases, adding a modern and bright touch. They can be paired with materials like steel or wood for varied design effects.

Corridors and Hallways: Glass handrails brighten corridors and hallways, making narrow spaces feel more open and spacious while improving comfort and visual appeal.

Outdoor Applications

Outdoor Balconies: Glass handrails provide a stylish and contemporary look for outdoor balconies, offering safety and clear visibility to enjoy the surroundings.

Outdoor Staircases: Glass handrails on outdoor stairs create a modern and fashionable exterior, ensuring safety while maintaining unobstructed views.

Maintenance of Glass Railings

Dust or Dirt

To remove dust or debris, gently wipe the glass with a soft cloth. For minor dust, a crumpled newspaper can also be used. If extra dirt is present, wipe it off with a damp cloth within a minute.

Grime

Use a damp cloth or a glass-safe cleaner for liquid or grimy spots. Grease can be effectively removed with ammonia-based cleansers or a diluted solution of apple cider vinegar and water (1:2).

Water Spots

After cleaning or in wet weather, use a squeegee to remove excess water to prevent water stains or streaks. The stains should disappear once the glass dries.

Animal Debris

Use disposable gloves and a towel moistened with apple cider vinegar to remove any animal droppings—such as bird droppings—that may have gotten on the glass.

General Maintenance

Glass railings need very little upkeep. Spots can be avoided, and the need for frequent washing can be decreased with a fast squeegee after cleaning or in wet weather. Unlike railings made of wood or iron, glass railings require very little upkeep.

Conclusion

Glass railings are a modern construction material that has become increasingly popular due to their adaptability to public, commercial, and residential settings. Their design and functionality have evolved, offering aesthetic appeal, safety, and versatility. Budget, location, purpose, maintenance requirements, and building code compliance are all important considerations when selecting the best system. By following the maintenance procedures discussed in this article, your glass railing system will remain strong, durable, and aesthetically pleasing for many years to come.

Field Measure – Importance & Tools in Construction

0
Field Measure

Field measurement is crucial in planning and executing any construction or renovation project. It involves measuring and documenting data to create accurate design plans and proper alignments. Field measurement involves distances, angles, heights, elevations, areas, and volumes using various tools and instruments.

Importance of Accurate Field Measurements

  • Accurate field measurements are essential to ensure the alignment of the structure with the actual plans. This can help avoid even small deviations in the structure, thereby reducing the chances of costly corrections.
  • It helps with clear communication with the construction team to plan and execute the design and construction process with a unified plan.
  • By reducing or avoiding the measurement corrections, the scheduled tasks can be executed without any delay and help in timely completion.
  • It helps to position components in place, preventing structural failures and any kind of instability.

Types of Field Measurements

Linear Measurement

Linear Measurement

Linear measuring is the process of determining the length, width, and distance between two points in a straight line, such as the walls, beams, columns, roads, and other structural elements. It is one of the basic measurement types and is used to measure small distances. 

Angular Measurement

Angular Measurement

It is the process of measuring angles between two lines or planes, typically used to determine the orientation of lines, walls, and other structural elements. They are measured in degrees or radians and help correct angles to improve functionality and structural integrity. 

Levelling

Levelling

It is the process of determining the elevation of a point relative to a reference point, to ensure the surface is vertically level throughout the construction site. This is crucial for buildings, roads, utilities, and other structures. It helps to create accurate designs and layouts, ensuring the safety, functionality, and stability of the project.

Geodetic Measurements

Geodetic Measurements

It is the precise measurement and observation of the Earth’s shape, orientation in space and gravitational field. It helps in determining the positions on the Earth’s surface, land movements, navigation, construction, and mapping. Such measurements play a crucial role in surveying, astronomy, civil engineering, and global positioning.

Tools and Instruments Used for Field Measurements

  • Measuring Tape and Steel Ruler are used for short linear distances, and are usually used in construction, land surveying and interior measurements.
  • Electronic Distance Meters are used to measure long distances using lasers or infrared beams, providing fast and accurate measurement.
  • Theodolite is used to measure both the horizontal and vertical angles of a distant object.
  • Total Station is a combination of a theodolite, a distance meter, and a data collector, that provides highly accurate measurements.
  • Levels are used to determine the horizontal alignment of the sight.
    • The hand level is used to measure levels over short distances.
    • The auto level is used to measure the horizontal level of the longer horizontal line of sight.
    • A dumpy level is used for accurate levelling.
  • Ranging Poles are used along with theodolite to measure the levels.
  • Tripods are used to position the equipment such as Total Station, Theodolite, and measuring instruments.
  • Plumb Bob is used to measure the transfer of points vertically.
  • Prisms are used along with total stations to determine the accurate measurement of distance.
  • Stakes are used as a tag to mark points on the ground.

Step-by-Step Process of Field Measurements

Site Evaluation

Conduct a preliminary walk-through survey to identify critical areas, such as boundaries, reference points, and existing structures. This will be helpful in planning and determining the benchmarks.

Data Collection

Perform field measurements based on the requirements. For linear measurements, use tools like measuring tapes, chains, or lasers. For angular measurements, use theodolites, total stations, or compasses. The levelling instruments or GPS devices can be used to measure the elevation or altitude.

Record the measurements including the time, date, weather conditions, and any observations which could affect the data. It is necessary to ensure multiple readings to ensure accuracy, especially in critical areas.

Data Verification

After collecting data, cross-check the measurements using different tools to verify the accuracy. If there is any measurement error, corrective actions can be made by performing necessary calculations.

Documentation

Document all the data collected manually or using digital tools, with proper references to the location and measuring instruments. This documentation will help in updating plans, verifying designs, or troubleshooting discrepancies.

Applications of Field Measurements in Construction

  • It is useful in marking and locating positions of buildings, roads, site planning , and preparation proper drainage system.
  • Helpful in locating and levelling the foundation lines, and verifying the dimensions and depths of excavations.
  • Can be used for laying out road alignments, grades, and cross-sections for infrastructure projects such as constructing roads, bridges, sewage systems, and electricity.
  • Ensuring accurate measurements will be helpful for architectural and finishing works, such as installing windows, doors, floors, walls, and ceiling finishes.

Advantages and Disadvantages of Field Measurements

Advantages

  • Measurements are highly accurate and provide precise data, preventing errors.
  • The data collected are real-time and give on-site conditions, enhancing flexibility and responsiveness.
  • Accurate measurements help ensure the project is built according to the approved design and engineering standards.
  • Effective field measurement helps reduce maintenance costs and the amount spent on reworks.
  • It plays a vital role in controlling the quality of the construction, meeting the quality standards, and aligning the design and material specifications.
  • In the case of planning for future alterations or expanding the building, field measurements are crucial.

Disadvantages

  • Conducting field measurements is time-consuming, especially in large or complex areas.
  • As most of the measurements are manually done, there is a chance of human errors; this may require corrections.
  • The cost of measuring equipment and tools such as total stations, laser scanners, or GPS systems can be high.
  • Numerous challenges are involved in conducting field measurements, especially in complex areas.
  • Accurate field measurements require skilled labourers, who are familiar with measuring tools and equipment.
  • Inaccurate measurements could lead to costly errors and may require planning and construction reworks.

Conclusion

Field measurements are crucial for any construction project, providing numerous advantages through accurate measurements. They provide real-time measurements, help in effective planning and construction, and prevent costly reworks. Although they have numerous advantages, they also have some limitations in terms of measuring challenges, time consumption, and environmental constraints.